
Agent Workbench
Quick start: Open the workbench and complete a conversation
Open the Agent Workbench
- Sign in to JoyToken and click Agent Workbench on the home page.
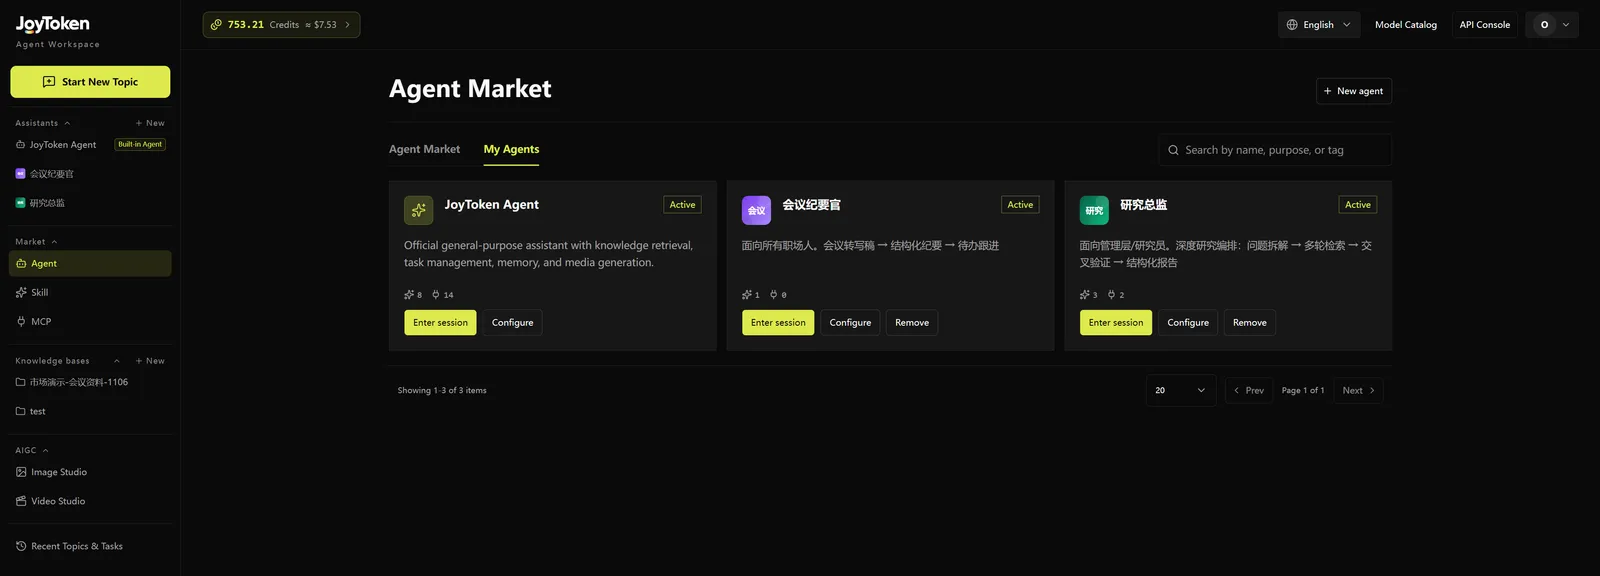
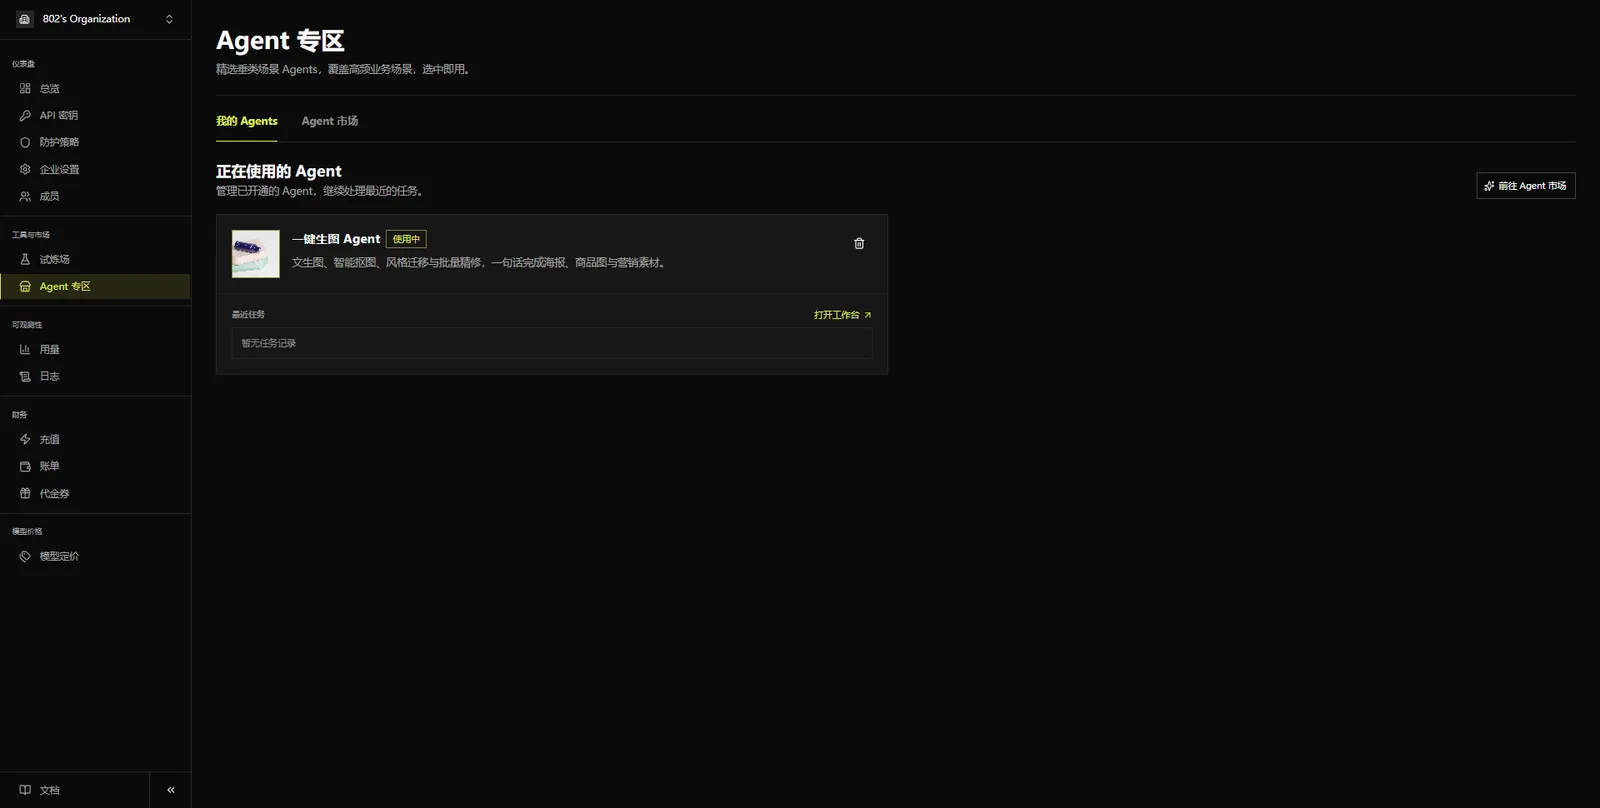
- Open My Agents to see your existing Agents.
- Click Start New Topic on the left to use the built-in JoyToken Agent. Alternatively, select an Agent under My Agents and click Enter Conversation.
- To use another Agent from the Marketplace, add and configure it first, then enter a conversation.
Choose a default model API Key
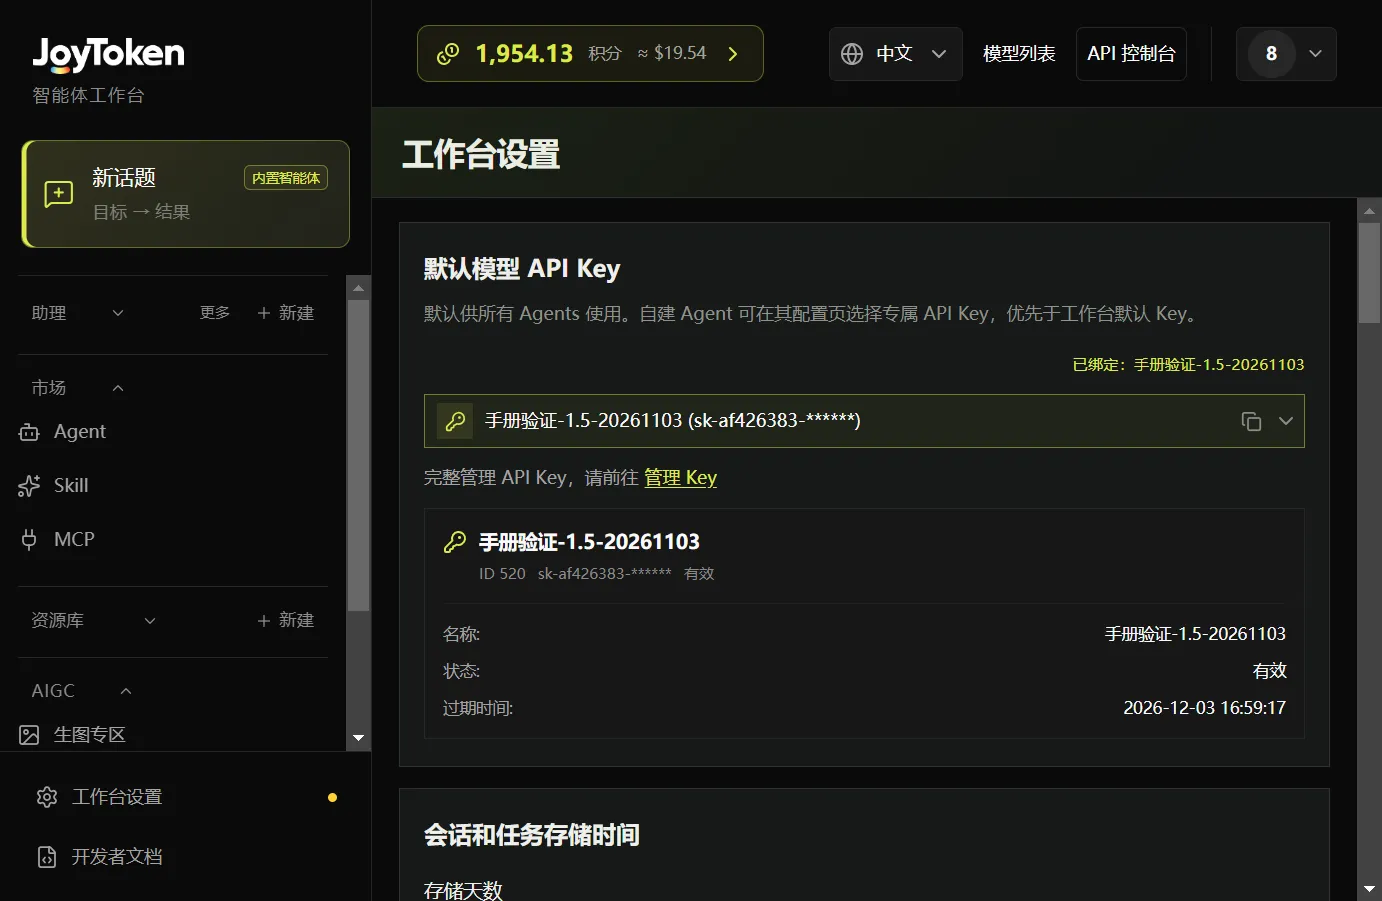
- Open Workbench Settings.
- Select an existing Key under Default Model API Key and check its name, status, and expiration date.
- Scroll to the bottom and click Save Settings.
- Return to the target Agent’s conversation and enter your request.
If no Key is available, click Manage Keys to open Key management in the current environment. After creating a Key, select and save it in the workbench. Also check the Key’s budget, daily quota, model permissions, and account balance.
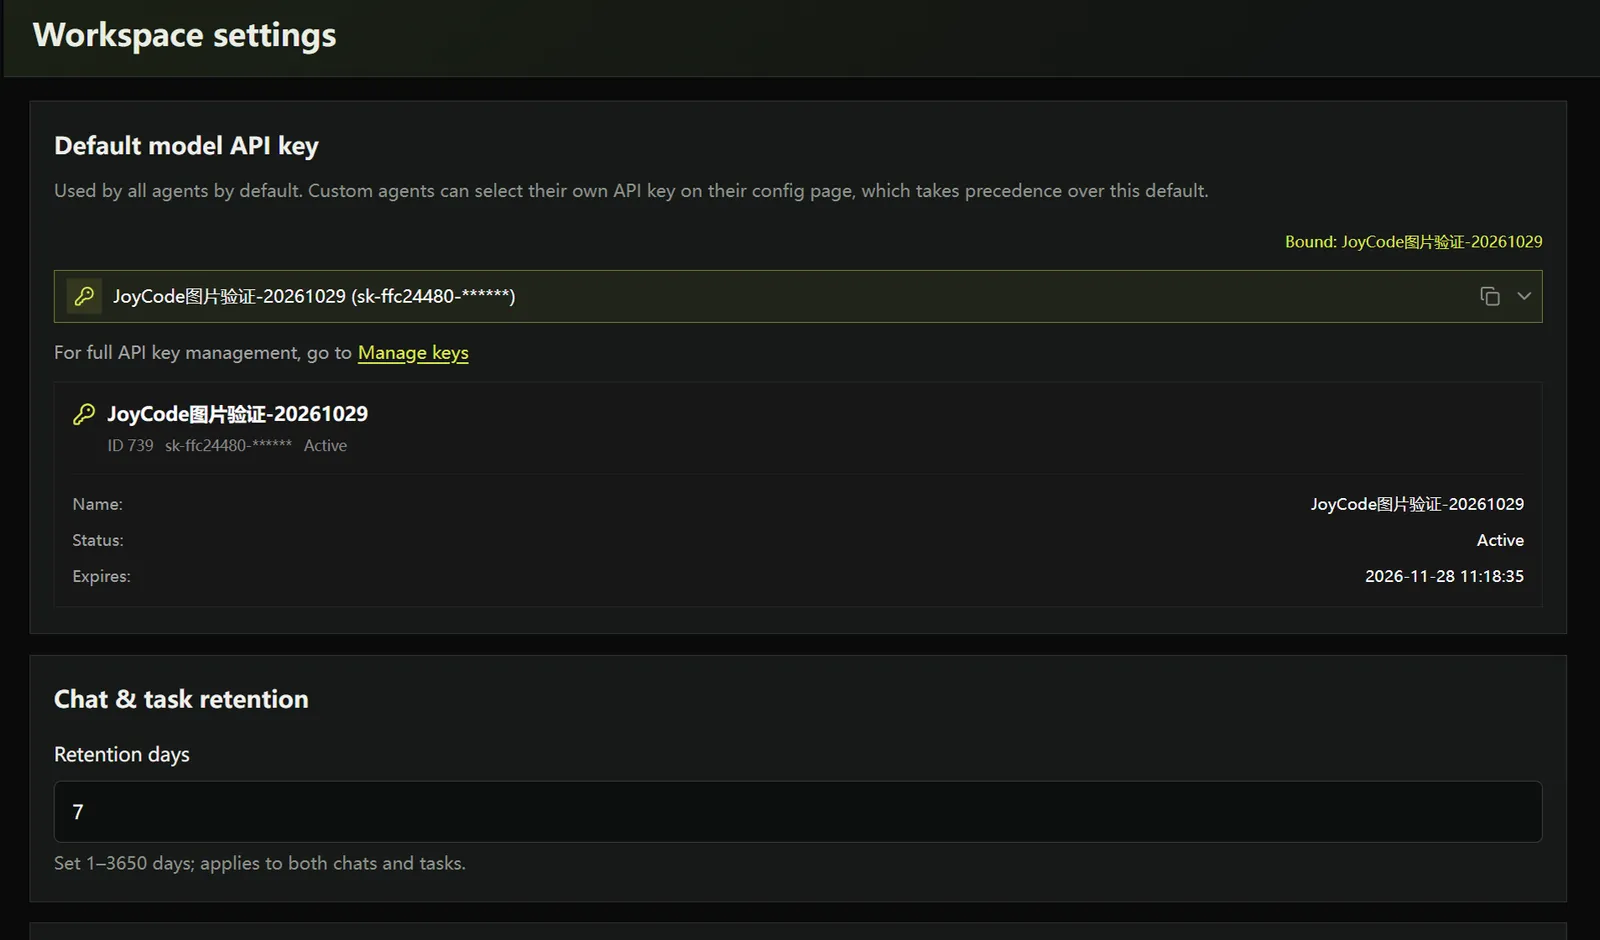
Workbench settings: the default model key and chat/task retention.
Enter your request and check the result
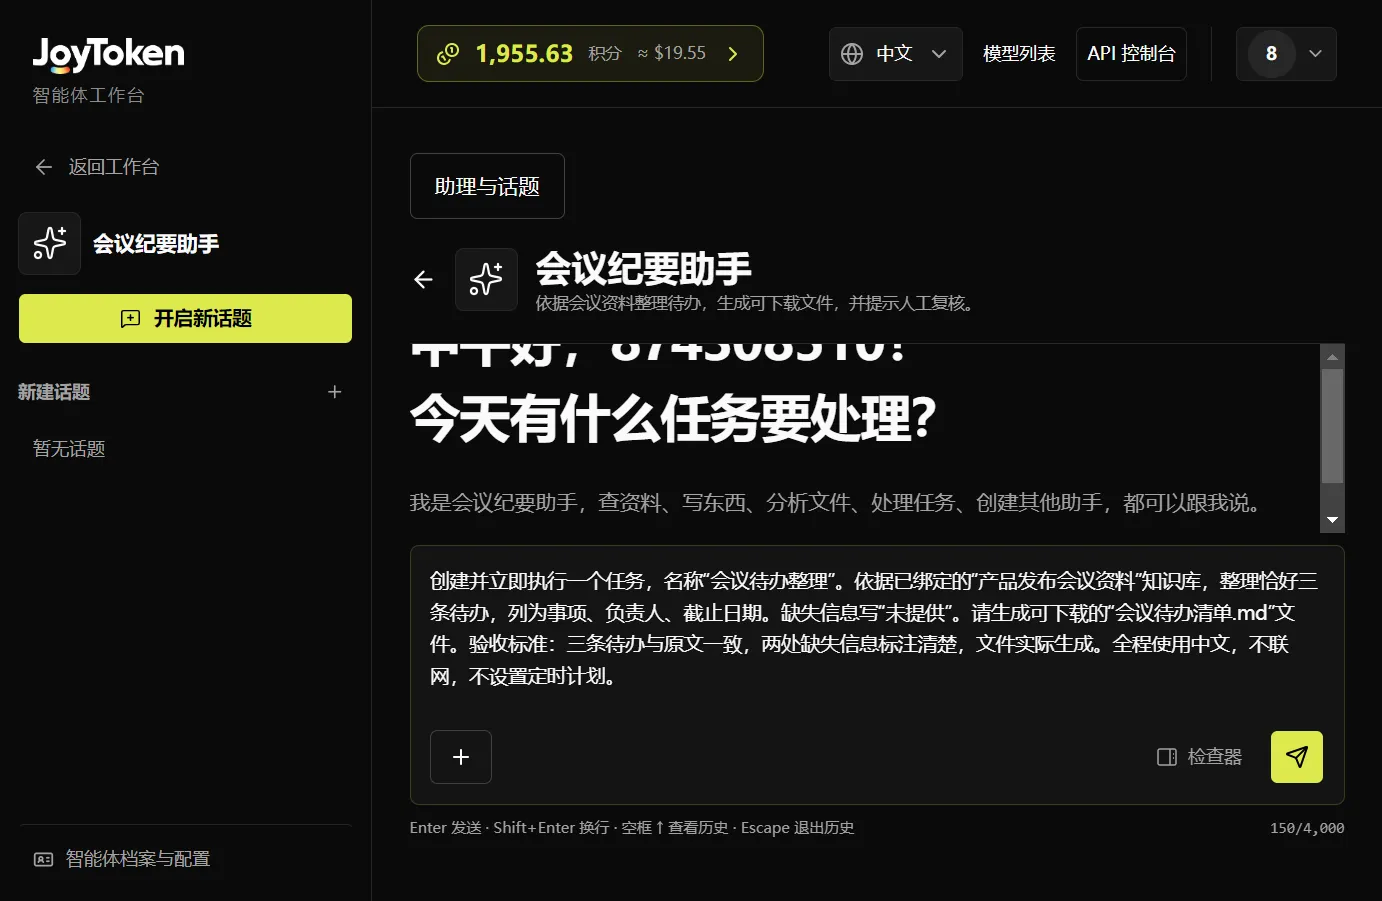
Press Enter to send and Shift+Enter for a line break. The input area has a 4,000-character limit.
For example:
After the response, check the result, approve tool calls when prompted, and download files to inspect them. Continue related work in the same topic; click Start New Topic for a separate task.
Navigation, topics, and tasks
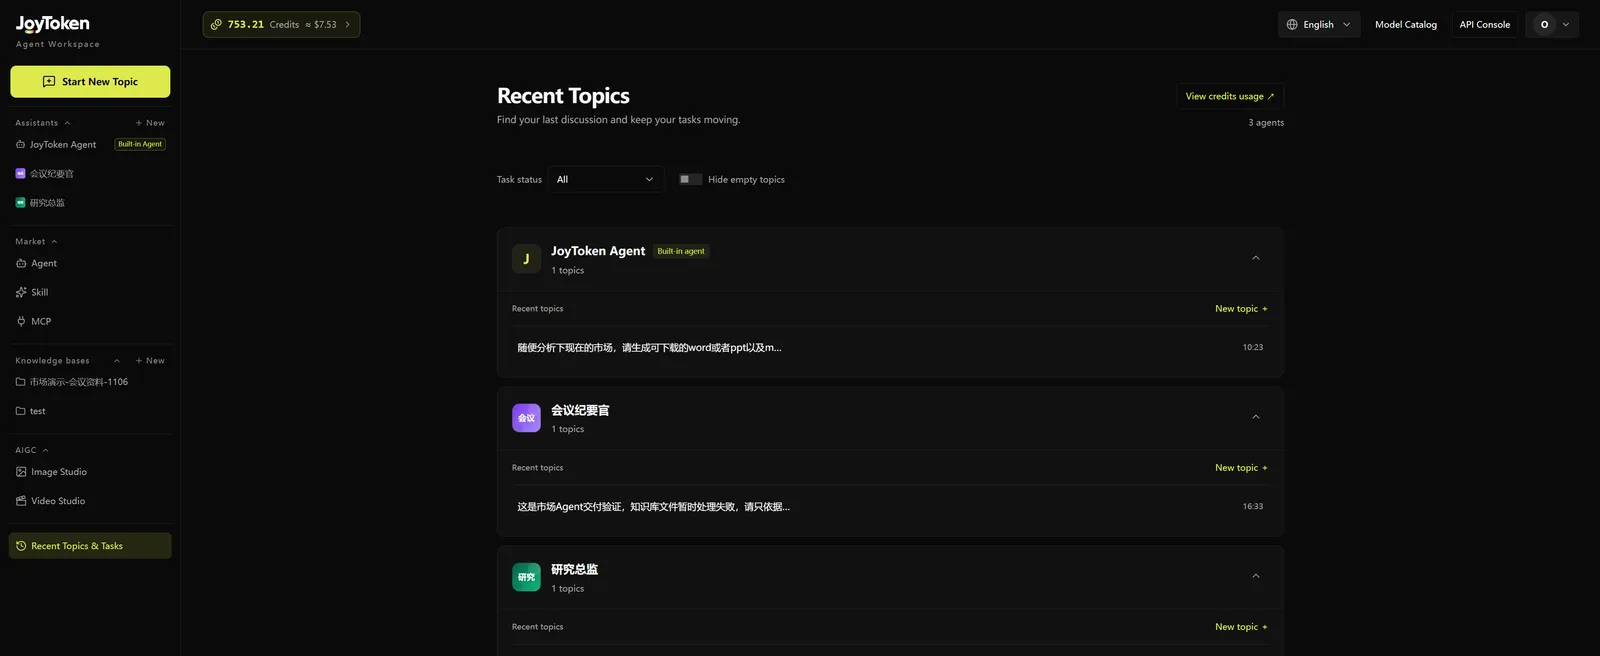
Under Recent Topics and Tasks, expand an Agent to select a topic. Use Task Status filters, Hide Empty Topics, and View Credit Consumption Details as needed. A topic records the conversation; a task has its own goal and status; each task run has a separate execution record.
Use Edit and Resend (Keep History) in a conversation to revise and resend input without changing the earlier message.
Workbench Settings
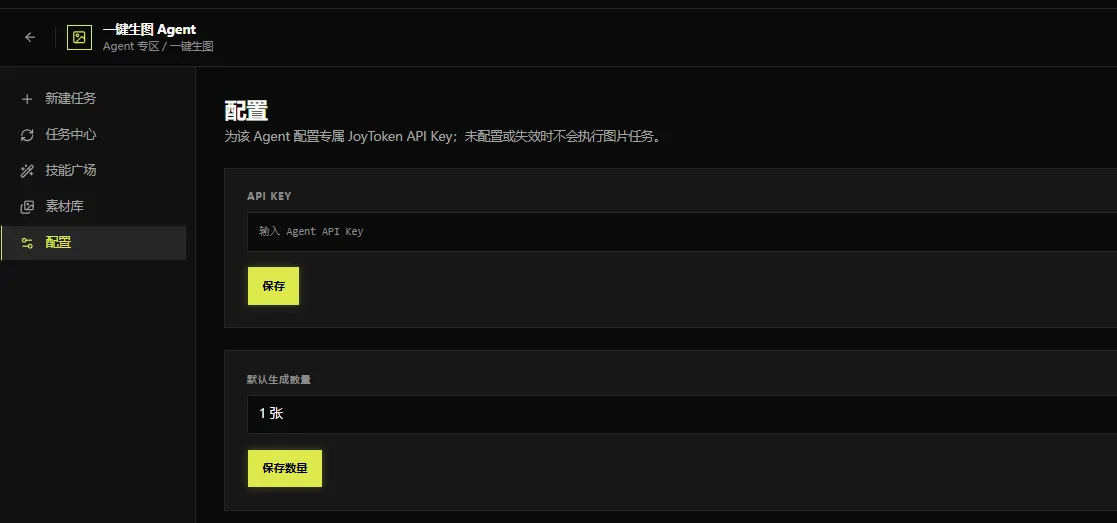
Default and Agent-specific Keys
The workbench default Key is used by Agents without a dedicated Key. Under Bind API KEY in an Agent’s configuration, choose Follow User Default Key or bind a dedicated Key. An Agent-specific binding takes priority; if that Key becomes invalid, check and update the configuration.
Record retention, tools, and memory
Storage Days under Conversation and Task Retention accepts 1–3650 days and applies to both conversation and task records. Click Save Settings at the bottom of the page after making changes.
Built-in Agent Tools include default-enabled Basic Tools and selectable Optional Tools, which set initial capabilities for new Agents.
To change an existing Agent’s tools, open its Assembly Configuration; confirm when a tool call requires authorization.
Enable Memory extracts preferences and information from conversations; Auto-compress Context summarizes history when approaching the context limit.
Download any results you need to keep before changing retention.
Create, add, and configure Agents
Three ways to create an Agent
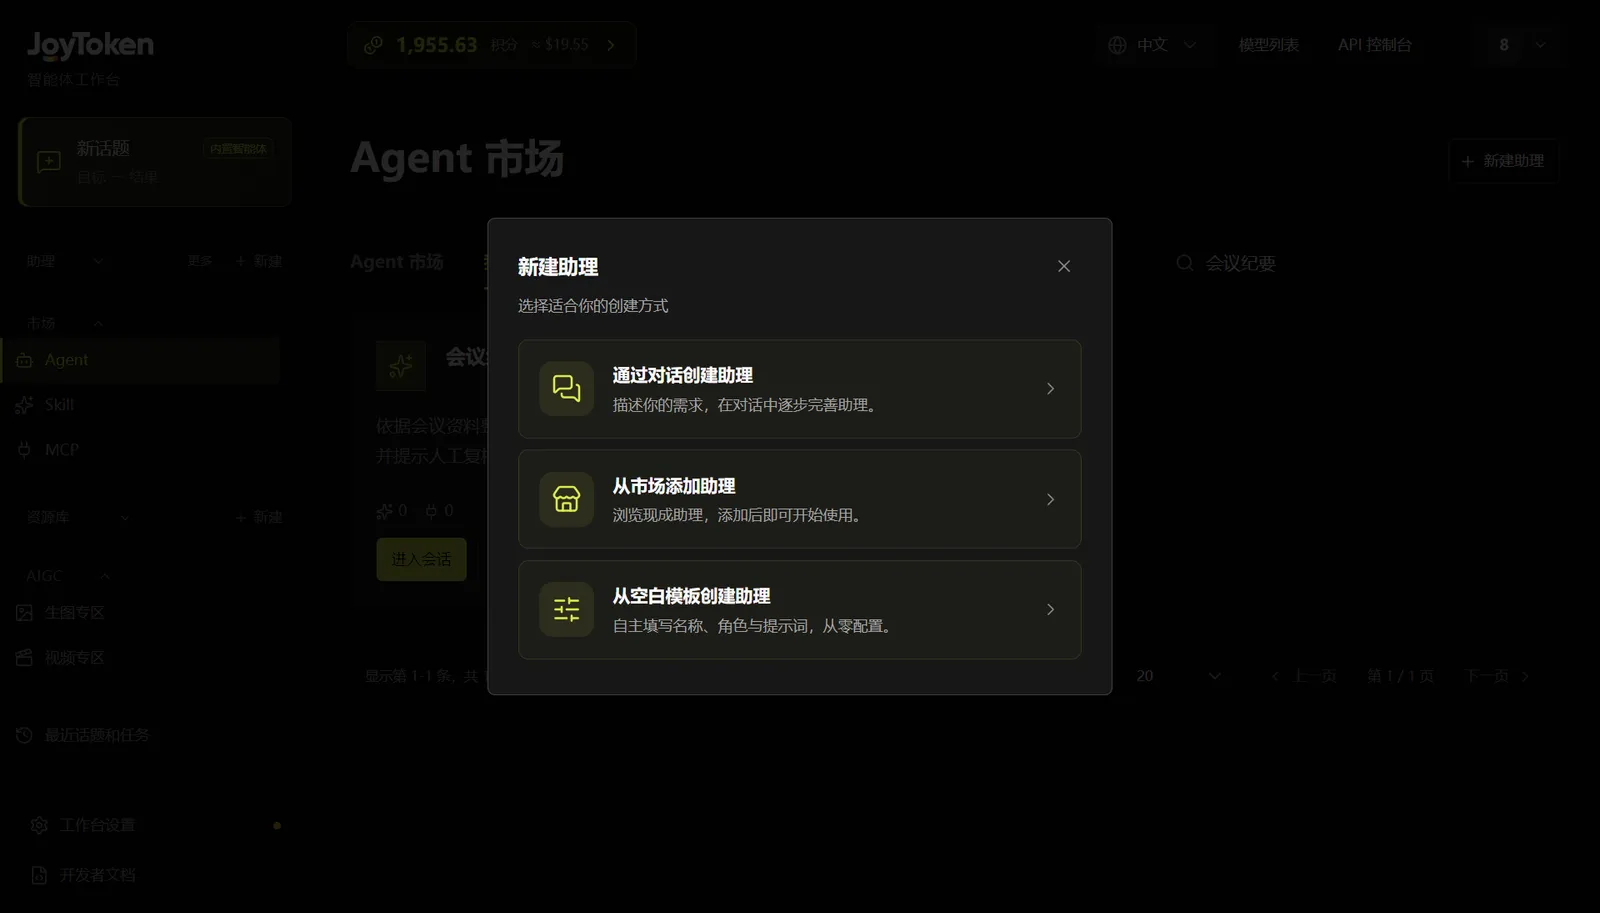
Click New beside Agent in the sidebar, or New Agent in the Marketplace, then choose:
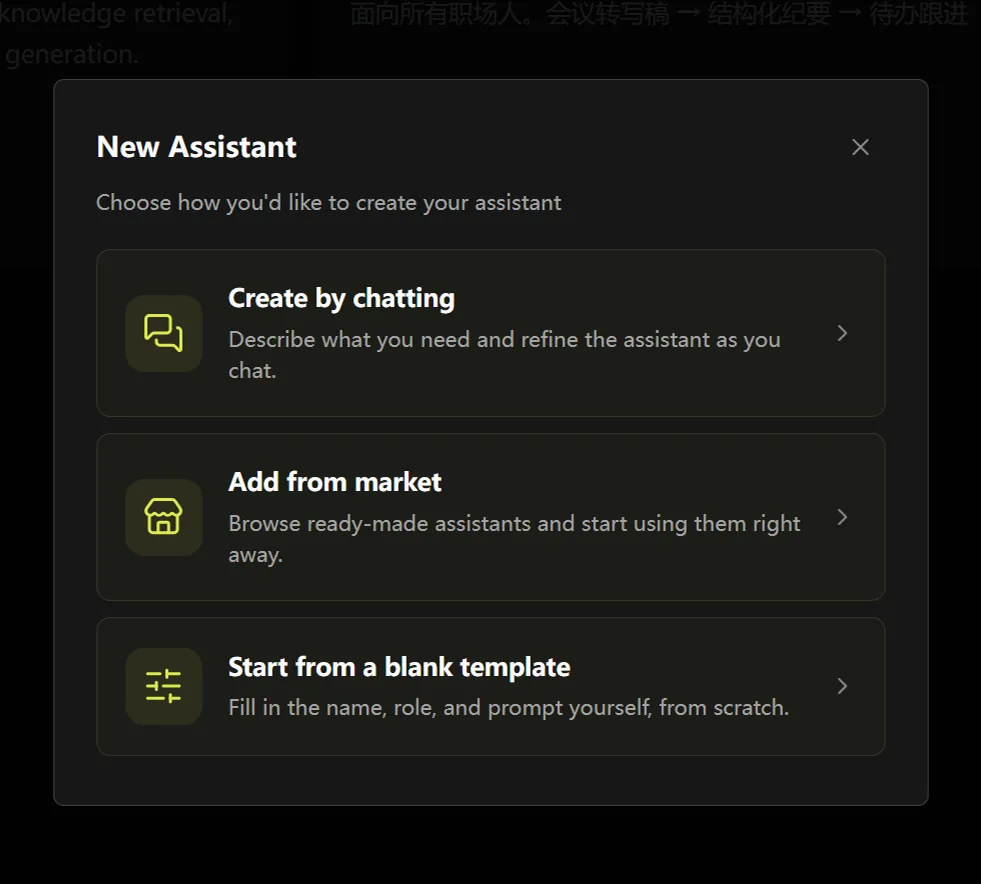
Three ways to create an assistant.
After choosing the blank template, the page is titled Create Agent · Configure Agent Assembly. Under Identity and Prompt, enter a name, description, prompt, and optional welcome message; the name and prompt are required. Expand More Identity Settings to add up to four starter questions. Check Generation Parameters, add Skills, MCP, and knowledge bases as needed, choose a Key, then click Create Agent or Create and Enter Conversation.
Add from the Marketplace
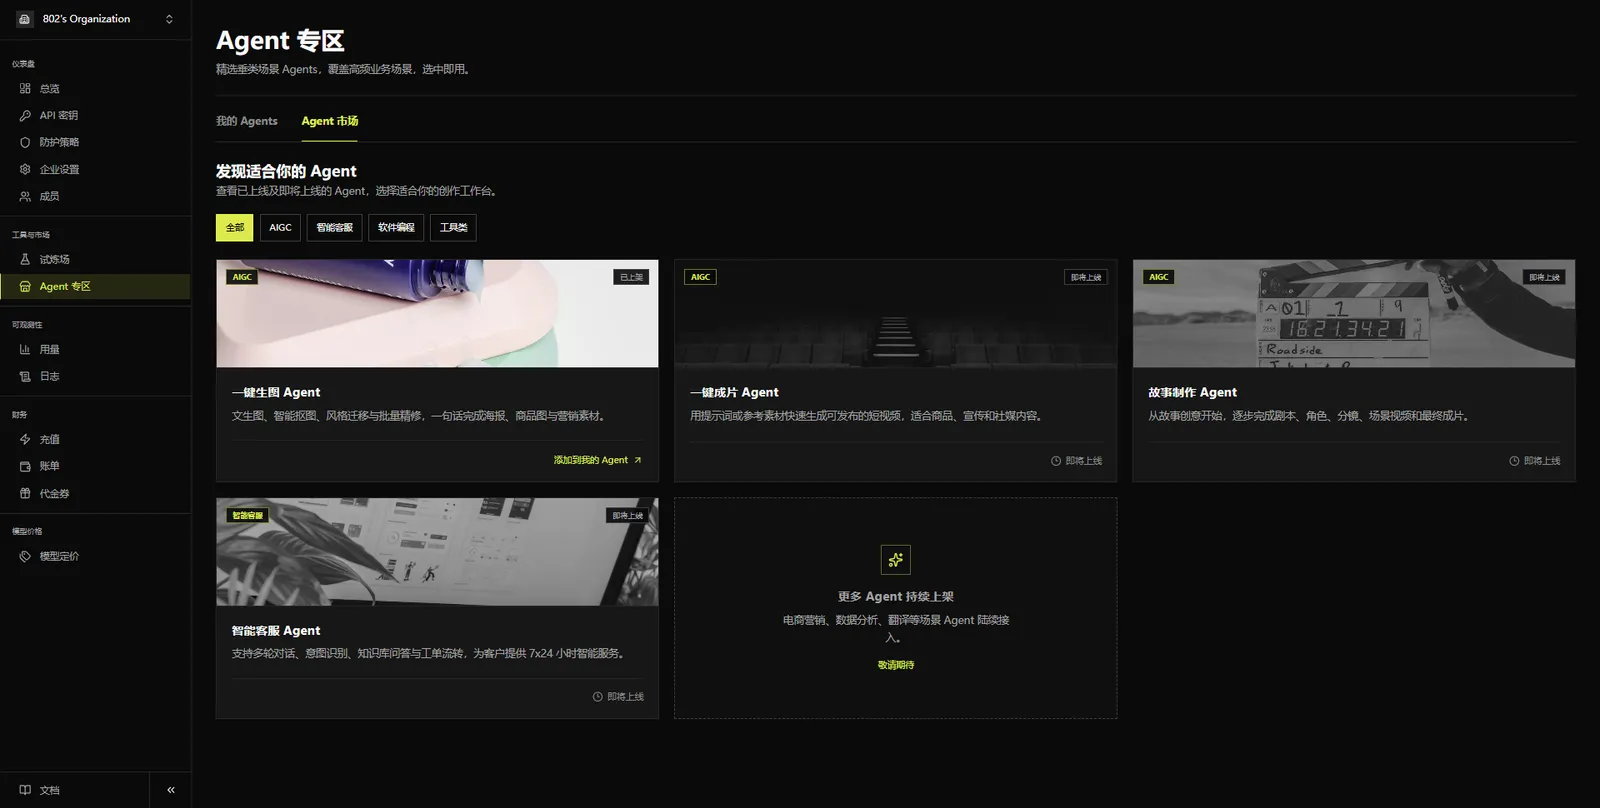
- Under Marketplace, click Agent to open the Agent Marketplace tab and search by name or category.
- Click a card or Go to Add to open its details.
- Review Overview, Setup, Assembly, Related, and Version for its purpose, prompt, capabilities, and version.
- To add it manually, select I am Human under Add Method, then follow the instructions and click Add at the top of the page.
- Check that it shows Added and appears under My Agents.
- Click Configure Assembly to check its capabilities and Key. Save and click Enter Conversation to start.
Alternatively, choose I am Agent, copy the integration prompt to an AI assistant, and follow the instructions to add it. The built-in JoyToken Agent can be used directly.
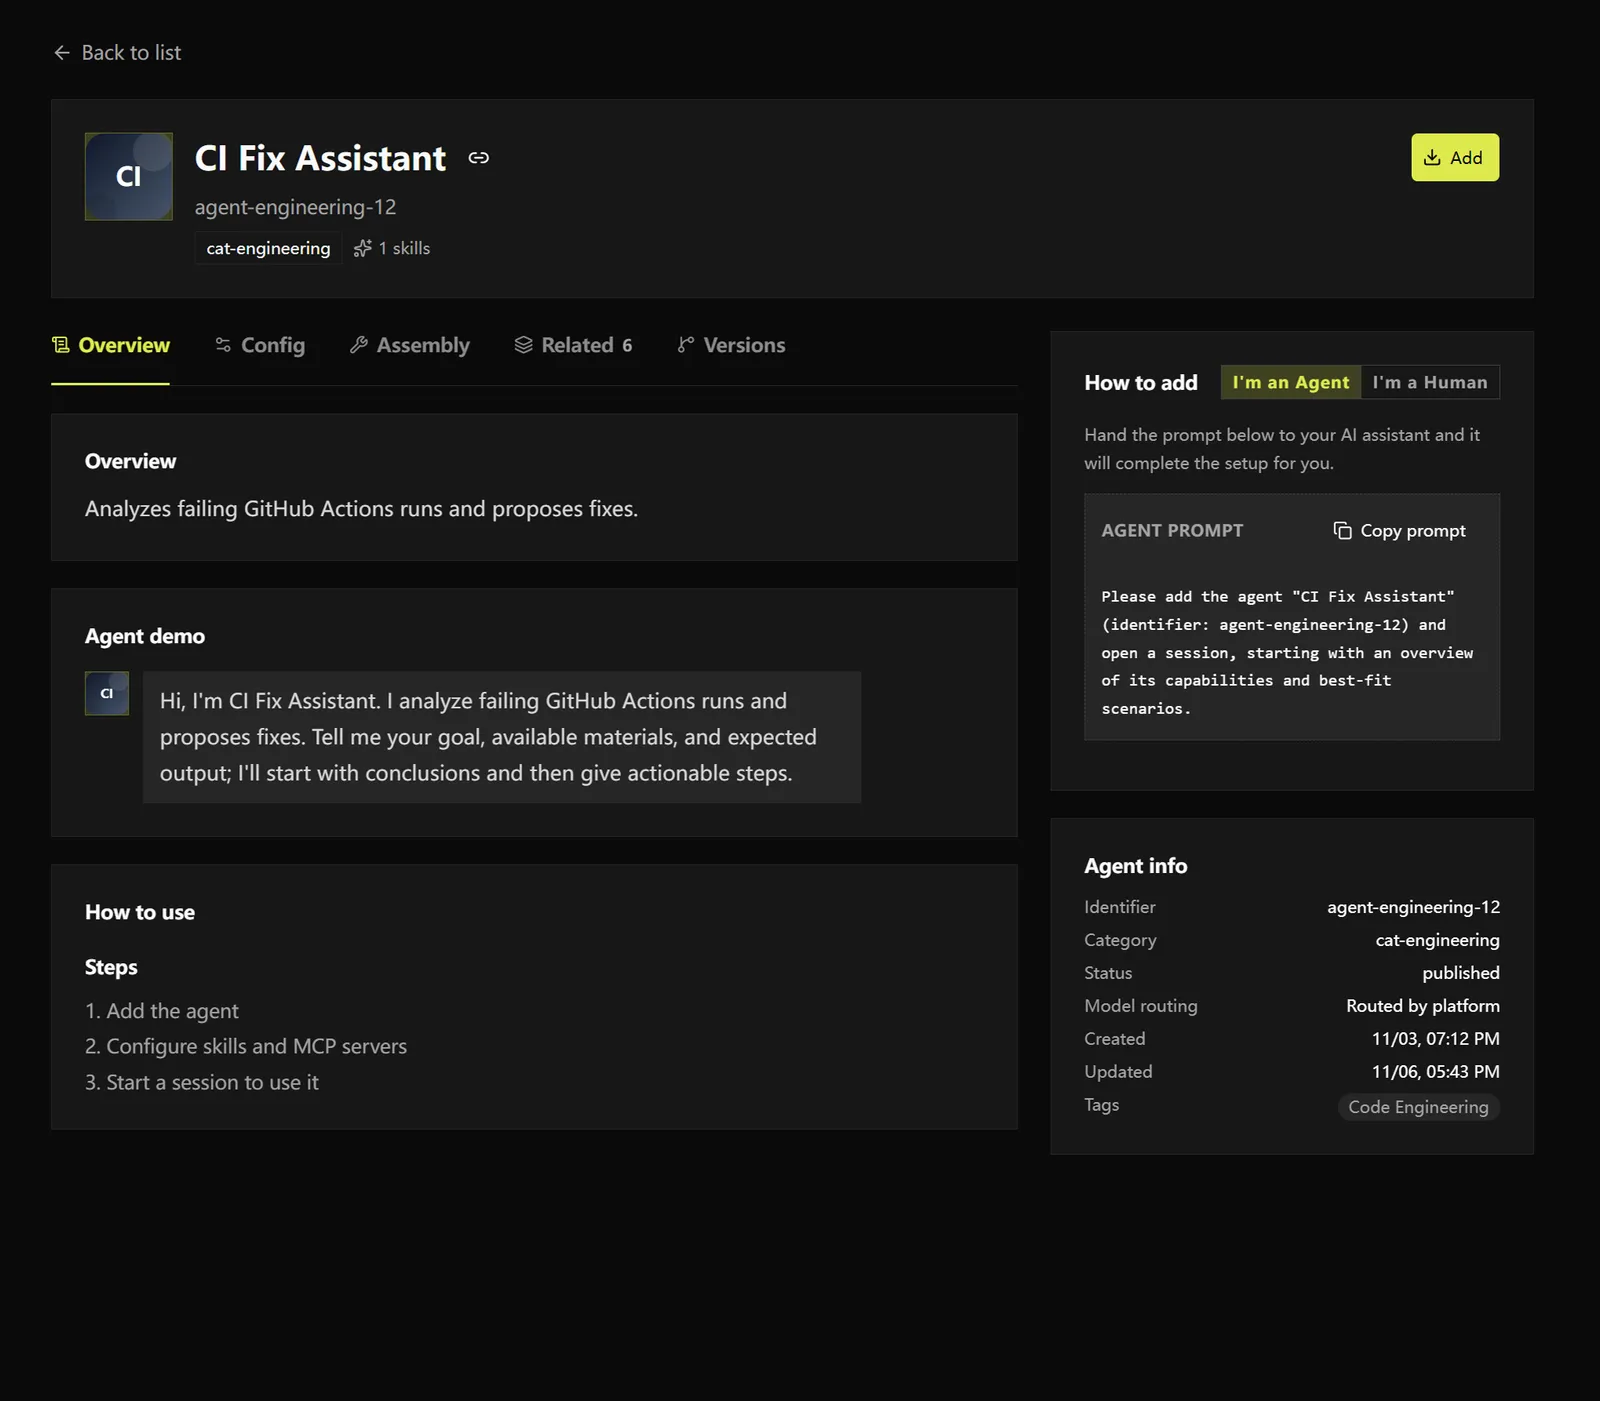
Edit an existing Agent
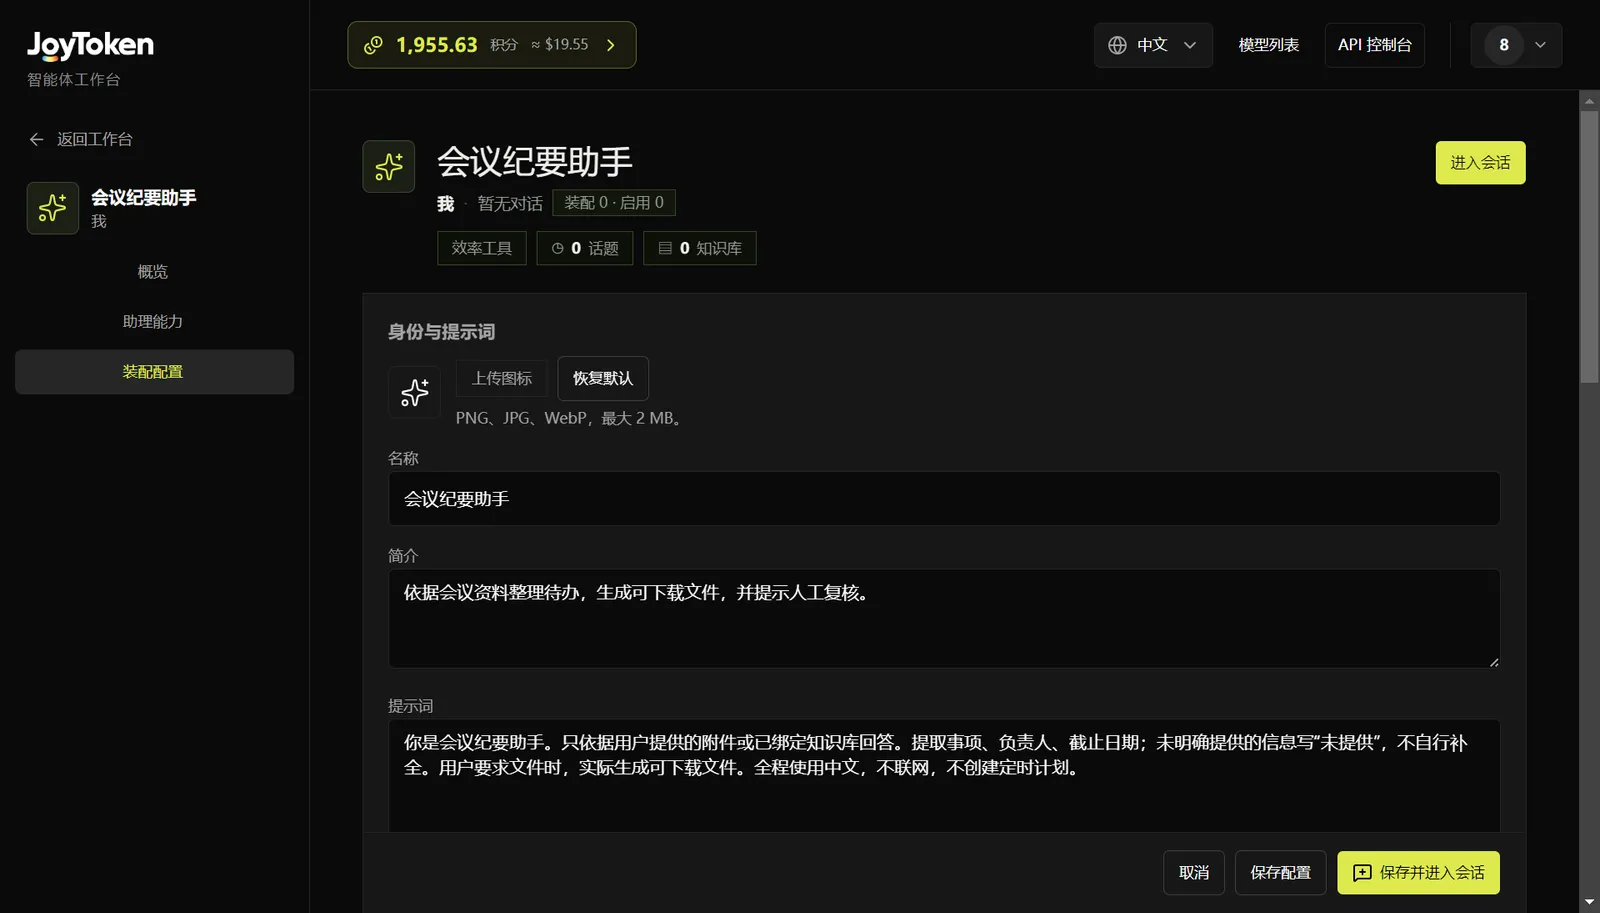
Click Configure Assembly on a My Agents card or its personal details page to edit identity, prompt, Skills, MCP, knowledge bases, and Key. Click Save Configuration or Save and Enter Conversation when done. To review its capabilities, open the Assembly tab on the details page.
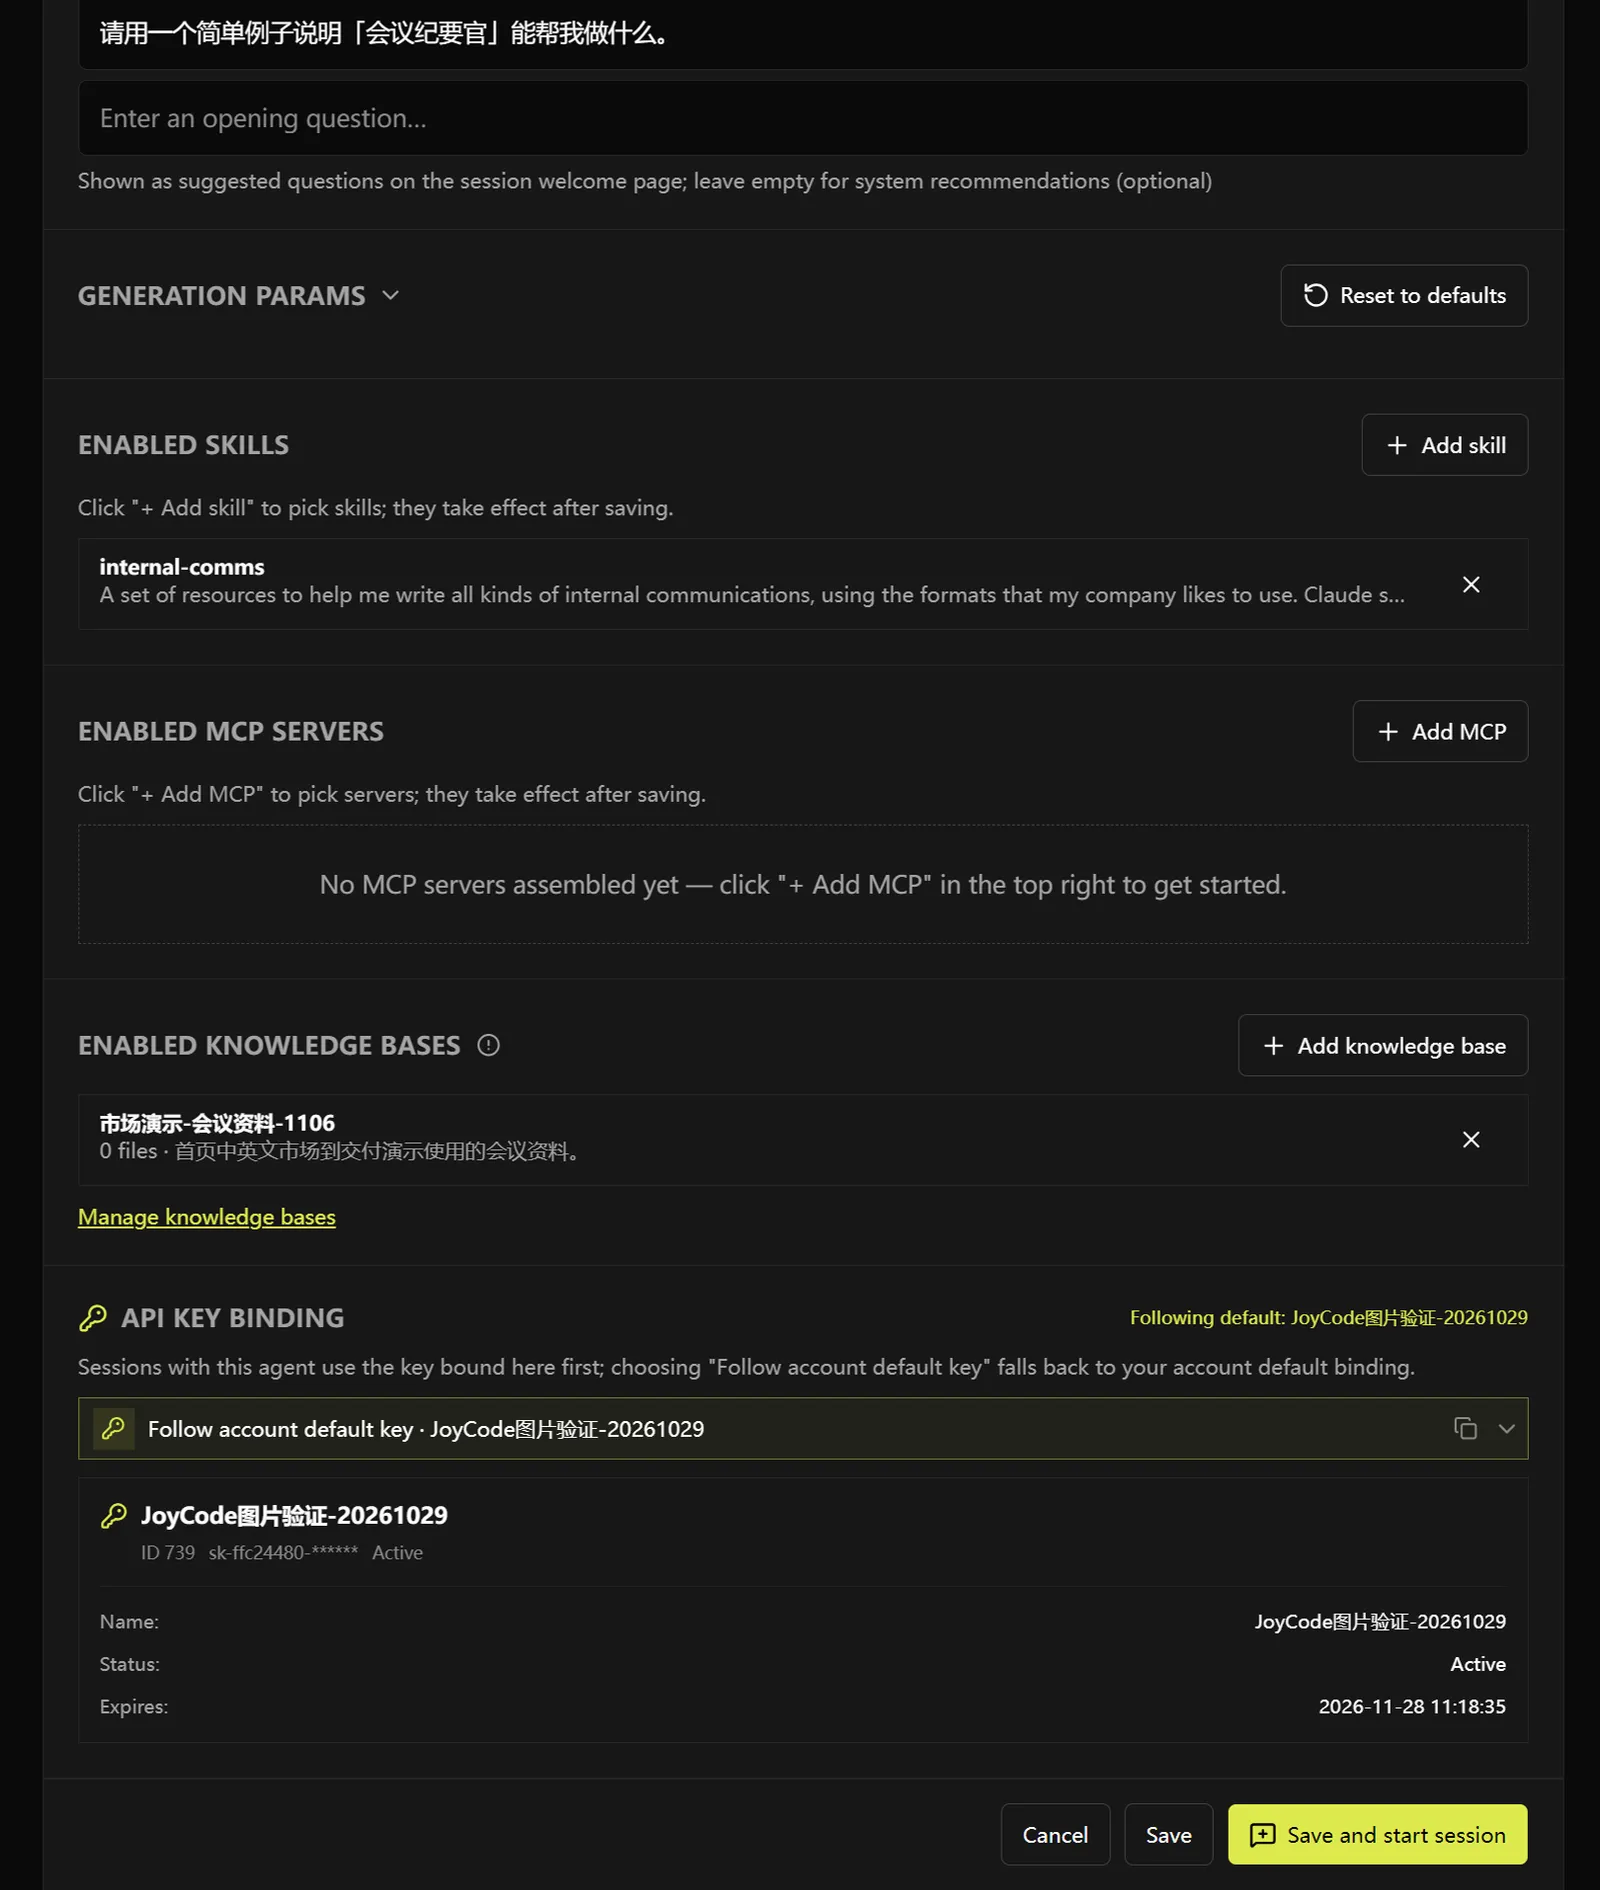
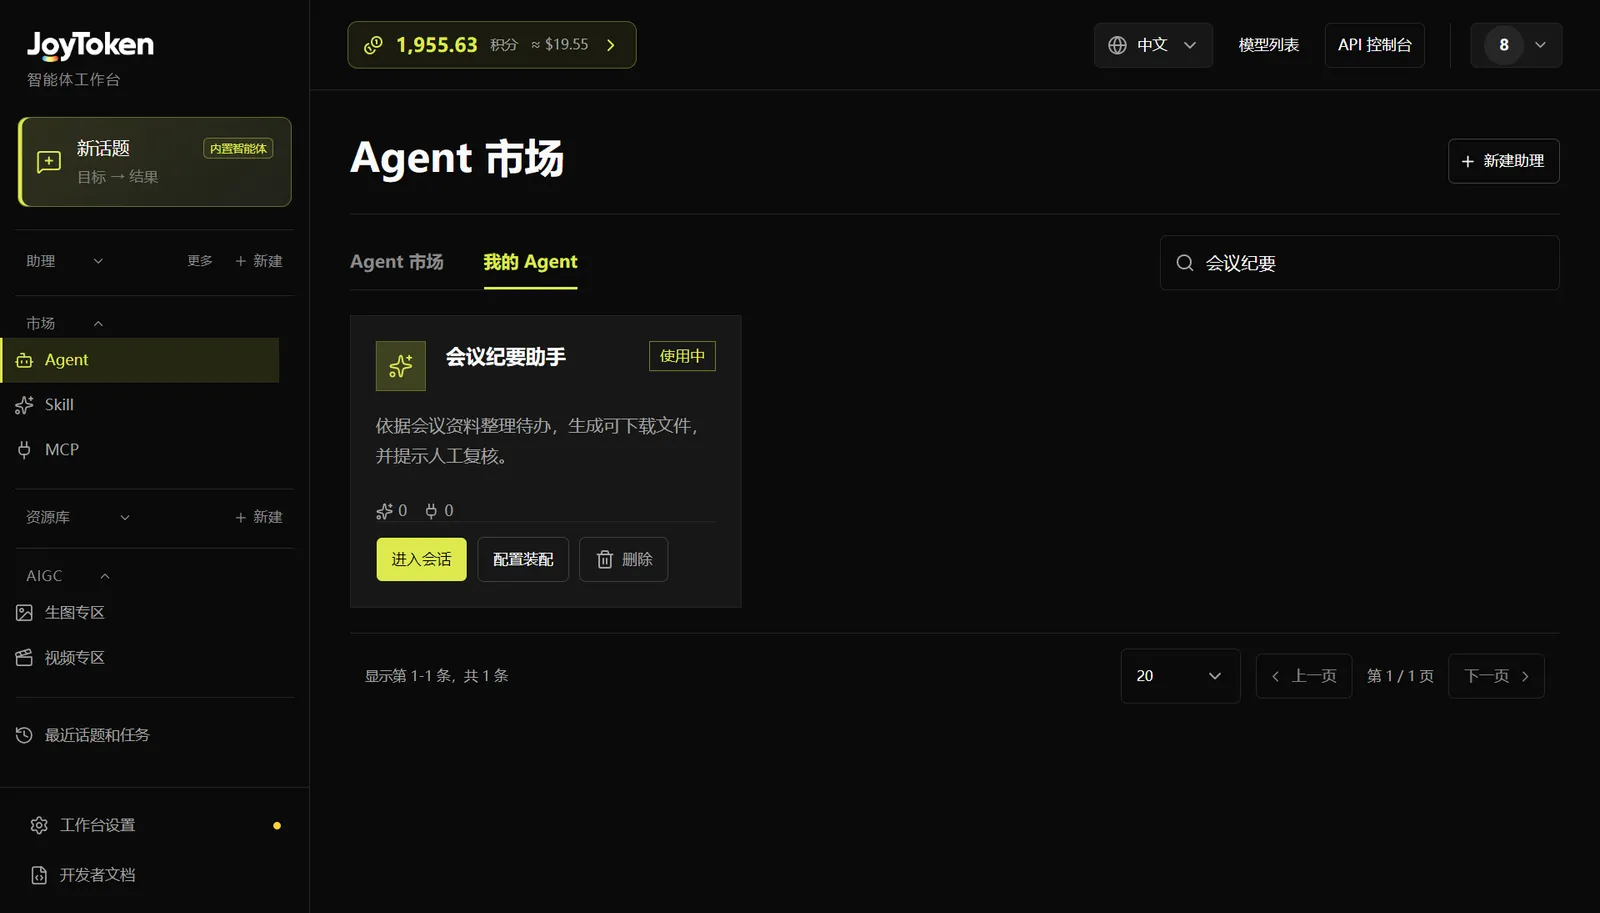
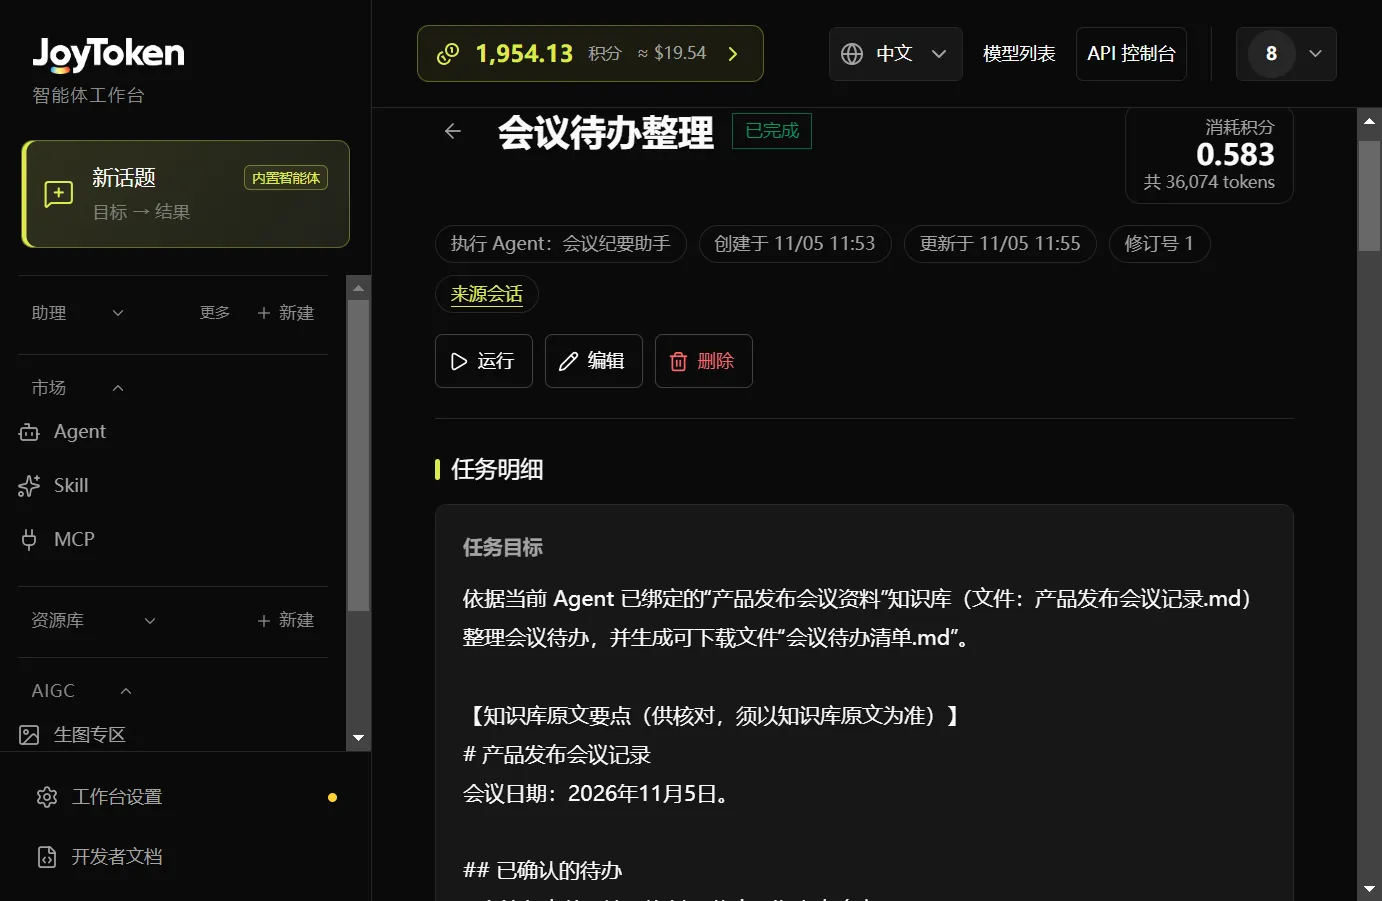
Select the Chinese example “Meeting Minutes Assistant” under My Agents.
Skills: Import and assemble
Import your own Skill
- Click Skill under Marketplace to open Skill Marketplace, then click Import Skill.
- Select an Import Method and enter a Skill Name and Skill Description. The default form lets you upload a UTF-8 Markdown file or paste a Markdown Body; remote-link and ZIP import methods are also available.
- Fill in the selected form and click Confirm Import. The Markdown Body limit is 1 MiB (1,048,576 bytes).
- Check the result under My Skills. To use a Marketplace Skill, click Go to Import on its card, open the details, and follow the import instructions.
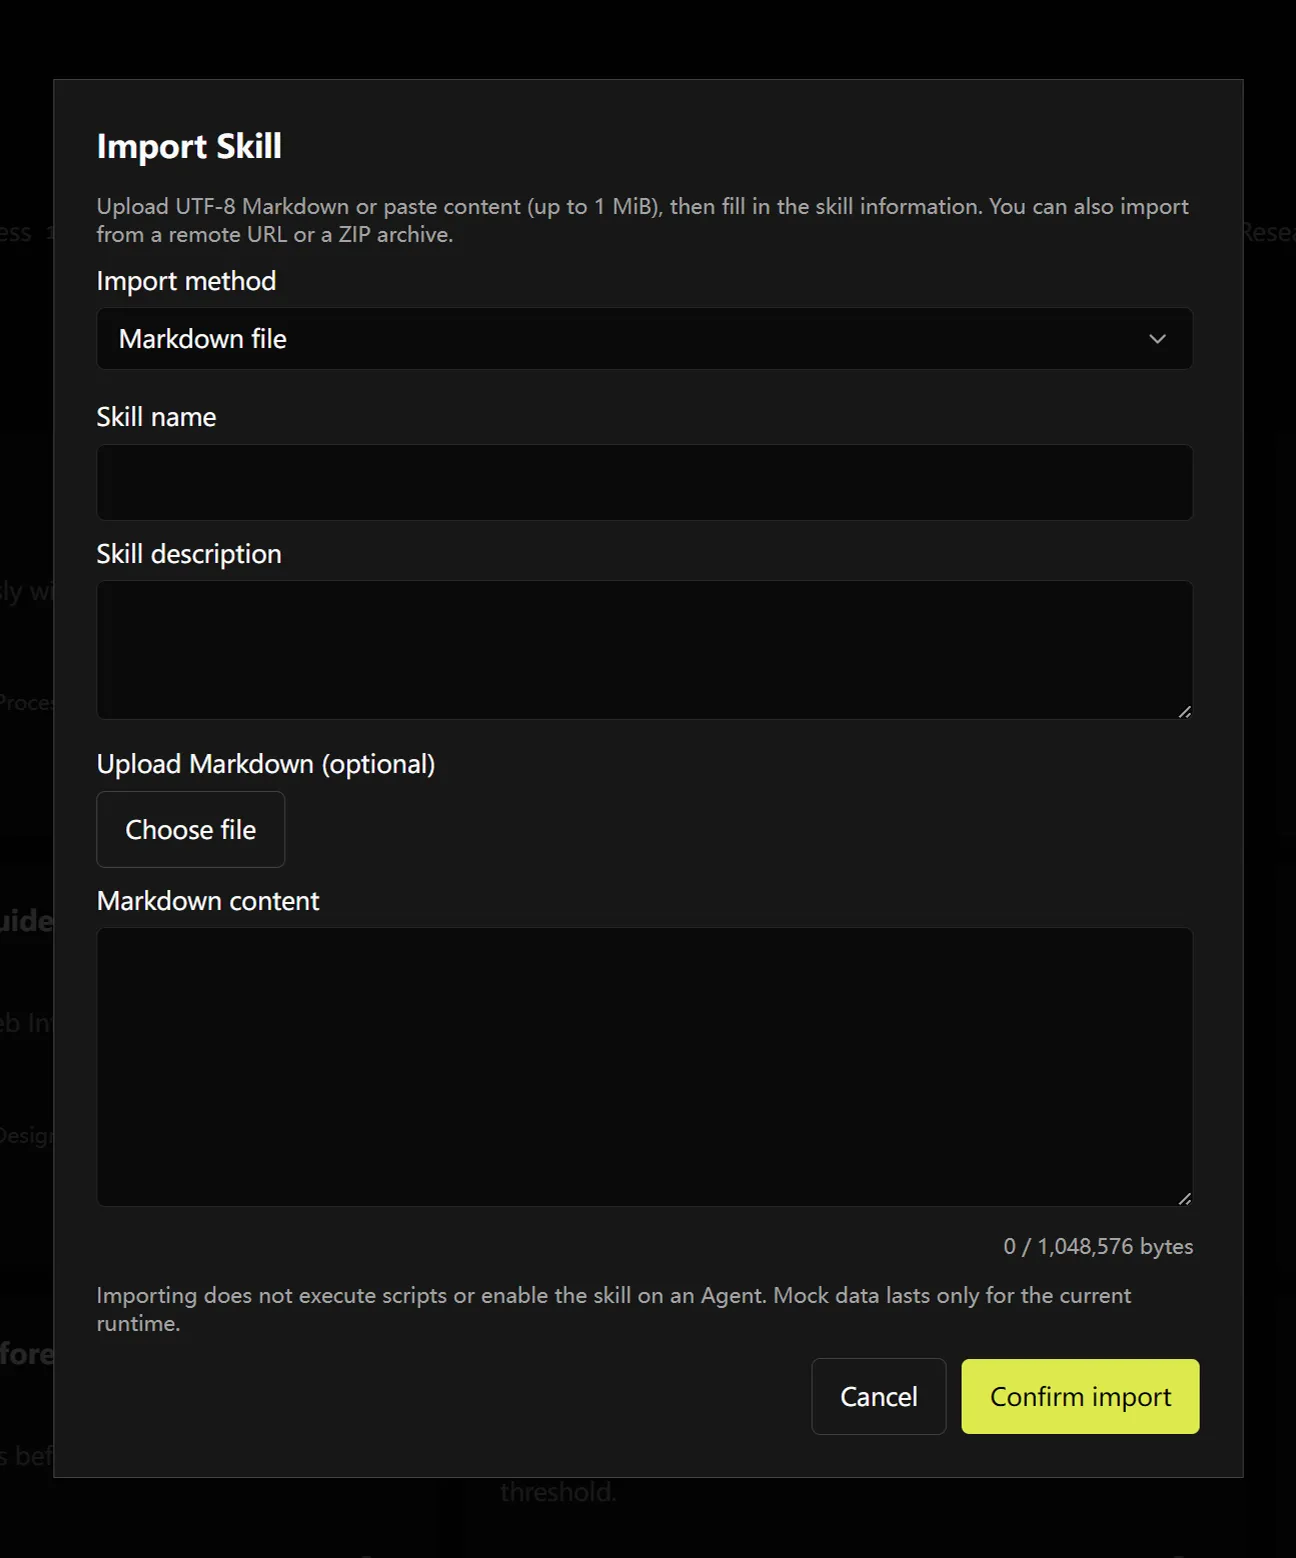
Assemble a Skill into an Agent
- Open an editable Agent’s Assembly Configuration.
- Under Enable SKILLS, click Add Skill.
- Find and select your personal Skill in the picker.
- Click Confirm and save the Agent configuration.
- Start or open a topic with that assistant and submit an input that suits the Skill.
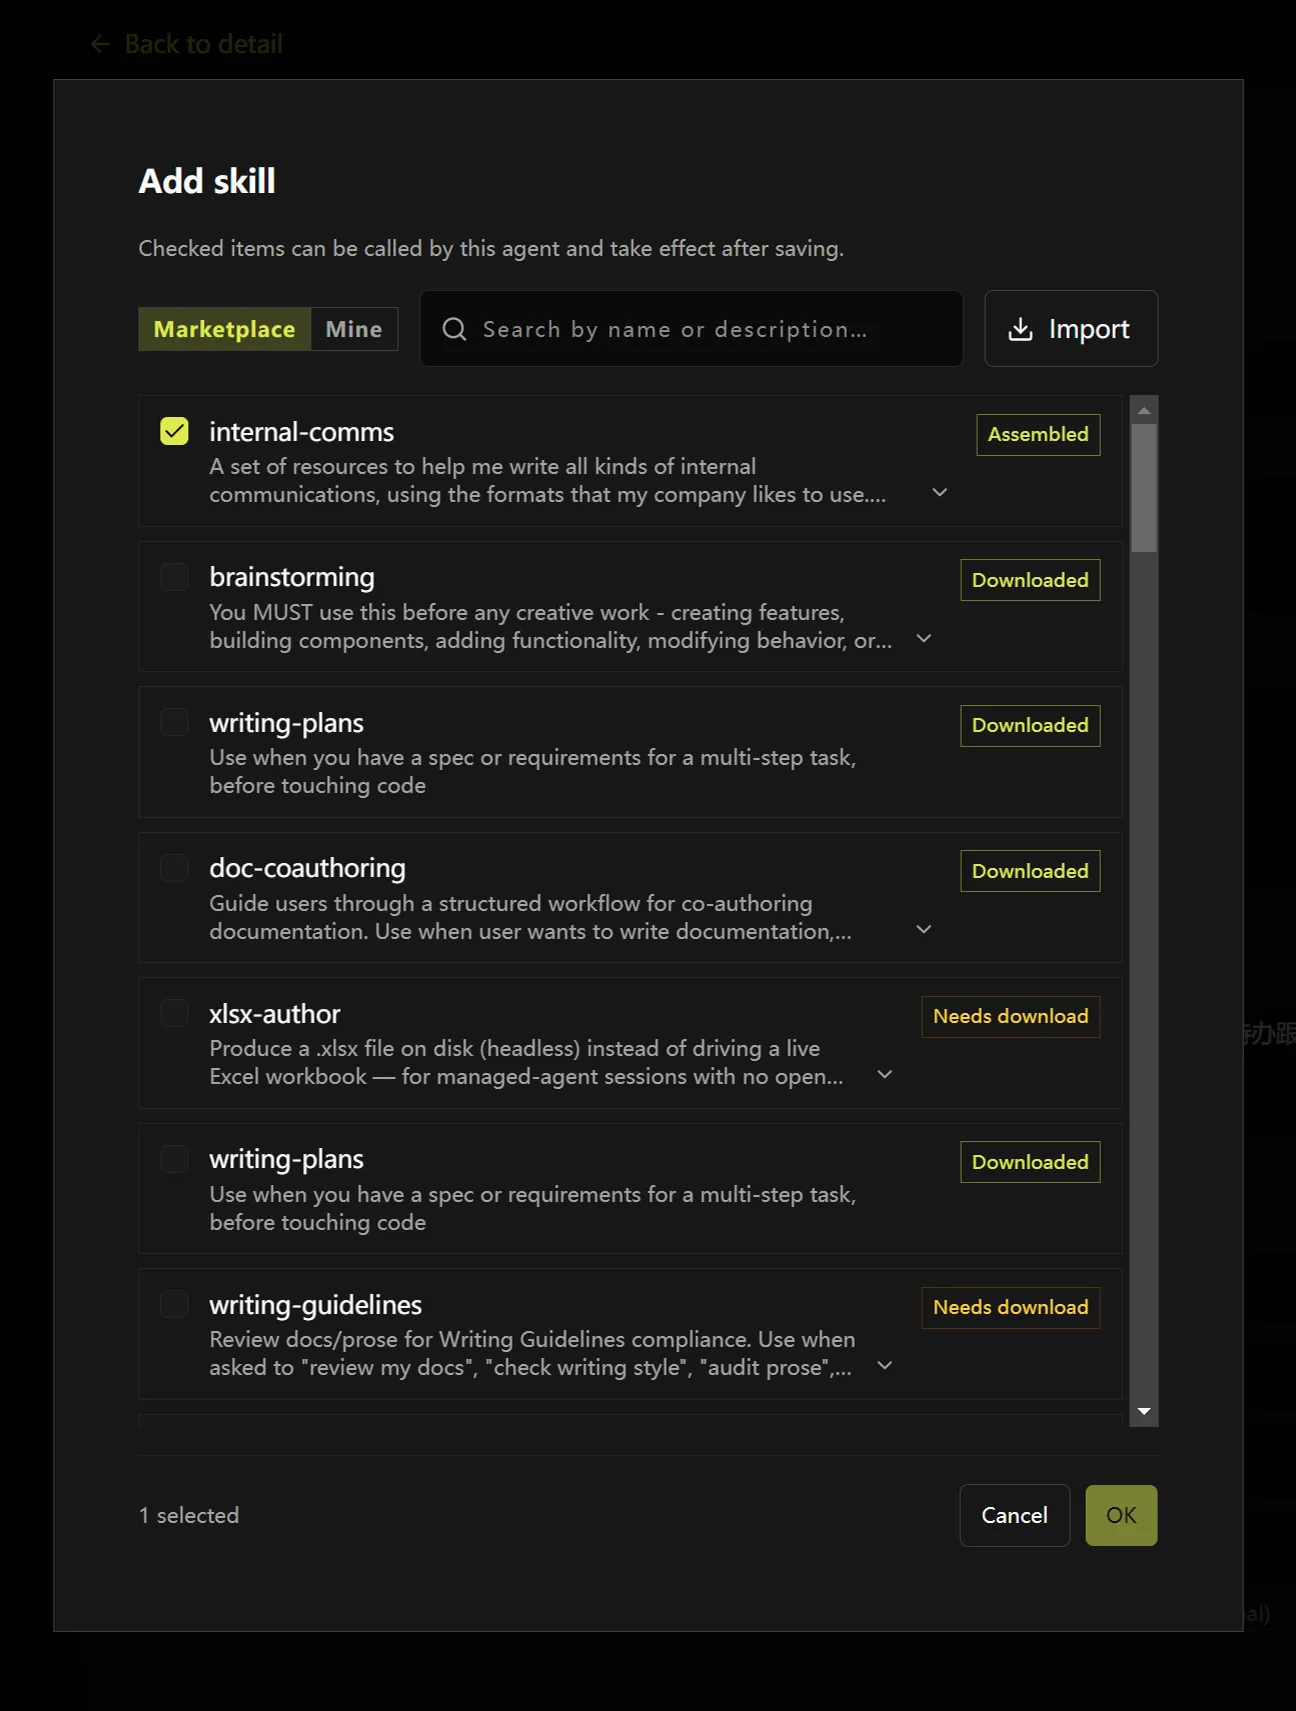
Skill details also offer Enable for My Agent. Importing alone does not bind a Skill to every assistant.
A Skill provides methods and materials; it does not automatically provide a general-purpose code sandbox, OCR, or arbitrary file-editing capabilities.
MCP: Obtain, bind, and troubleshoot
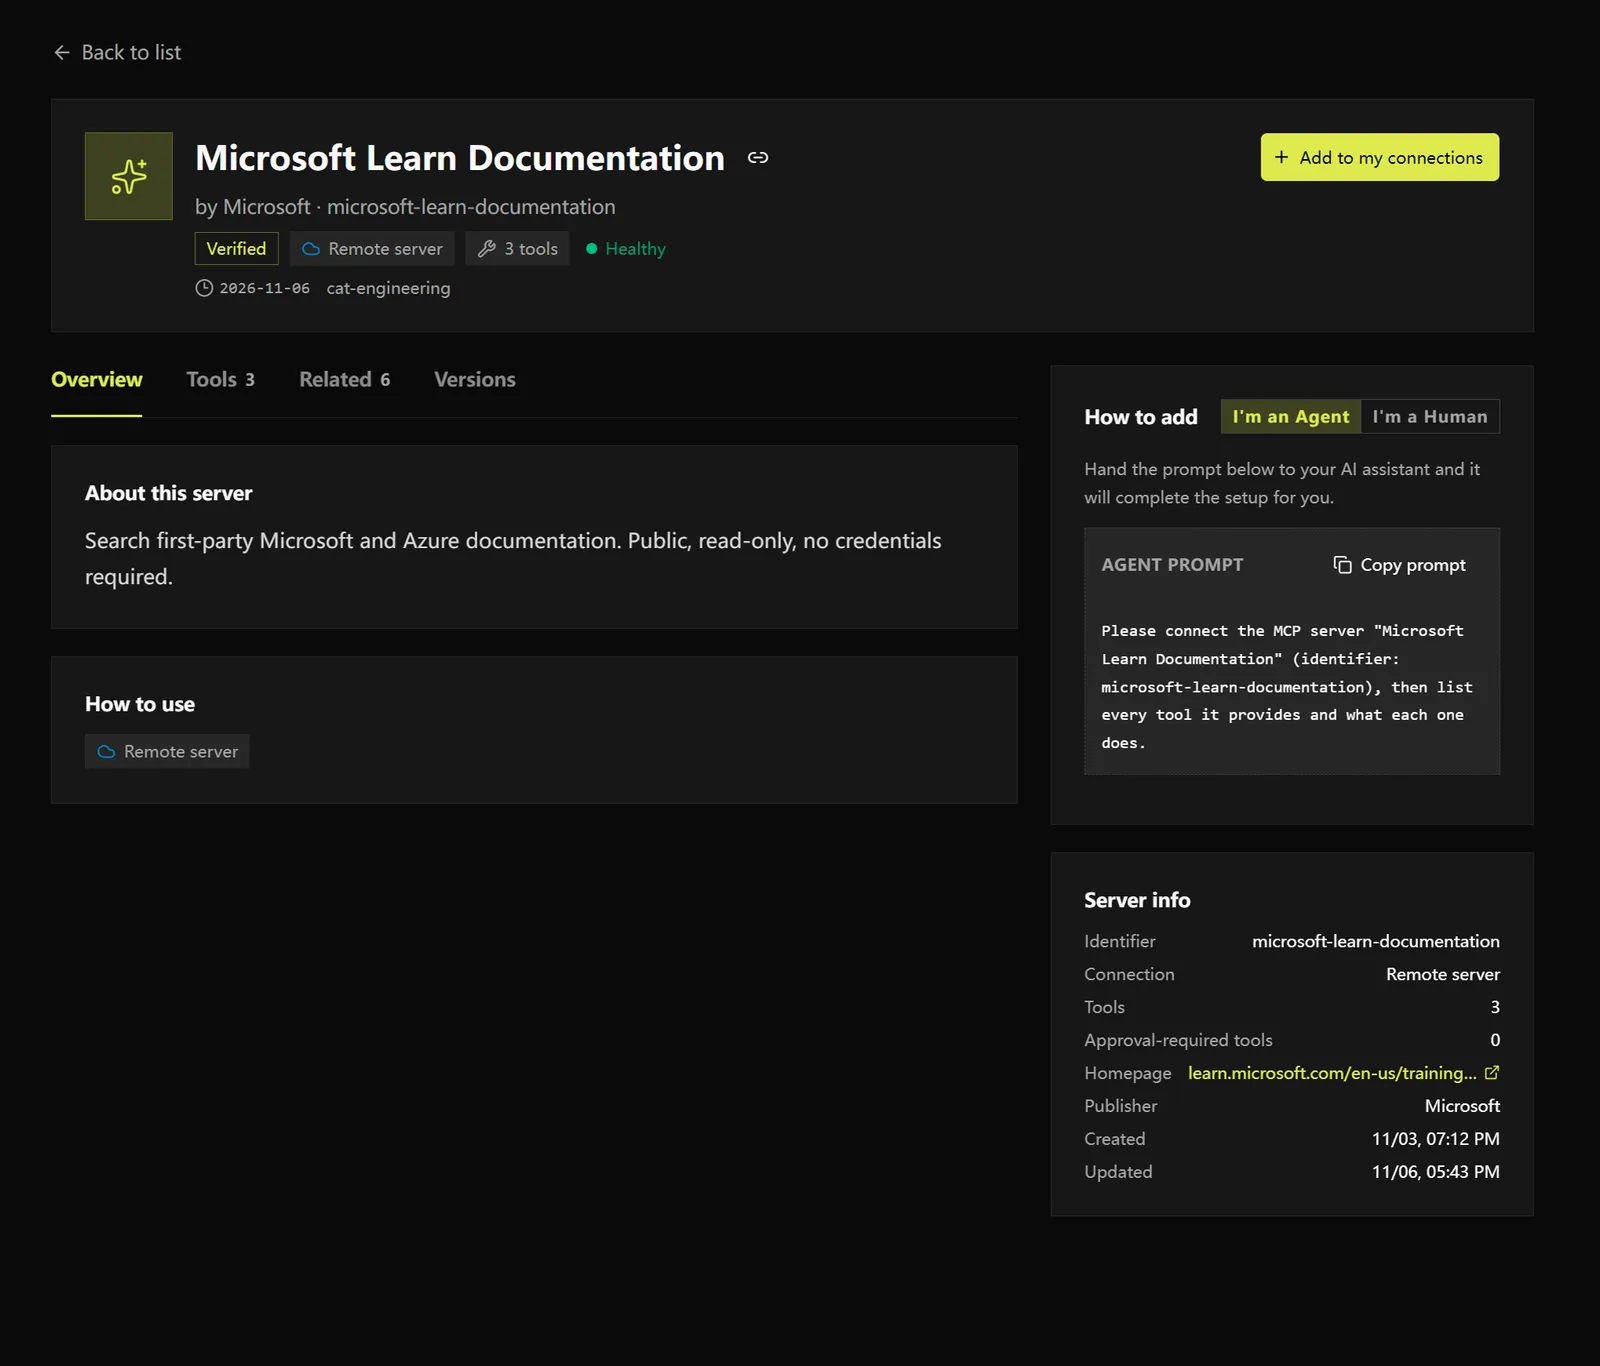
Obtain from the Marketplace
- Open MCP Marketplace and choose a service.
- Review its summary, tools, Schema, version, and authorization requirements.
- Click Add to My Connections.
- Open your personal connection under My MCP and check its status and tools.
Add to an Agent
- Open the Agent’s Agent Profile and Configuration.
- Click Add MCP.
- Select a service you have obtained and click Confirm.
- Save the configuration and enter a conversation.
- Request a task that explicitly needs the tool and inspect the actual result.
Personal connection details
You can review the connection name and identifier, remote server identifier, enabled status, authentication configuration, and tool permissions. Set the address and credentials for a custom connection using the current form; do not treat your model Key as credentials for a third-party tool.
If something goes wrong
Check, in order, whether:
- The configuration was not saved or bound;
- The connection or tool is unavailable;
- The current operation has not been authorized;
- The model call failed before the tool could be used;
- The tool failed or returned no result.
Knowledge bases: From upload to citation
Create a knowledge base
- Click New under Knowledge Bases, or New Knowledge Base on the knowledge-base page.
- Enter a Knowledge Base Name; a description is optional.
- Click Create Knowledge Base.
- Click View in the list to open it.
Knowledge bases are currently managed within a personal visibility scope; the page explicitly says Only visible to me.
Upload files
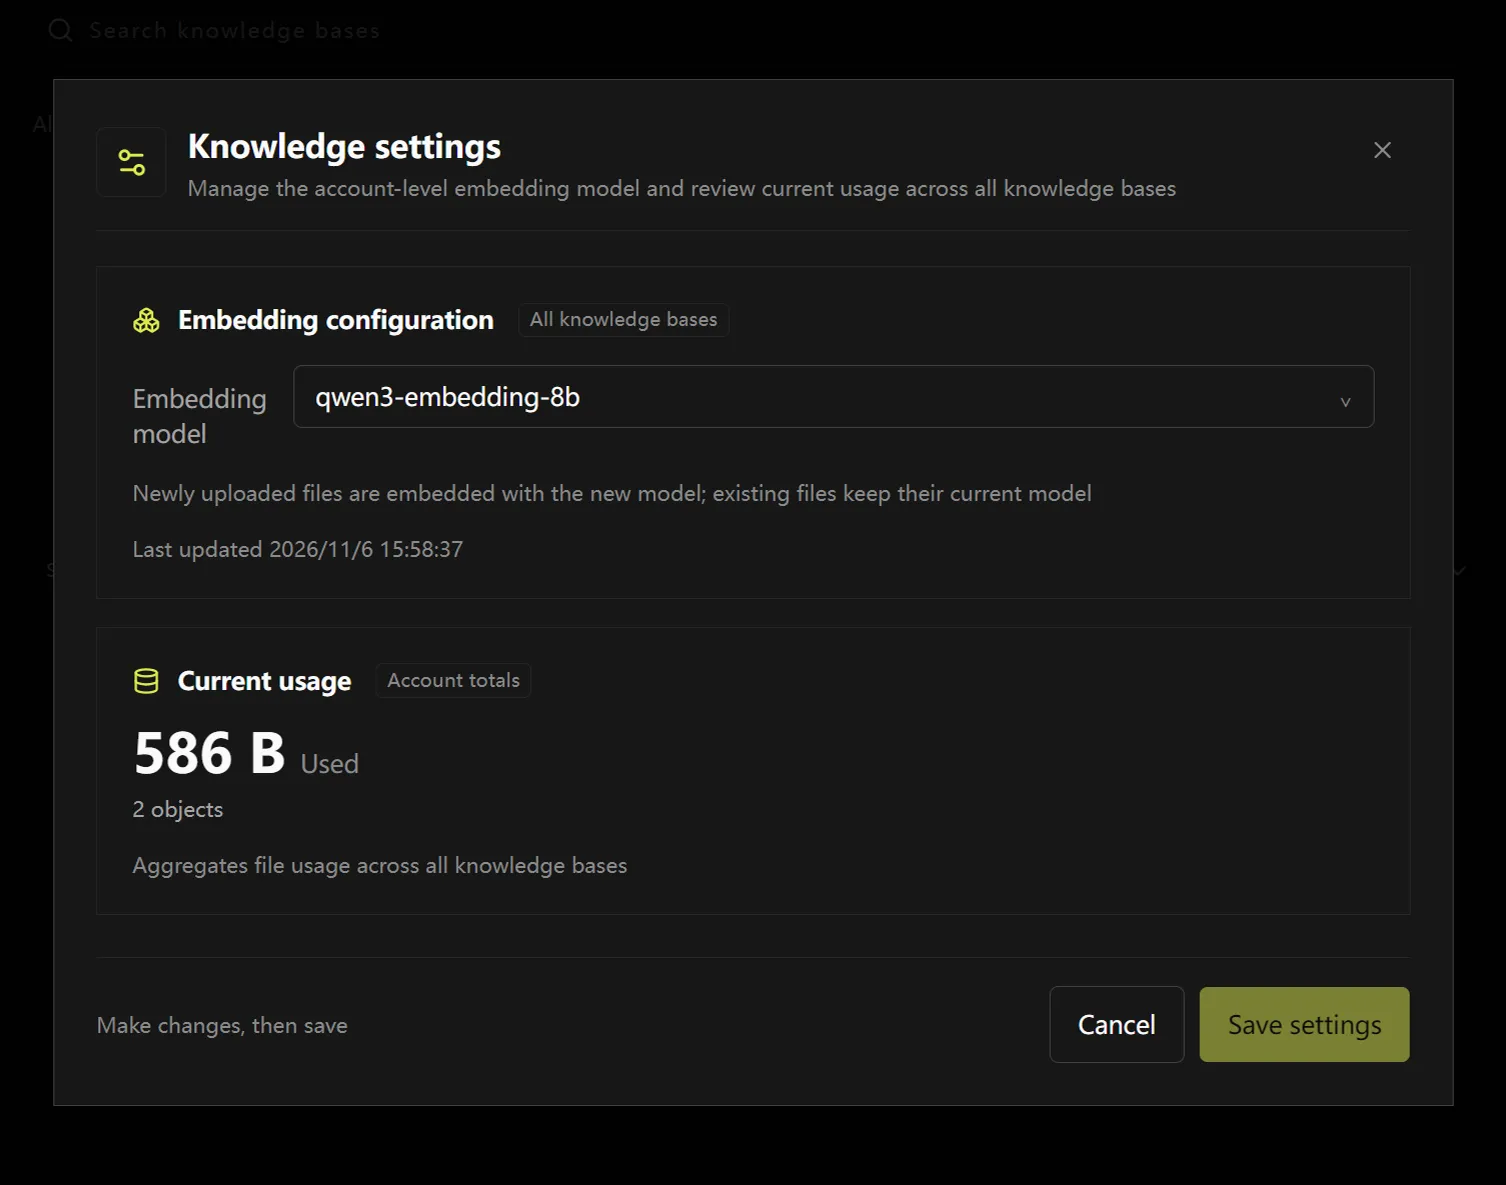
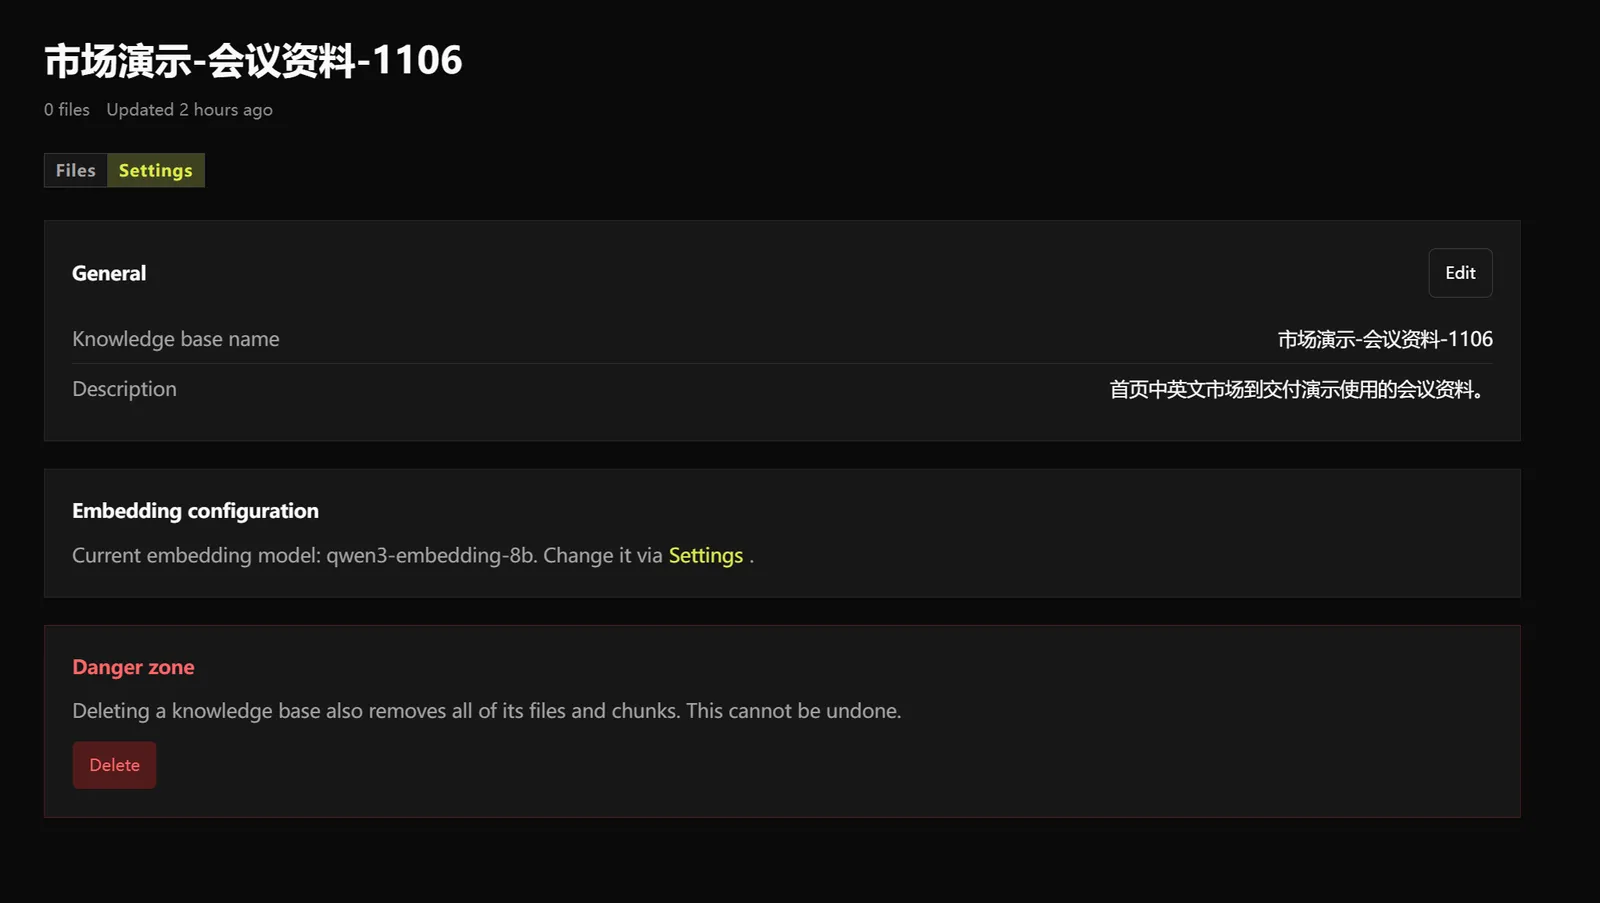
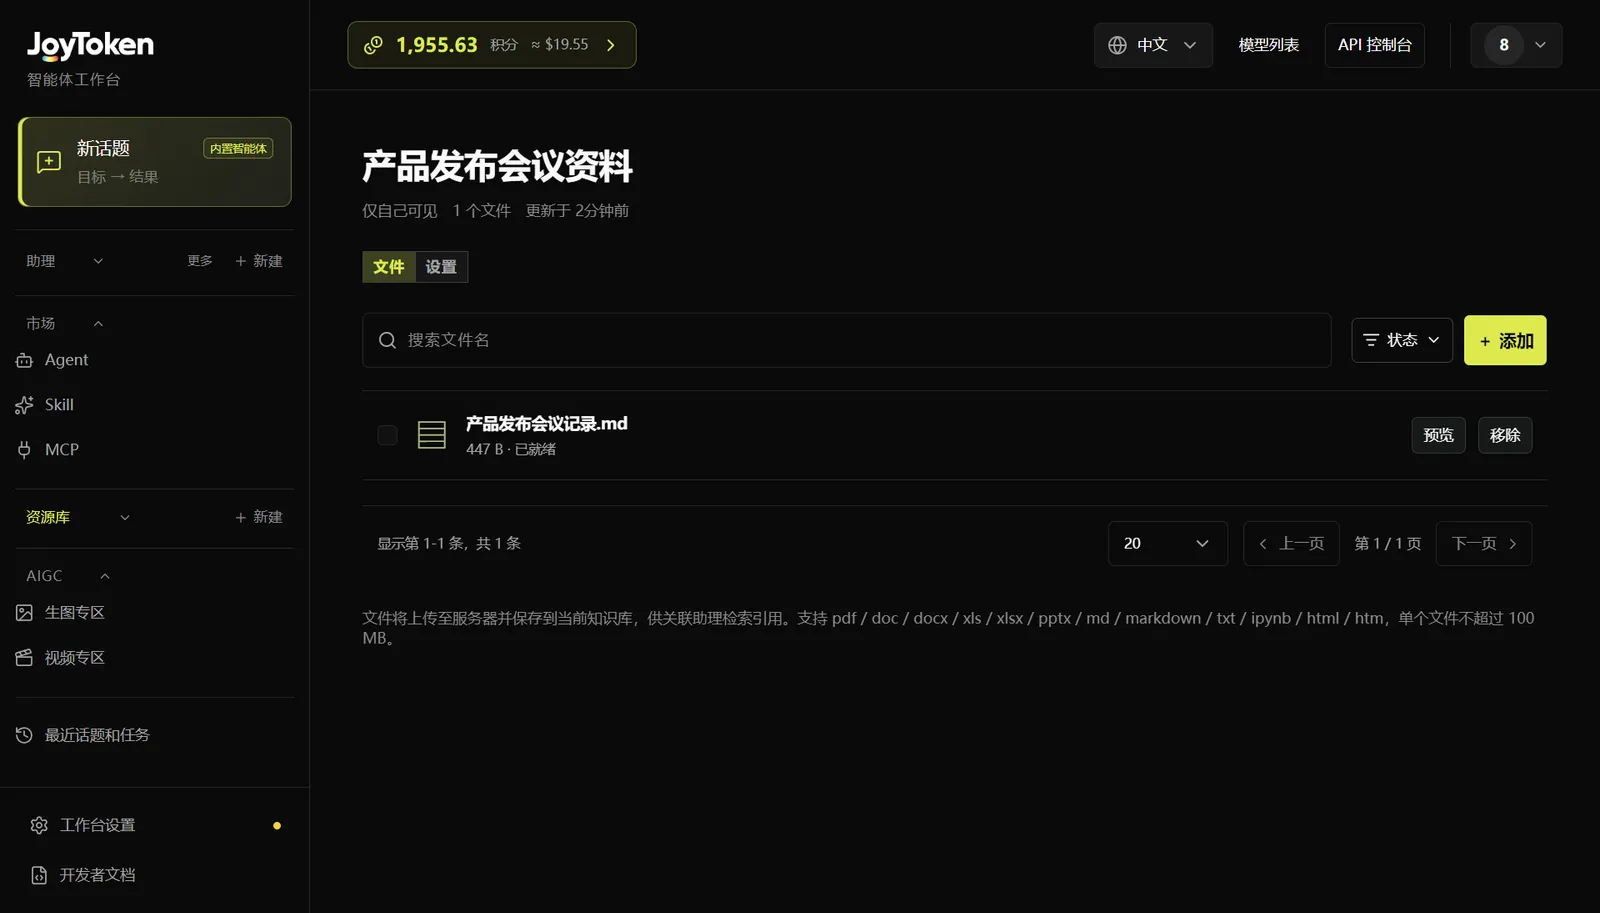
An empty knowledge base offers Upload File and Upload Folder. For an existing library, use + Add to add more.
The page currently lists pdf, doc, docx, xls, xlsx, pptx, md, markdown, txt, ipynb, html, and htm, with a maximum of 100 MB per file. Files inside an uploaded folder are saved in a flat list; do not assume the original folder structure is preserved.
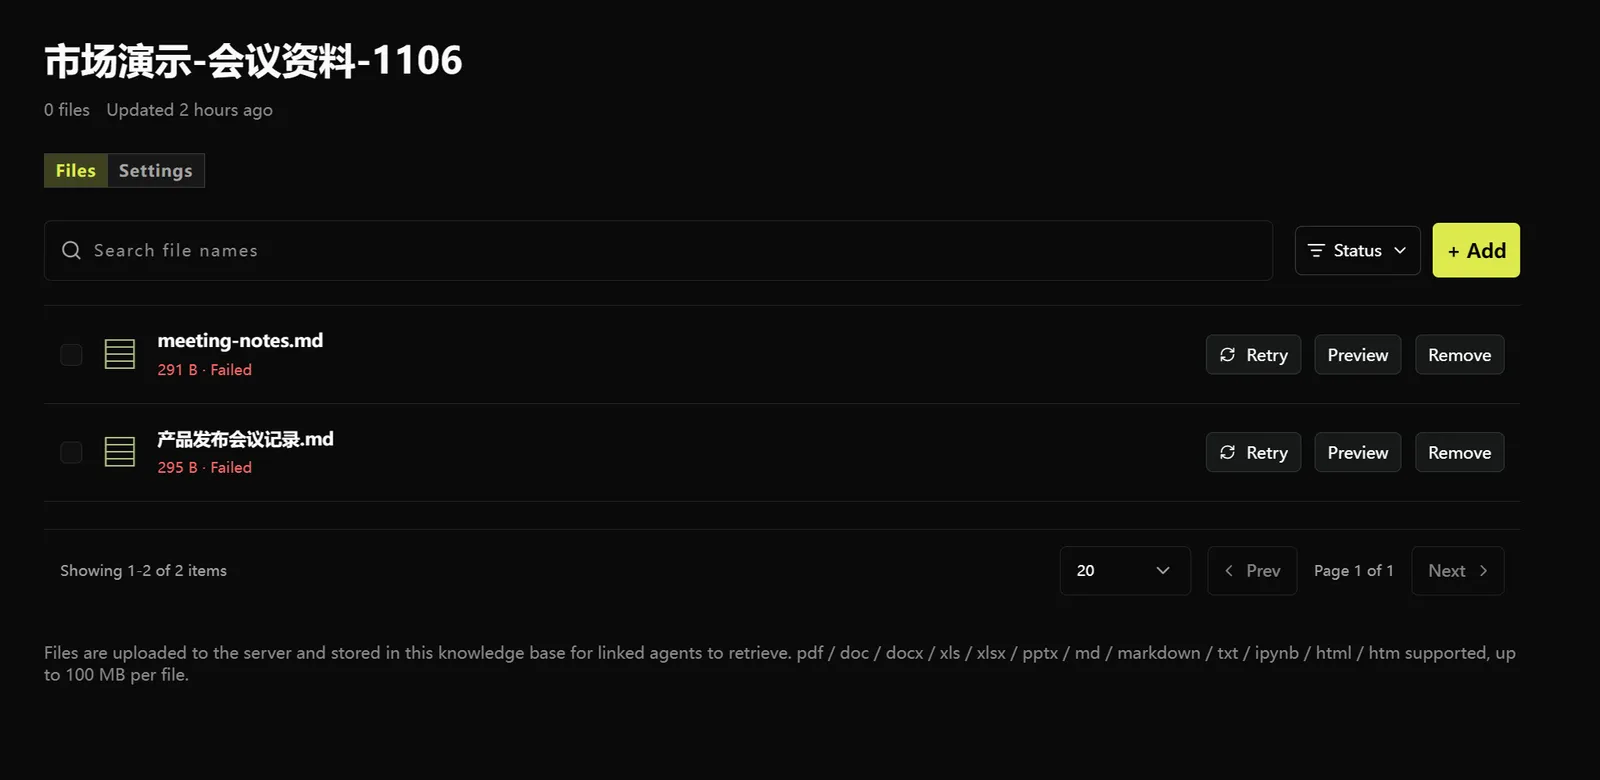
Watch server-side status changes such as Queued and Ready after upload. If the UI has not updated, return later rather than uploading the same file again to speed it up.
File details and preview
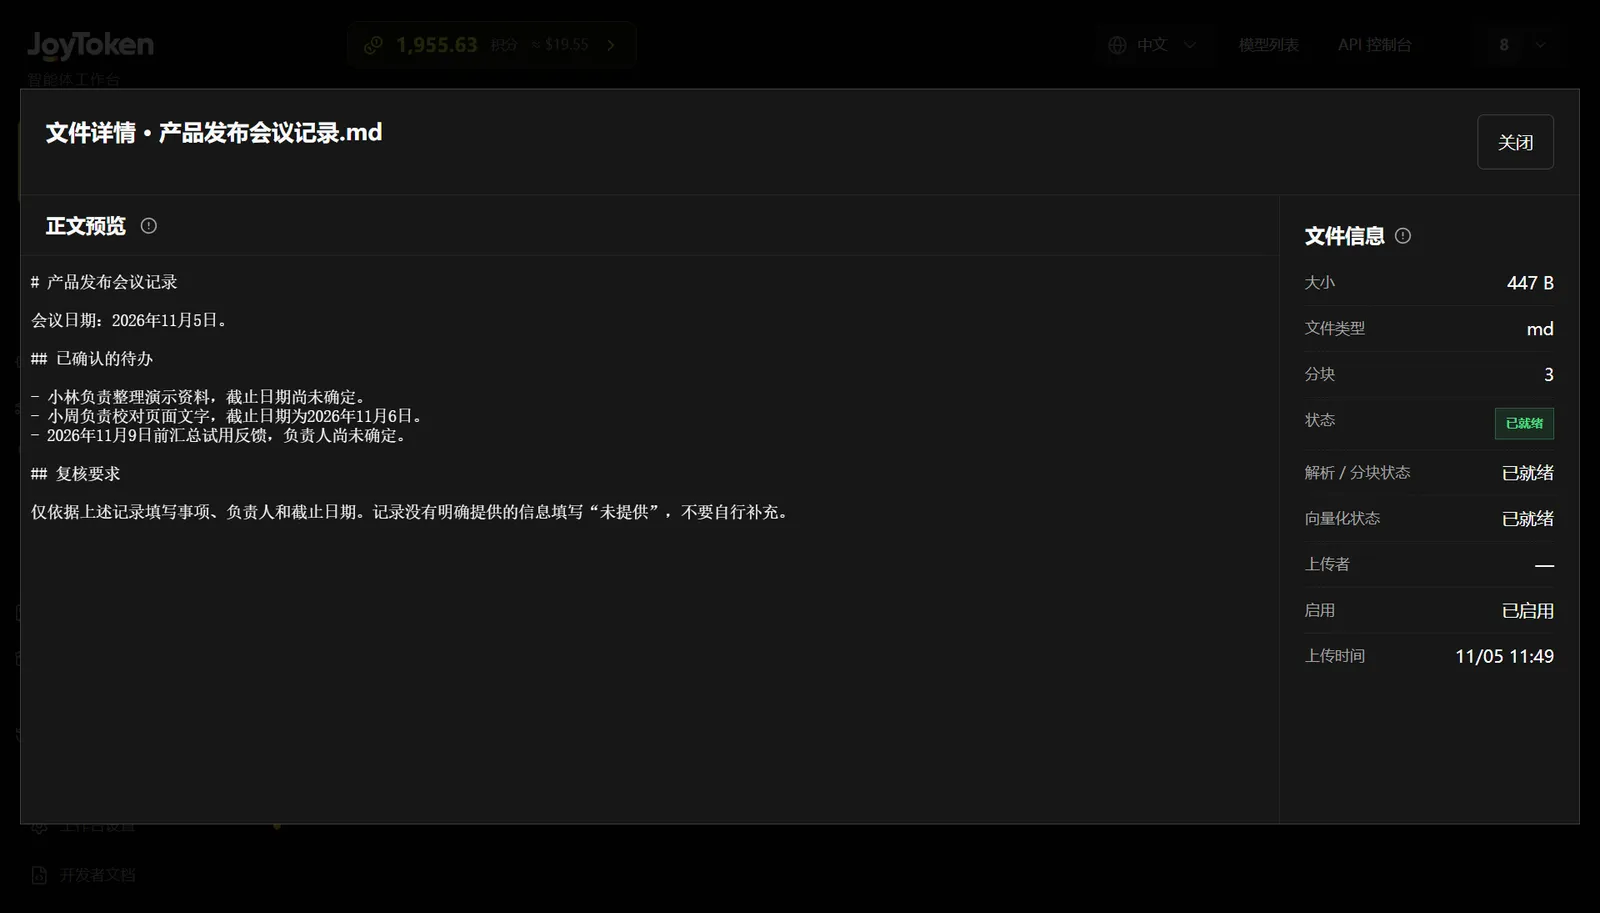
Click Preview in a knowledge base’s file list to open File Details. File information tells you whether processing is complete and the file can be searched; the body preview lets you confirm that the right content was uploaded.
Fields:
Body preview:
The body area displays the current file through a temporary download URL. Check the title, key fields, completeness, and version. Different file types may render differently.
File Details currently notes that preview links are valid for 30 minutes by default. If a link expires, close and reopen the details to obtain a new one.
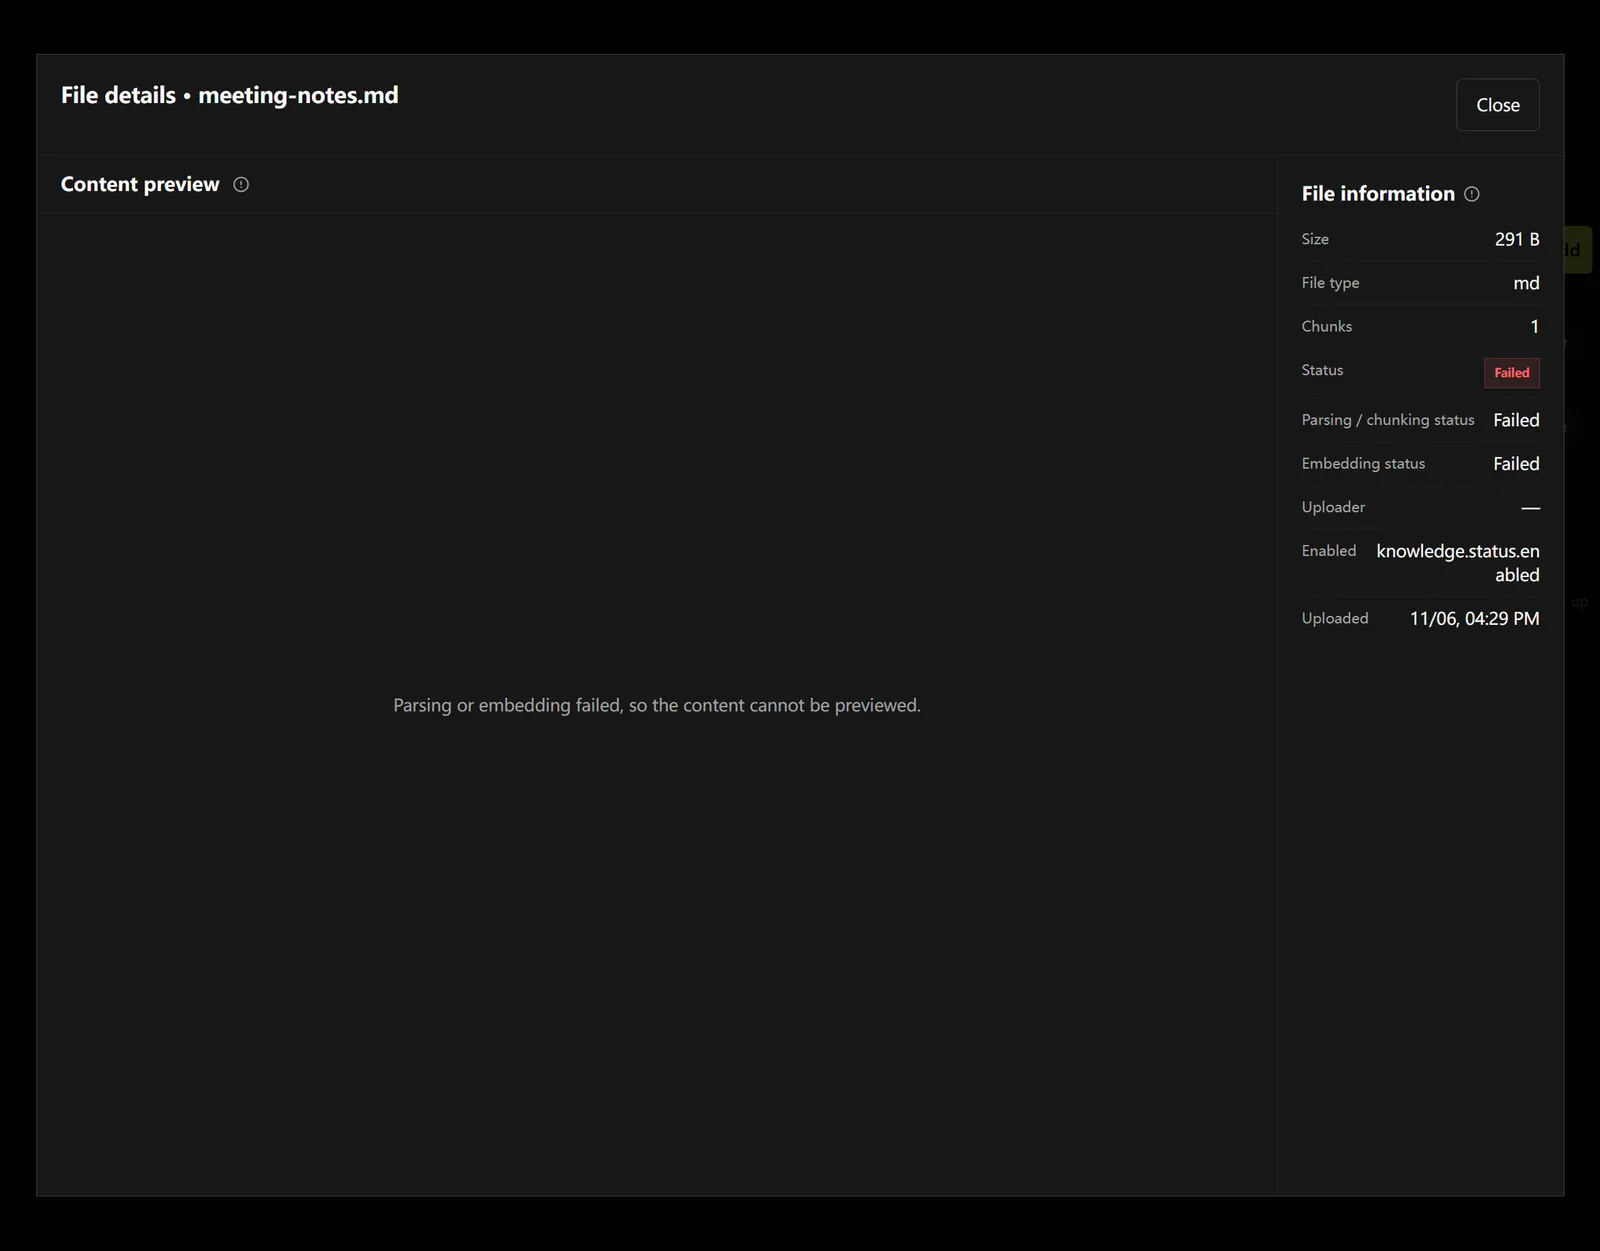
File details: parsing, chunking, embedding status, and file information.
Bind and retrieve
- Open an editable Agent’s configuration.
- Click Add Knowledge Base, select an existing library, and confirm.
- Save the configuration.
- Open a topic with that assistant and explicitly request an answer based on the bound materials.
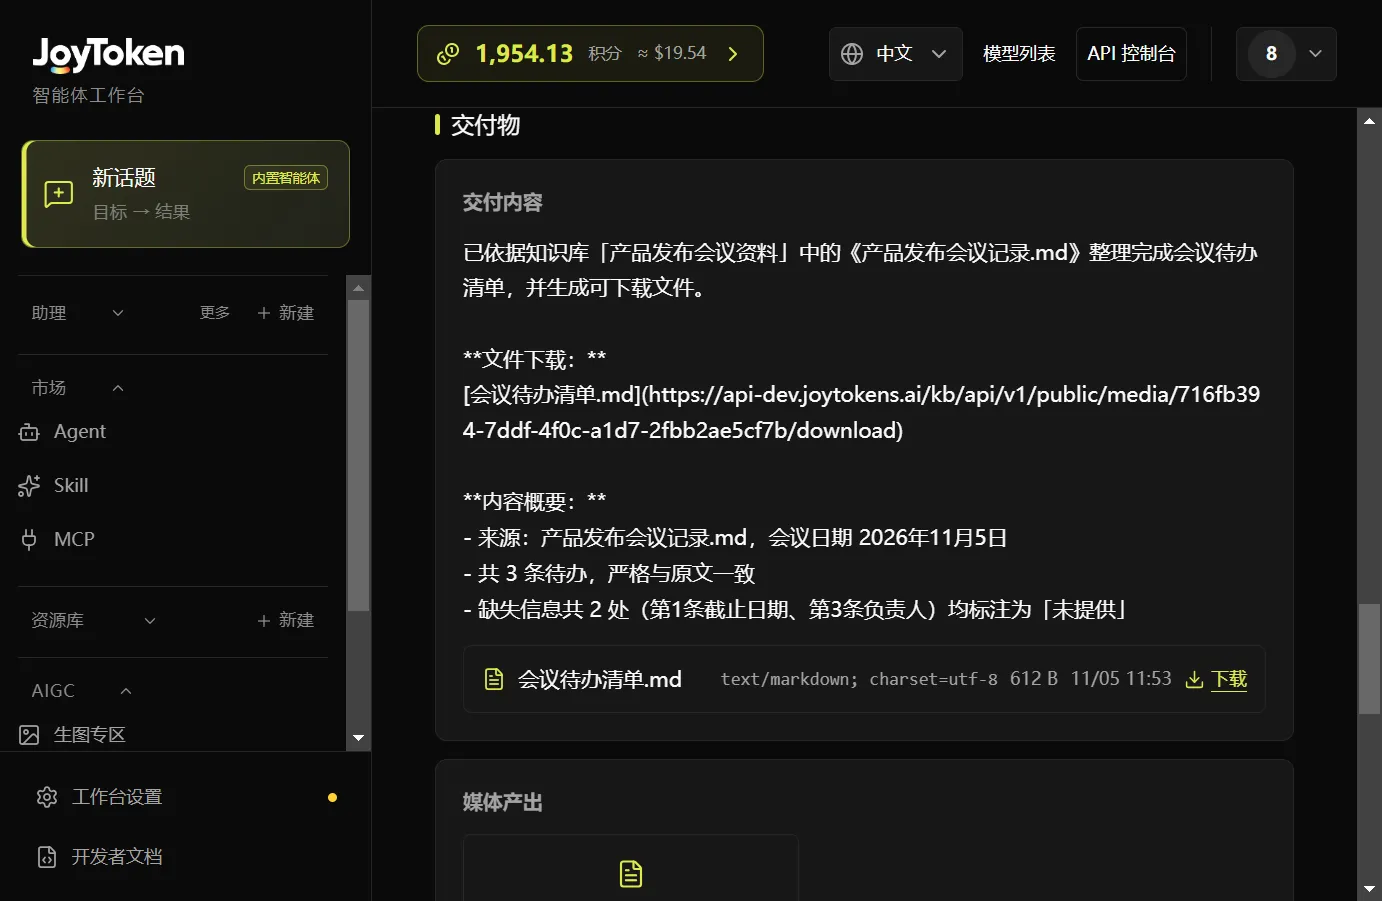
- Check the answer and its sources; missing information should be identified as such.
Attachments and knowledge bases differ: attachments serve the current input; knowledge bases are materials that can be retrieved repeatedly.
Conversations, attachments, and Inspector
Input and attachments
Press Enter to send and Shift+Enter for a line break. With an empty input box, press ↑ to browse input history; Escape exits that state.
Use + to attach files. The conversation attachment area currently shows up to 10 items and offers Clear Attachments. Accepted attachment types differ from knowledge-base uploads; follow the current file picker and error messages.
Specify what to do with the attachment in your request. “Extract the to-dos” is more precise than “Look at this file.”
Tool-call approval
When a model proposes an action requiring authorization, Tool Call Approval displays the tool name and parameters.
For changes to external data or media generation, do not assume approval just because the assistant says it has started. Respond to the approval prompt first, then check the final status.
Inspector
Click Inspector by the input area to view Overview and Routing.
Overview may show request ID, Key, strategy, tier, actual model, credits, tokens, cache, and latency. Treat absent fields as “Not provided.”
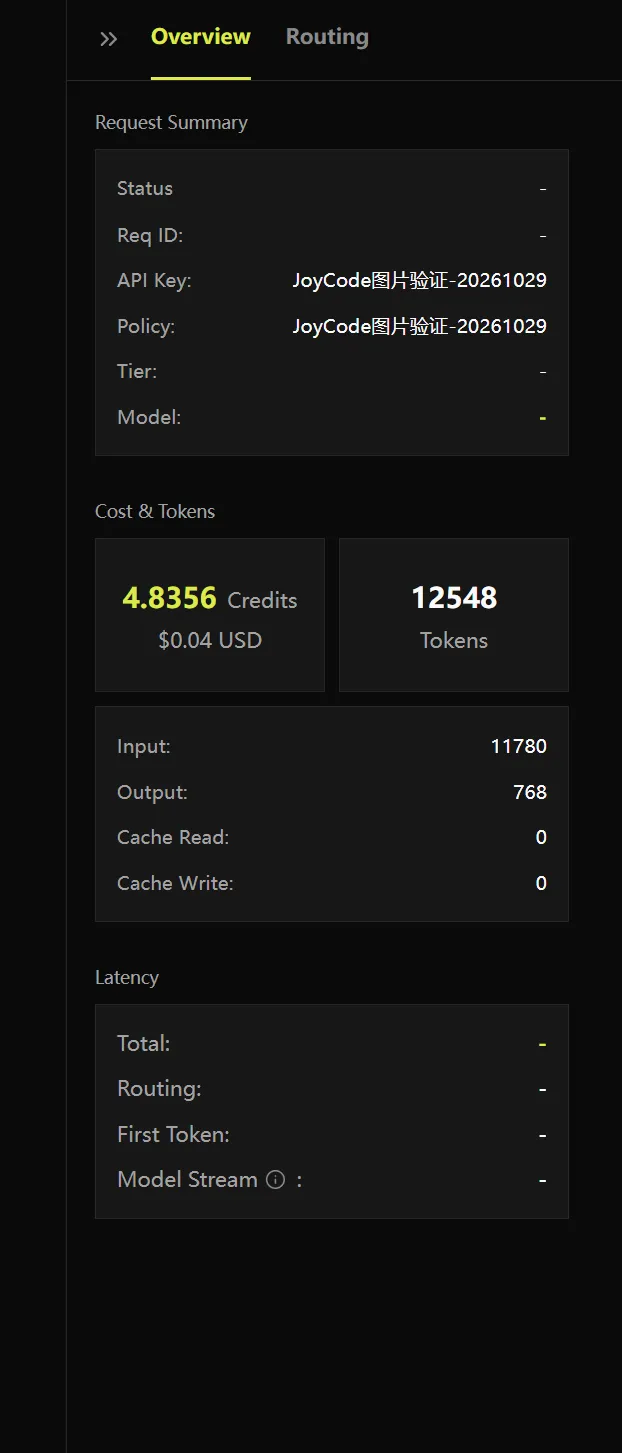
Retry, stop, and history
Keep three things separate: the conversation stores chat history; “generating” describes the current reply; tasks and media have their own execution statuses.
Retry:
Click Retry on a message and wait for the new result. A retry may create another model call and charge.
Stop:
While the current turn runs, use Stop or press Escape as the page suggests. Wait for the status to update and verify the turn has ended; existing output and saved content remain available.
If this turn launched a separate task, also check its details for Cancel Run. If image or video generation was submitted upstream, check that media task’s status as well. Closing the page, switching topics, deleting a message, and stopping generation are not the same action.
Review history:
- Use Recent Topics and Tasks to find the relevant Agent and topic, then open the original messages.
- For a separate task, open Execution History in Task Details, choose a run by time, trigger type, or sequence number, then click View Conversation.
- Check which execution produced a deliverable; distinguish the first run from retries and scheduled runs.
File deliverables: Word, Excel, PPT, and PDF
Tell the Agent the file types, names, and structure you want. For example:
When finished, file cards and download links appear in the message. Download and check:
Even if a file card shows success, inspect its contents. Longer documents may go through staged drafts; wait for the final download link.
Files generated within a task belong to a specific execution. Multiple runs of the same task produce separate files; do not mix up versions.
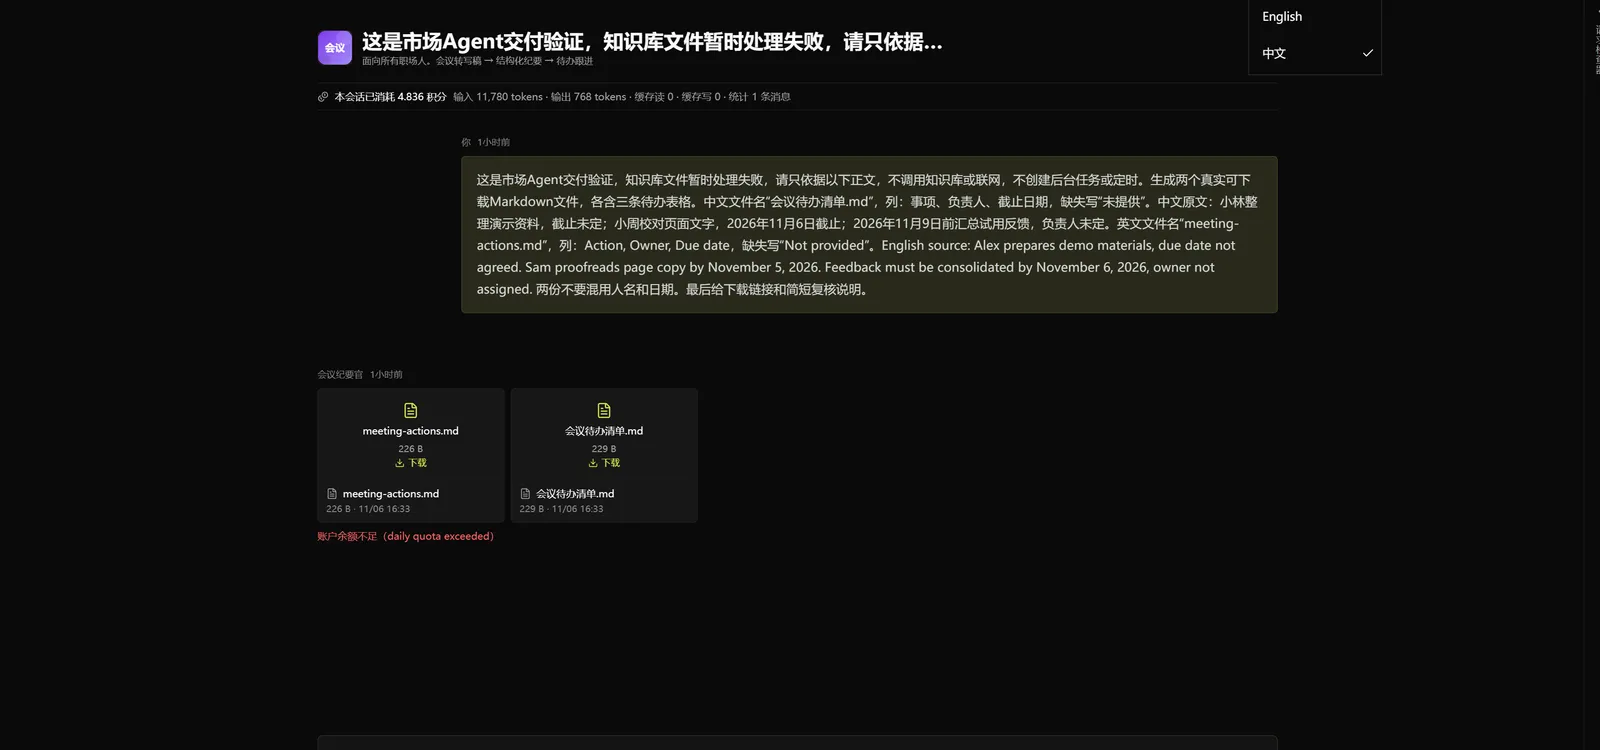
Tasks: Create, run, and confirm acceptance
Create in a conversation
If you only request creation, the task may stay pending; requesting a run should produce an actual execution record.
Task details
Open a task card in the conversation. The main areas include:
Run and accept
- Click Run to start an execution.
- Wait for it to finish and inspect the output and files.
- If the task shows Awaiting Acceptance, click Confirm Acceptance after reviewing the result.
- The task changes to Completed.
Execution completion and task acceptance are recorded separately. Even when an execution is Completed in the history, the task may still await your acceptance; the assistant saying “acceptance criteria met” does not replace your confirmation.
Edit, add steps, and cancel
Use Edit to change the goal or requirements, and Add Step to expand the plan. During a run, a step may only allow status updates; follow the UI prompts.
Running again adds another execution record. Click View Conversation to review that run’s separate process.
Deleting a task, canceling a run, and deleting a file affect different objects; check your target before acting.
Scheduled plans
Configure a plan
- In Task Details, click Set Schedule under Execution Settings.
- Choose the repeat frequency and execution time.
- Enter or verify the time zone, for example Asia/Shanghai.
- Select Enable and click Save.
- Check the task’s displayed next run time.
Track manual and scheduled runs separately
Manual and scheduled runs may be different records of the same task. Choose the relevant execution when reviewing files, usage, or results.
Disable or delete a plan
Under Execution Settings, use Edit to disable the plan, or Delete in that section.
The deletion confirmation explains that the task will no longer run automatically but the task itself remains. Once confirmed, the frequency reverts to Manual Only and the next run is blank; previous runs and files remain.
Review usage and billing
Conversation totals in the workbench, per-call Inspector data, and Console billing may be calculated at different times and cover different scopes. Use settled entries in Usage Details for reconciliation.
- Open the API Console from the workbench.
- Open Usage and select the time range and Key.
- Switch to Usage Details.
- Open Details for a record and check input, output, cache, reasoning, and other metered items and their per-call prices.
- Expand More Information if you need to trace the call.
For small amounts the page may show “<0.01 credits”; Details can display a more precise charge.
AIGC: Image Studio
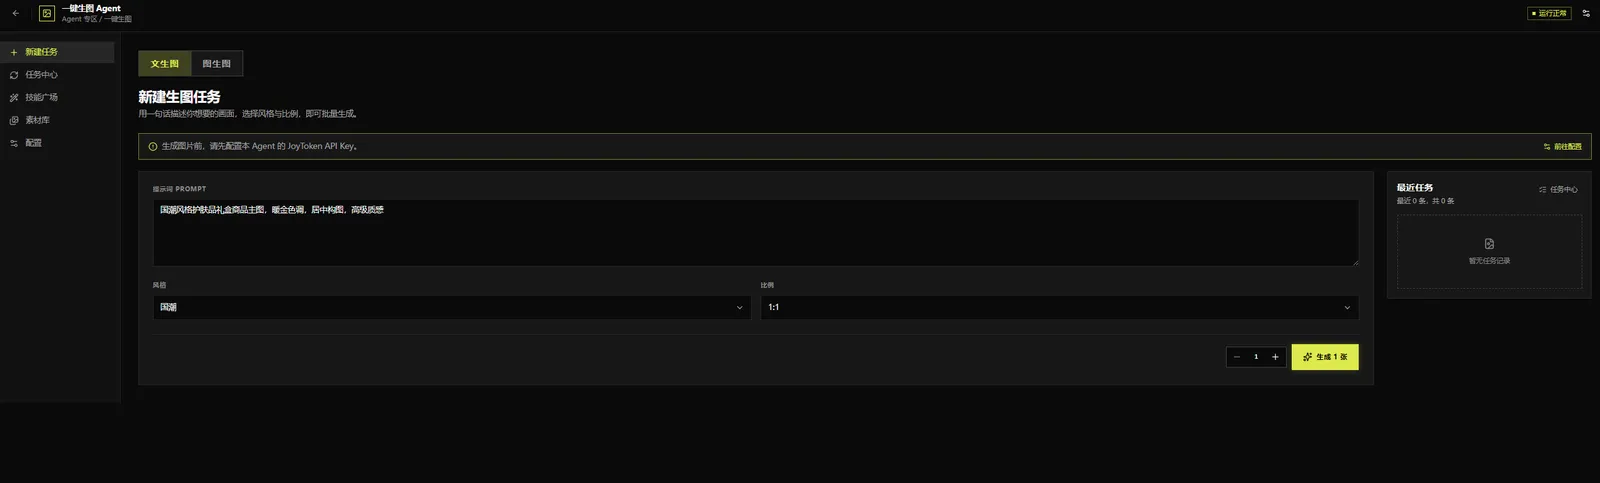
Step 1: Create a generation task
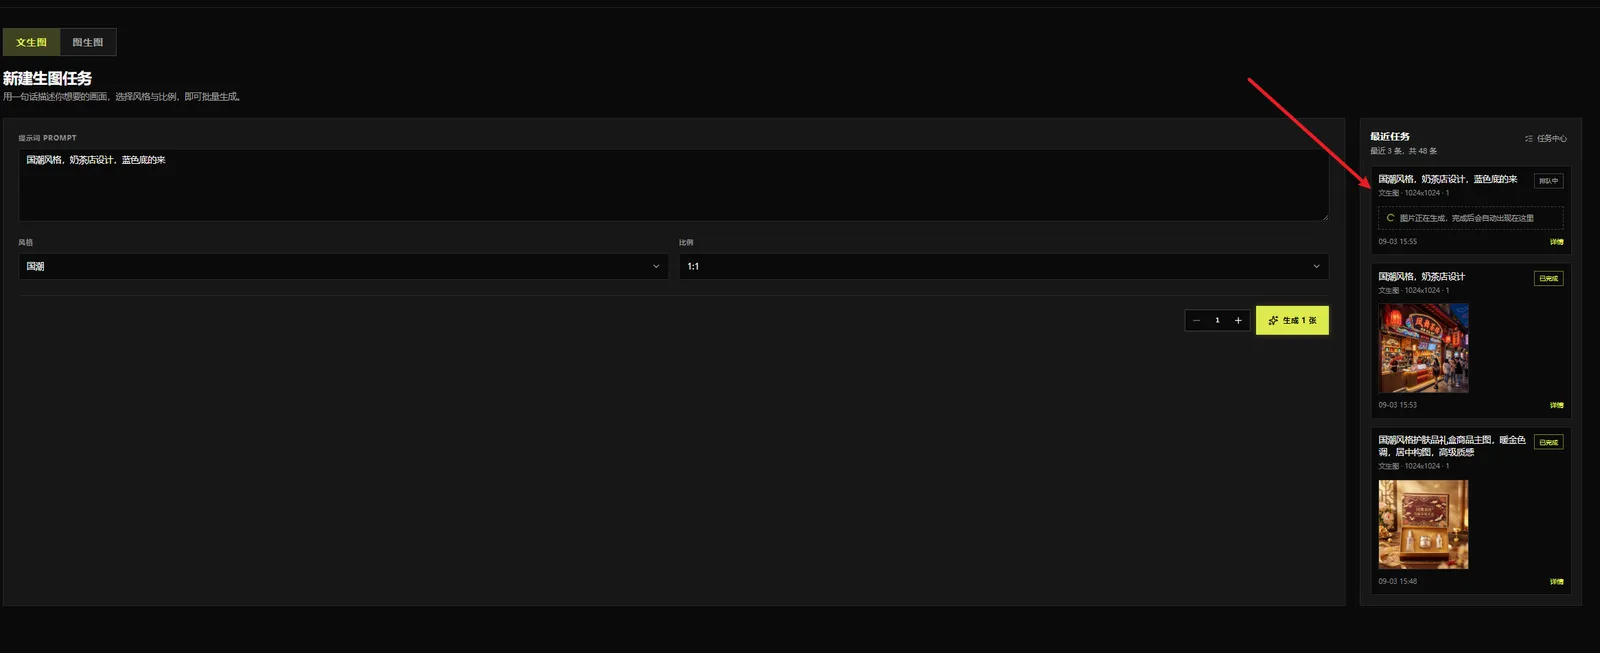
Click New Task in the left navigation; it opens the Text-to-Image mode by default. Follow these steps to generate images:
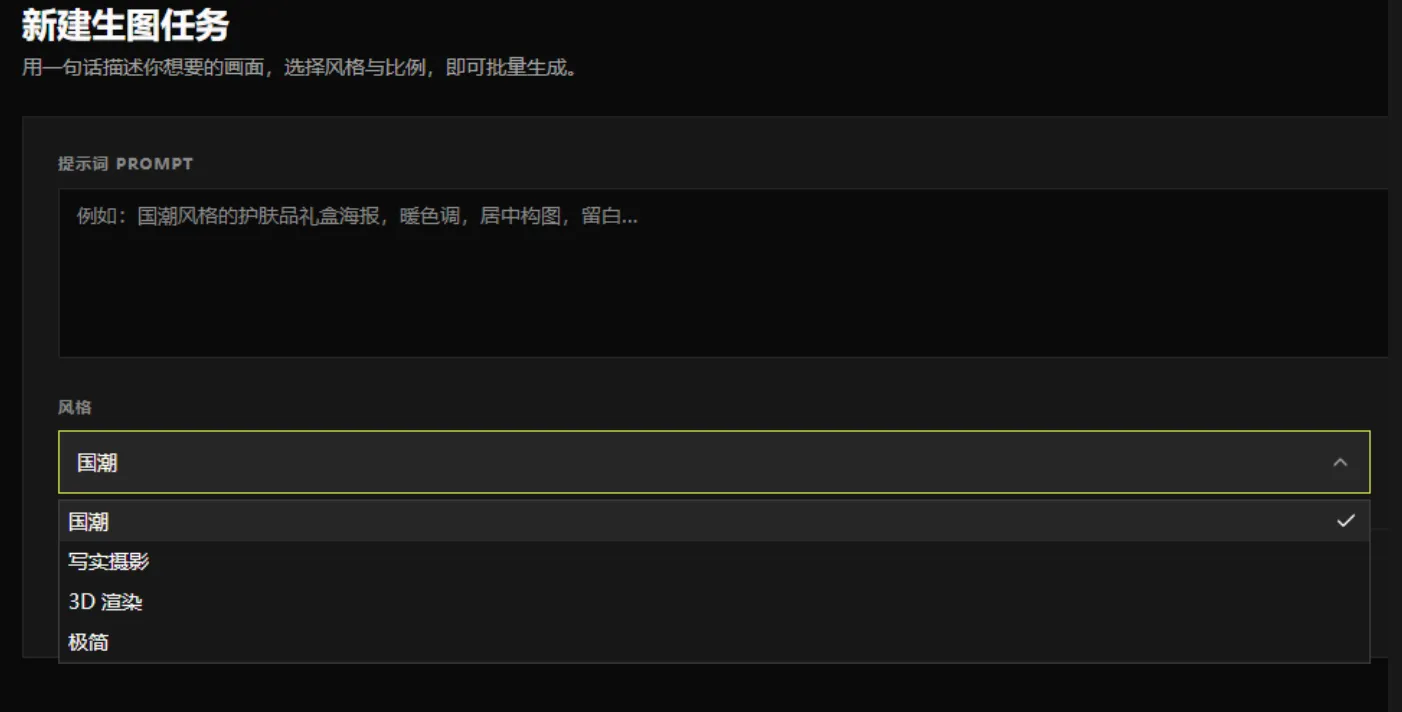
- Enter the PROMPT — describe the image you want in a single sentence (with an example placeholder).
- Select a style — Guochao / Realistic Photography / 3D Render / Minimalist.
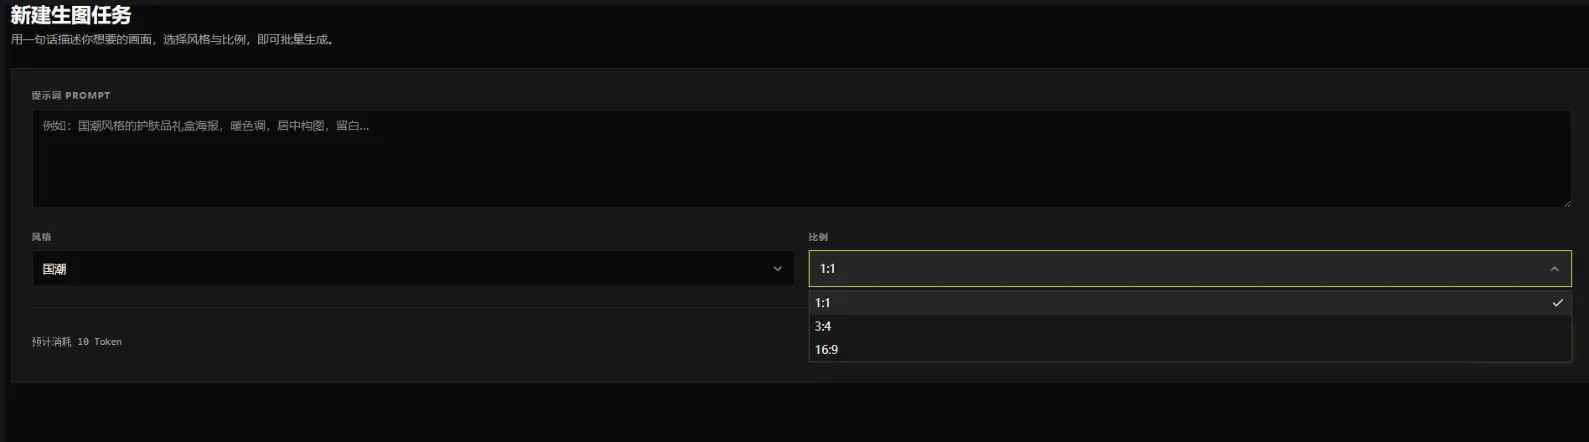
- Select an aspect ratio — 1:1 / 3:4 / 16:9.
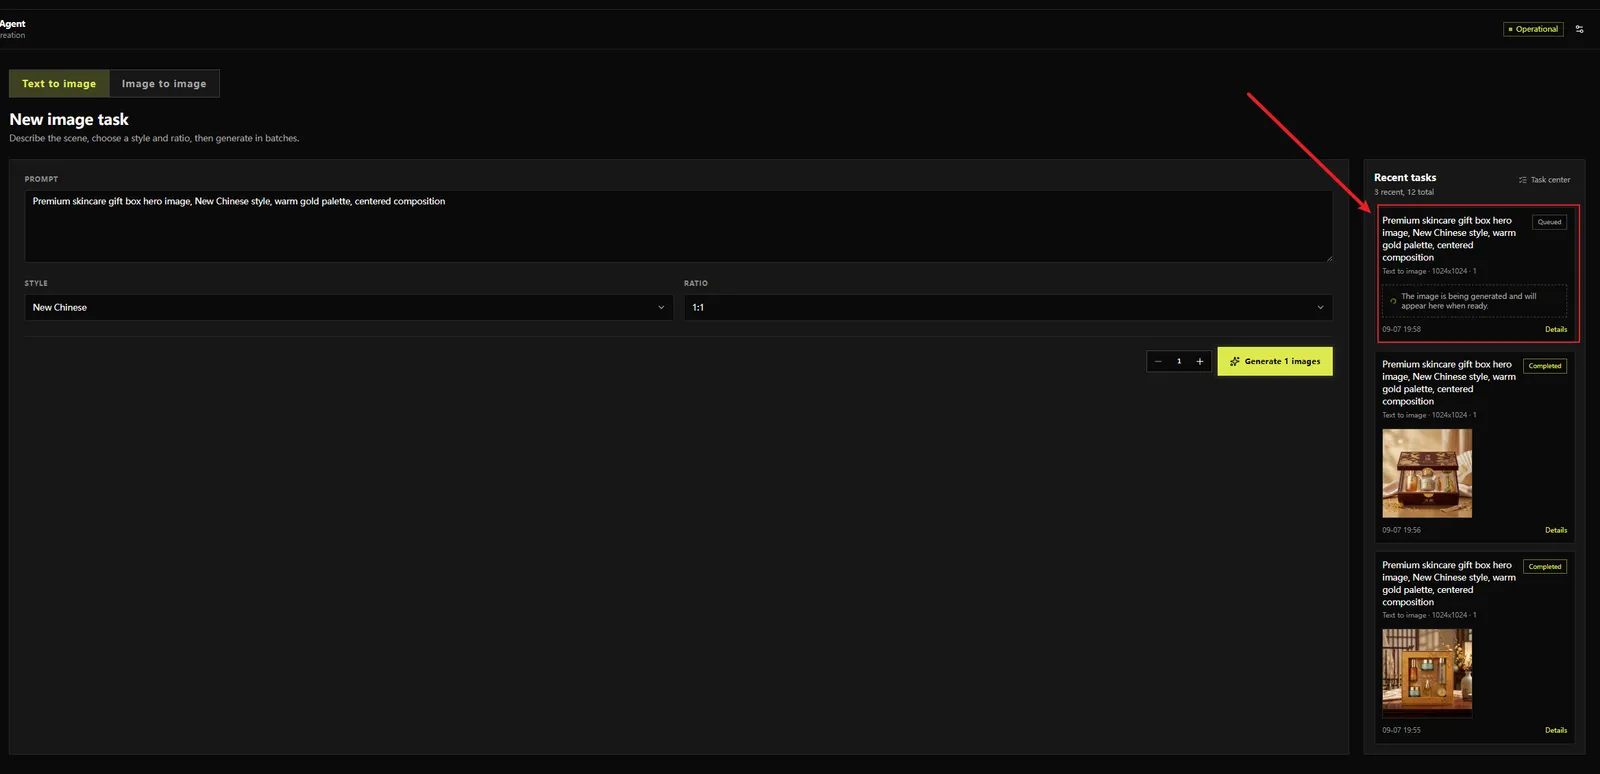
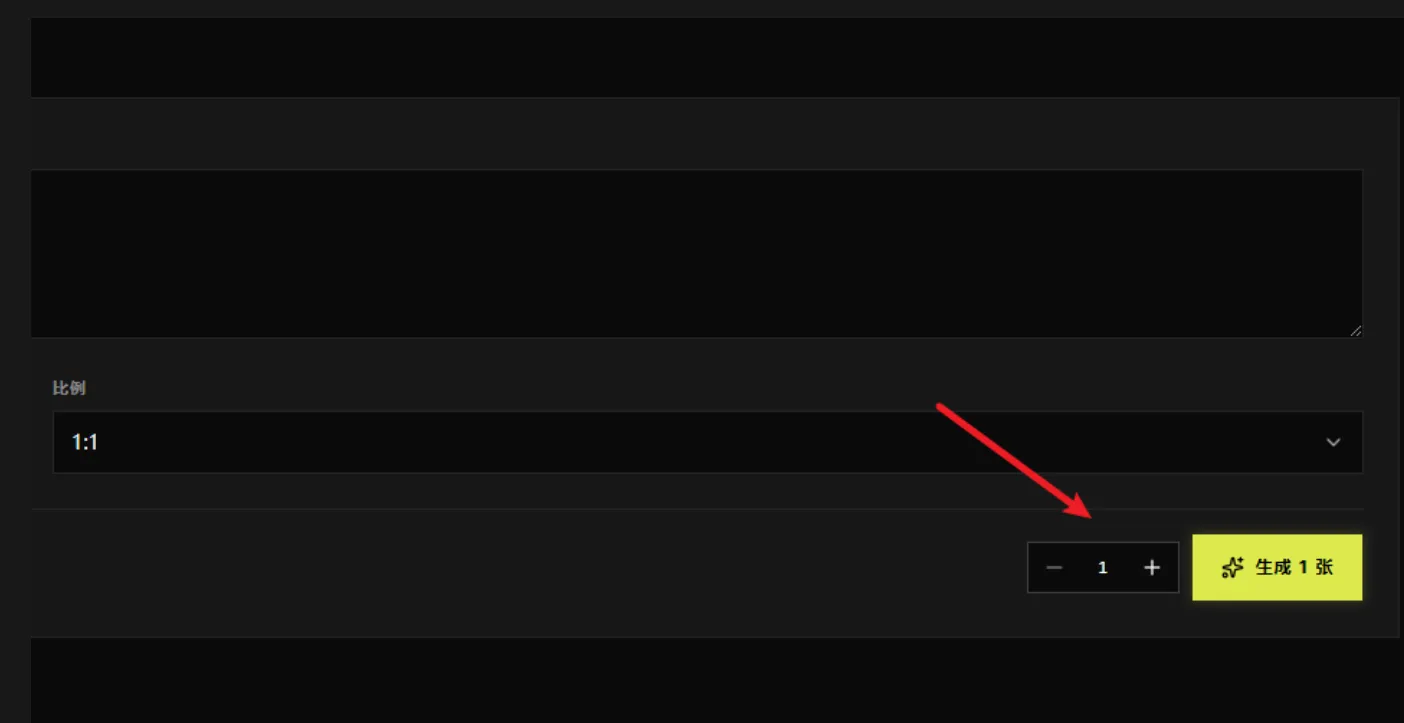
- Select the number of images — adjust with −/+; the estimated Token cost appears at the bottom-left. Click Generate N images to submit; results appear in the Recent Tasks panel on the right.
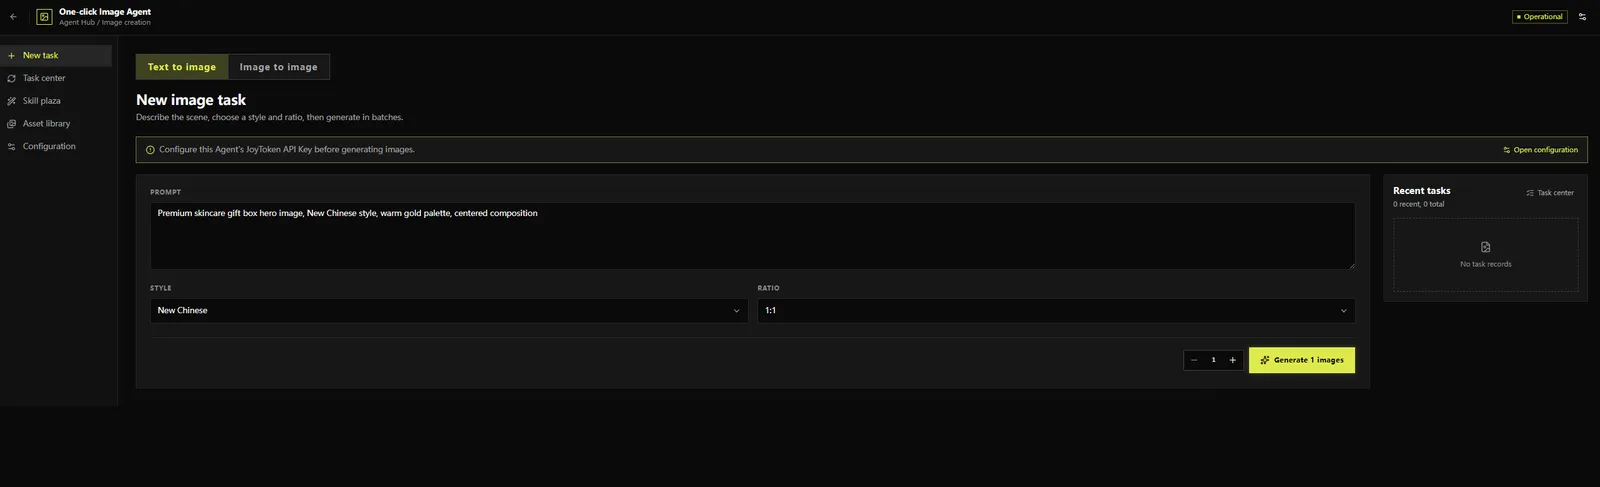
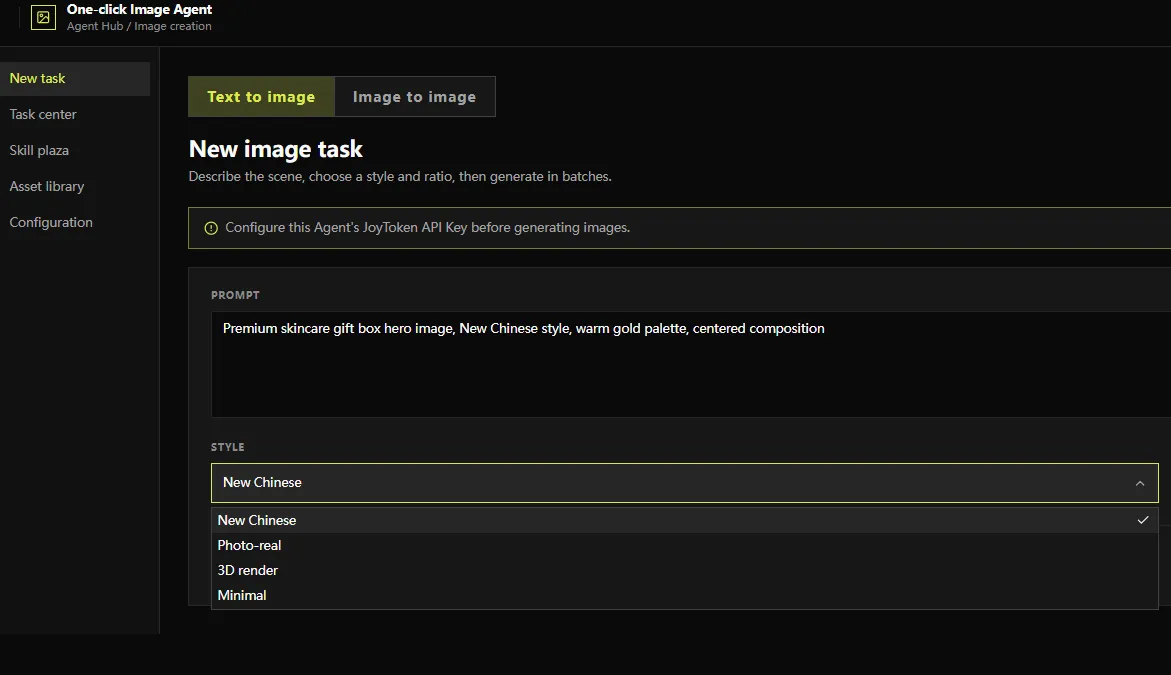
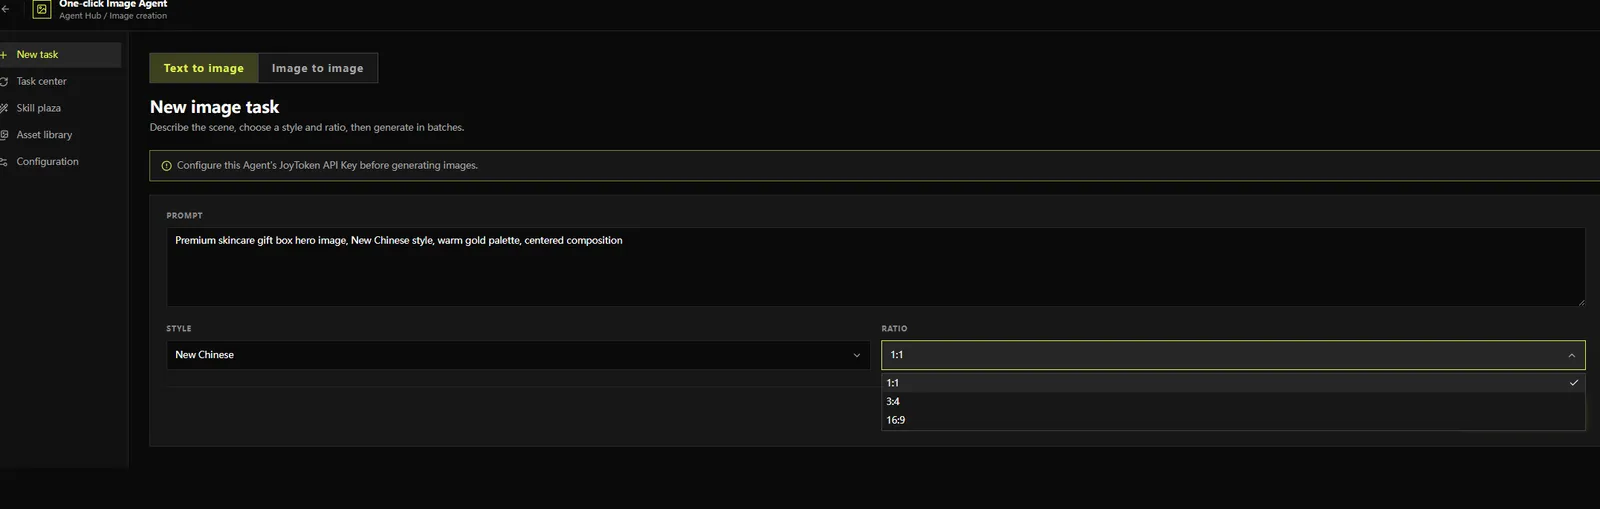
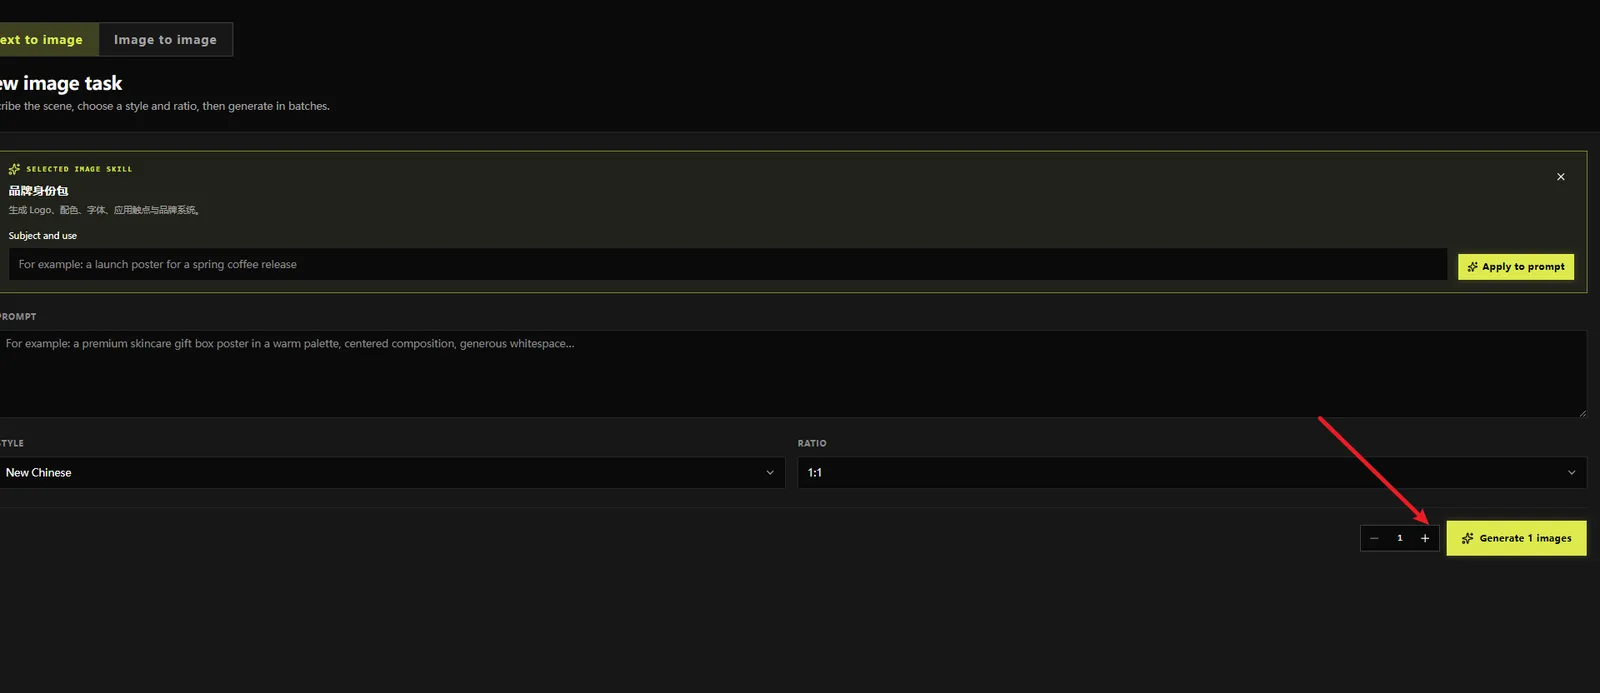
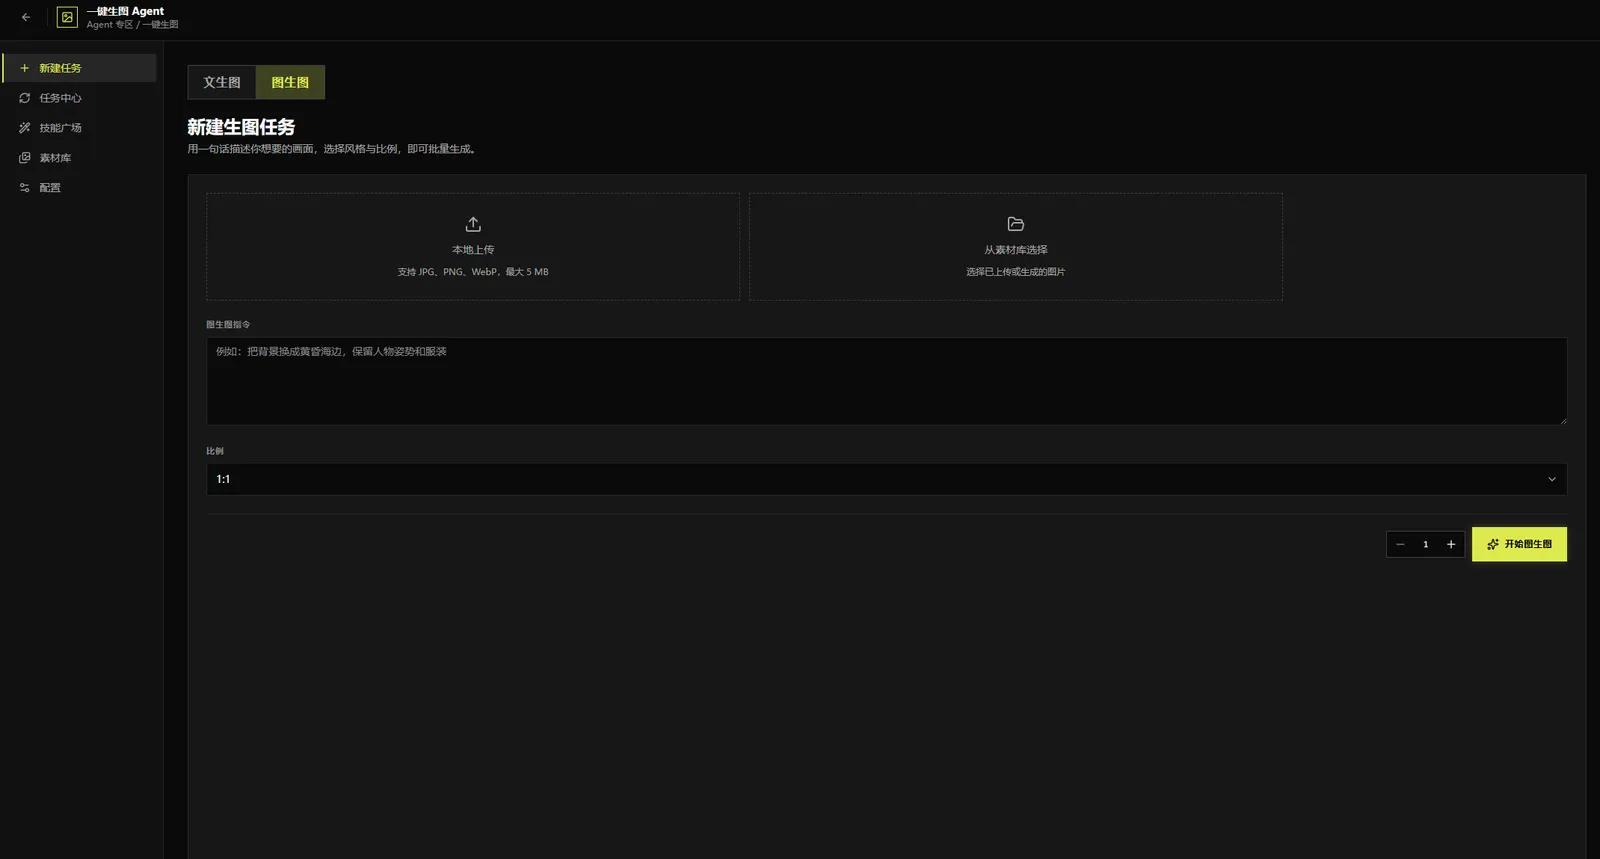
Image-to-Image: create with AI from an existing image. Switch to the Image-to-Image tab, then:
- Upload a reference image (choose one): upload from local (JPG, PNG, WebP; up to 5 MB each) or select from the Material Library.
- Enter your instruction, e.g., “Change the background to a beach at dusk, keep the pose and outfit.”
- Select the output ratio (default 1:1).
- Set the batch count with −/+ (default 1 image).
- Click Start Image-to-Image; the system generates results in batch, and you can track progress and outputs in the Task Center.
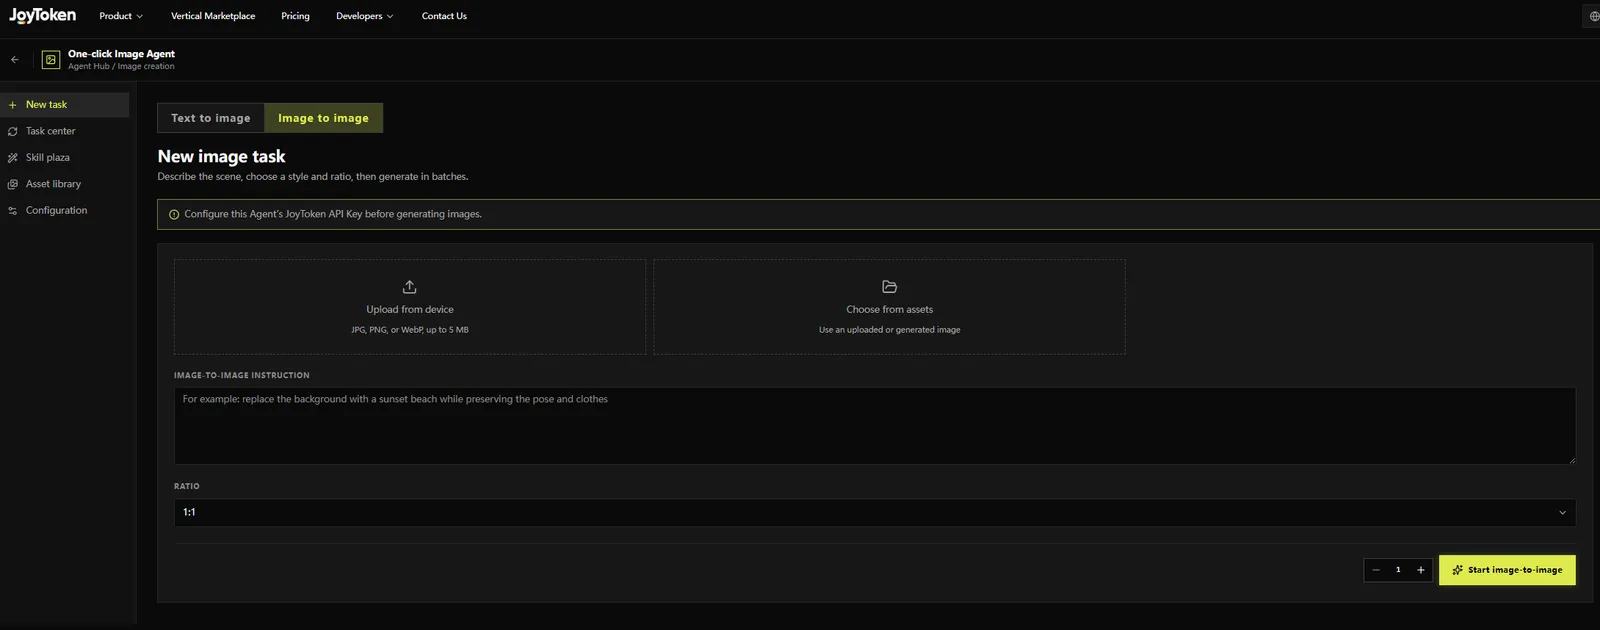
Step 2: Track progress and view results
After generating, check progress in the Recent Tasks panel on the right, or open the Task Center menu.
Task Center
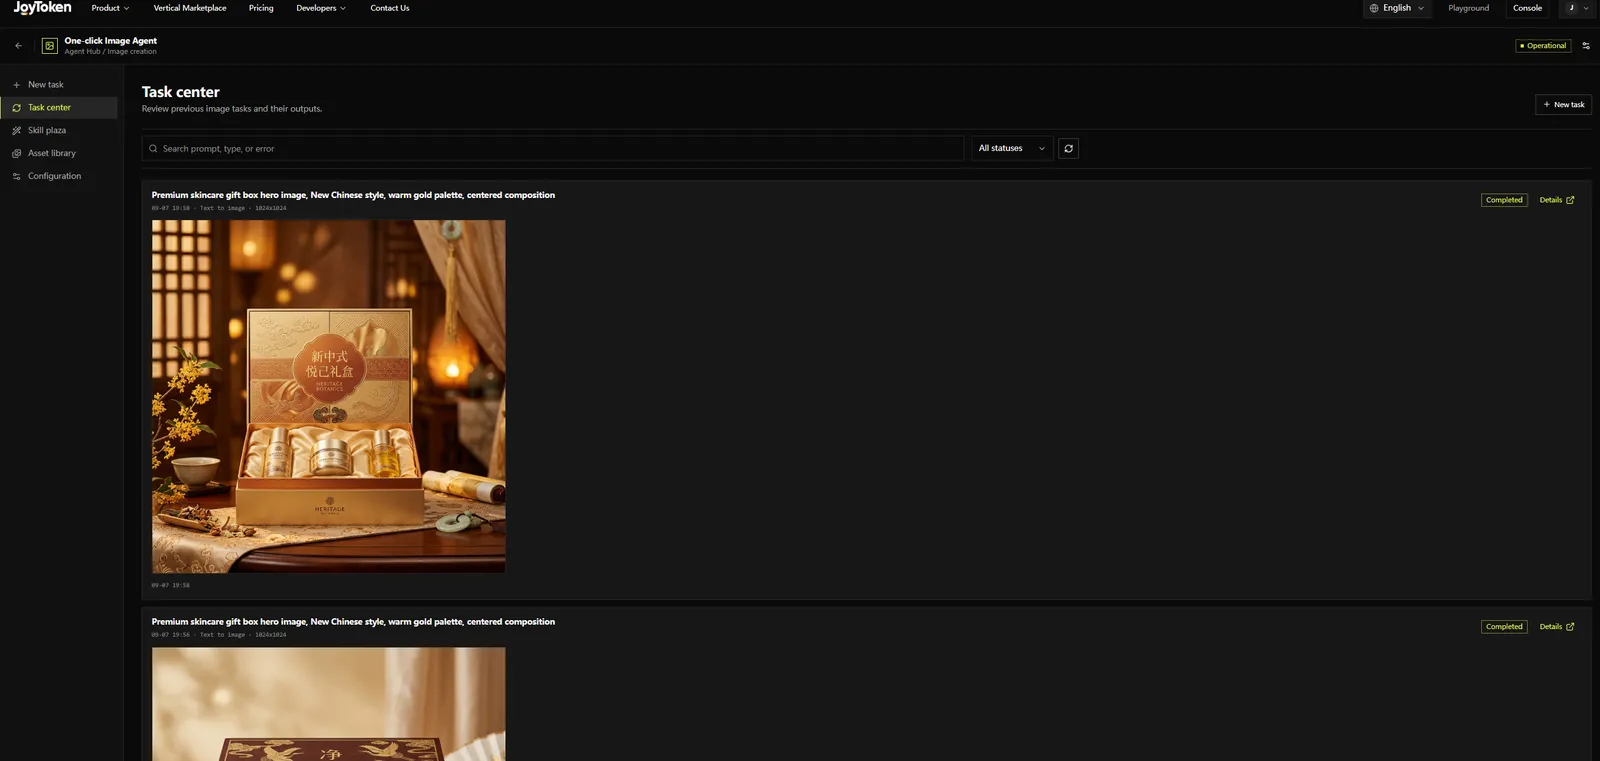
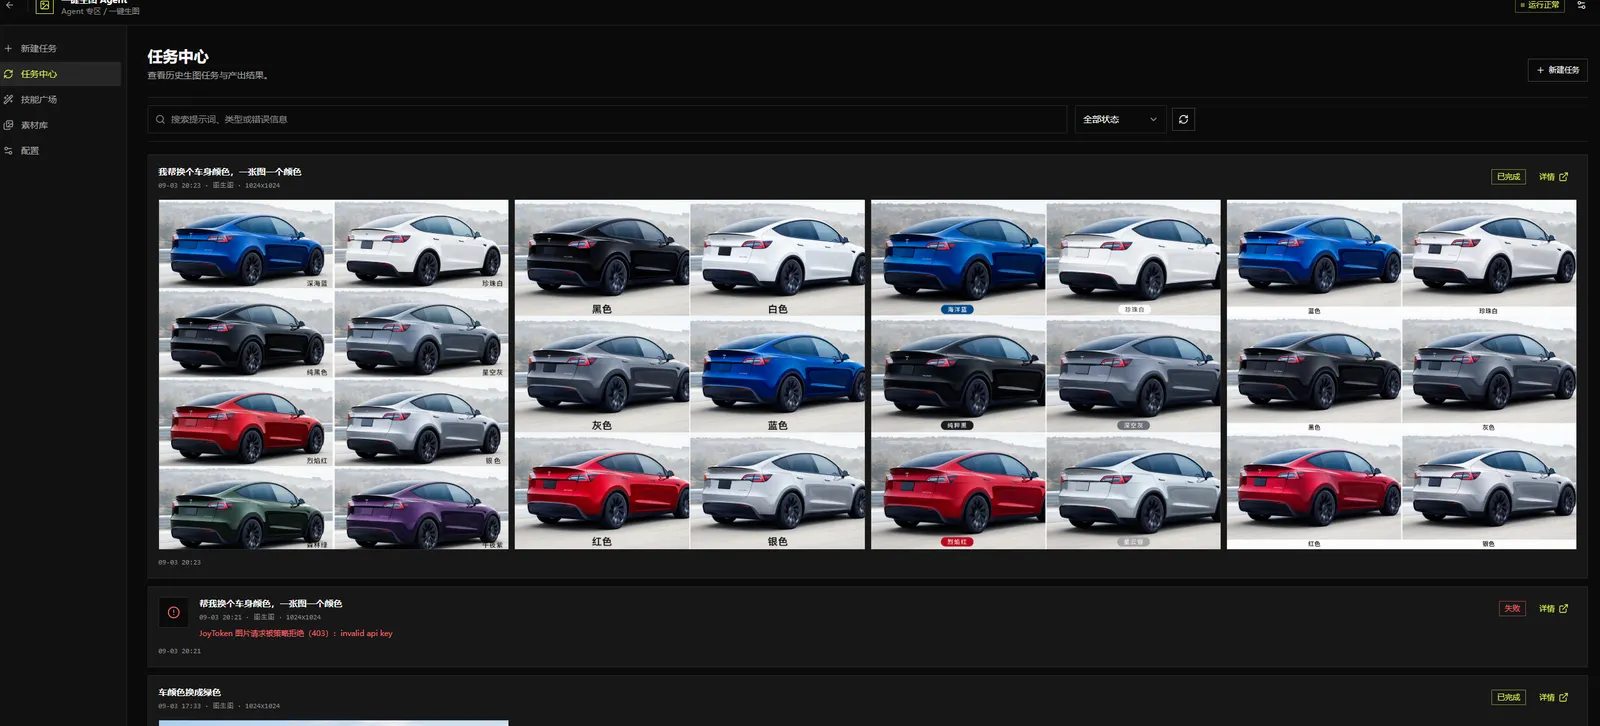
The Task Center reviews historical generation tasks and their outputs, centrally managing all Text-to-Image / Image-to-Image tasks. It shows task status, generation time, image size, and output images, and supports search, status filtering, and refresh.
Interface:
- Search bar: search history by prompt, type, or error message.
- Status filter: the top-right dropdown filters by “All statuses” and more (e.g., Completed, Failed).
- Refresh button: manually refresh the latest status of the task list.
- New Task: a top-right shortcut that jumps to creating a new generation task.
- Task cards: each task shows the prompt, generation time, type, size (e.g., 1024×1024), a status tag, and thumbnails of the outputs; Details on the right opens the full result.
Statuses: Completed (green) means success and shows the batch of result images; Failed (red) means the task did not succeed and displays the error reason.
Task Details
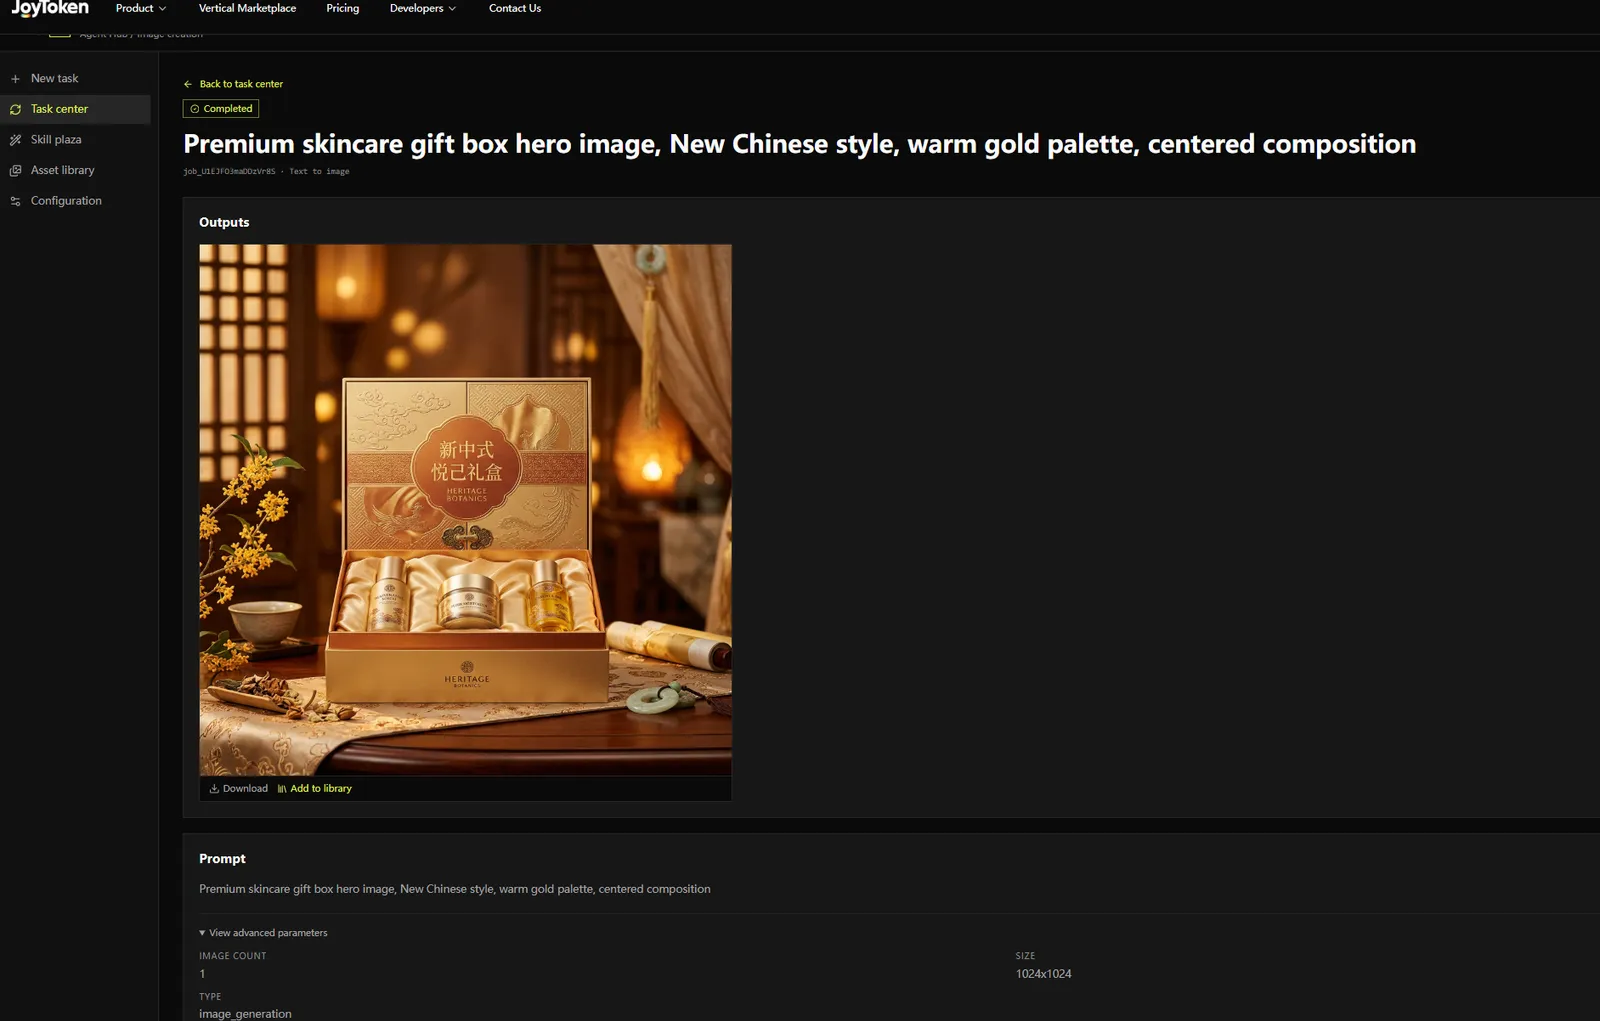
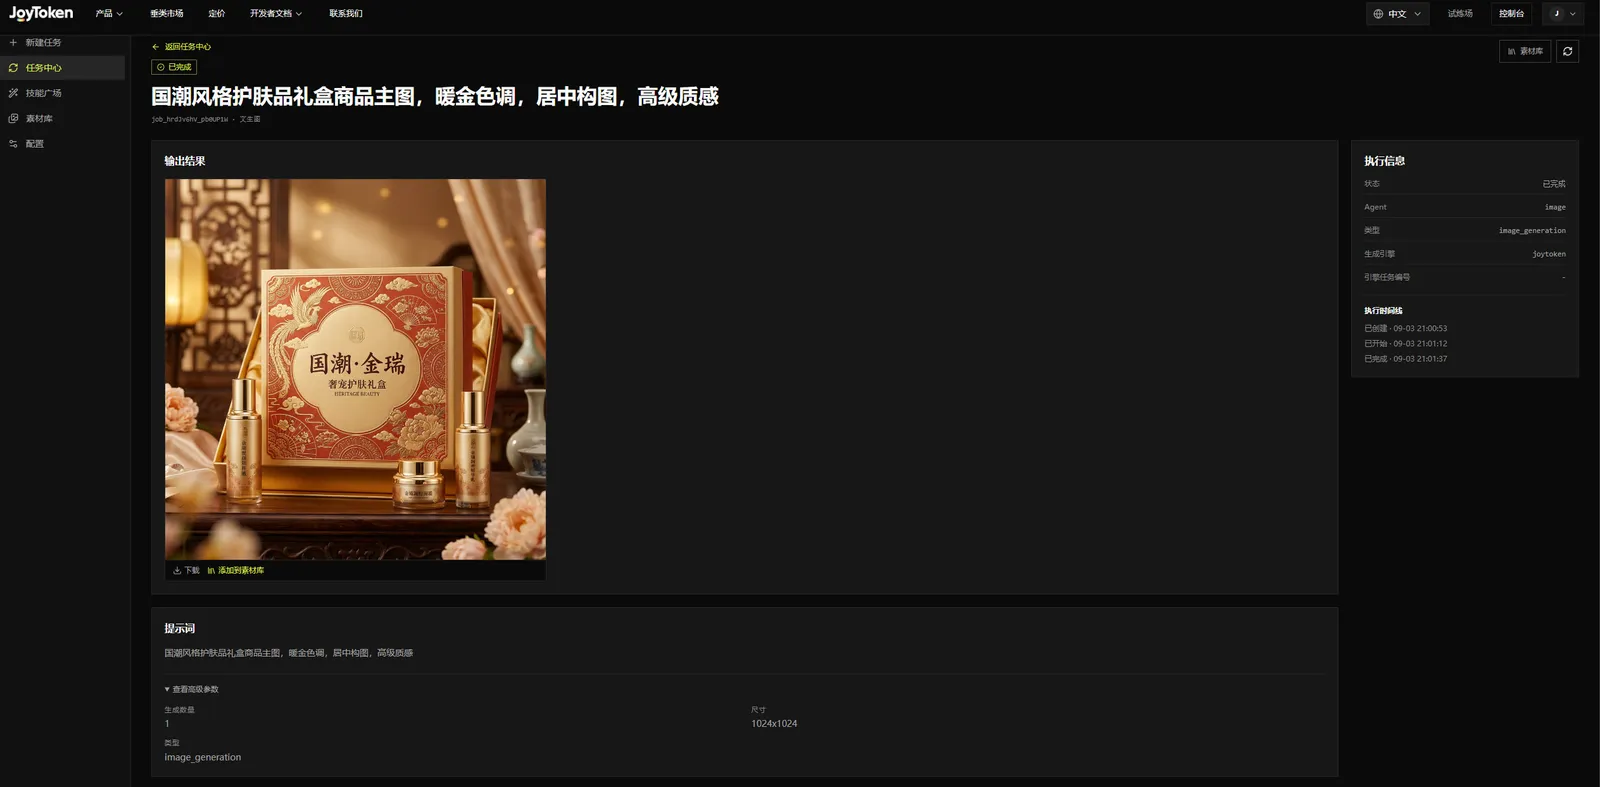
The Task Details page shows the full information of a single generation task — output results, prompt, execution info, and advanced parameters — for viewing generated images, downloading/saving or reusing assets, and tracing the execution process.
Sections:
- Output results: the finished images, each with Download (save locally) and Add to Material Library (for later reuse).
- Execution info (right panel): status, Agent (image), type, generation engine, engine task ID, and the execution timeline (Created / Started / Completed timestamps).
- Prompt: the full prompt text used for this generation.
- View advanced parameters: expand to see the count, size, type, and other detailed settings.
Material Library
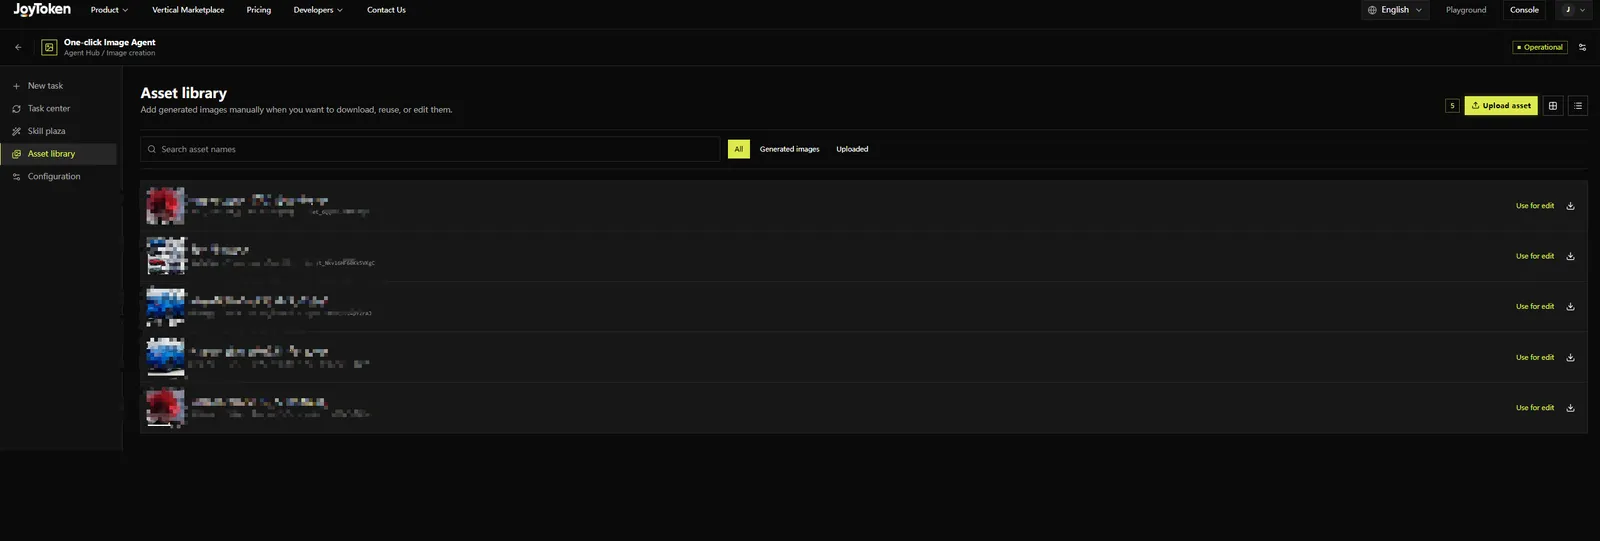
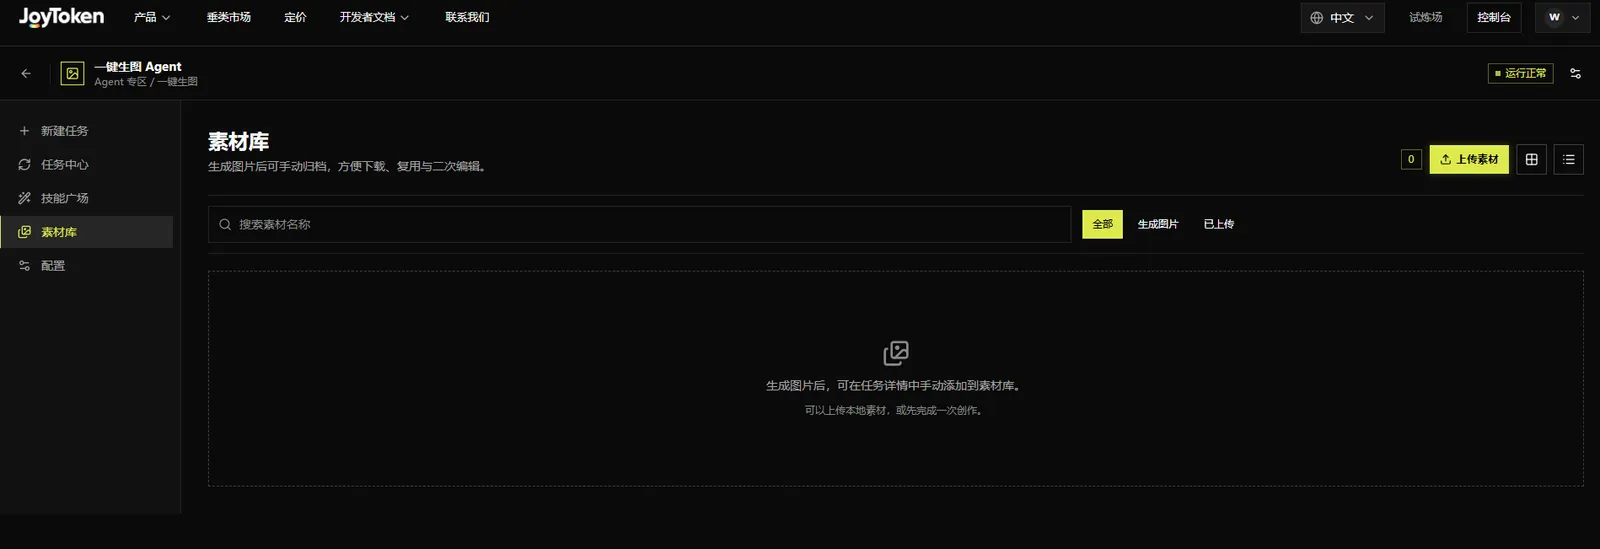
The Material Library archives and manages image assets in one place. After generating images you can manually archive them here for easy download, reuse, and re-editing (e.g., as a reference image for Image-to-Image); uploading local assets is also supported.
Interface: a search bar (search by name), category filter (All / Generated / Uploaded), an Upload button, an asset count, and a grid/list view toggle.
Sources: Generated (results archived via “Add to Material Library” on the Task Details page); Uploaded (local images added via the Upload button).
Skill Plaza
Overview
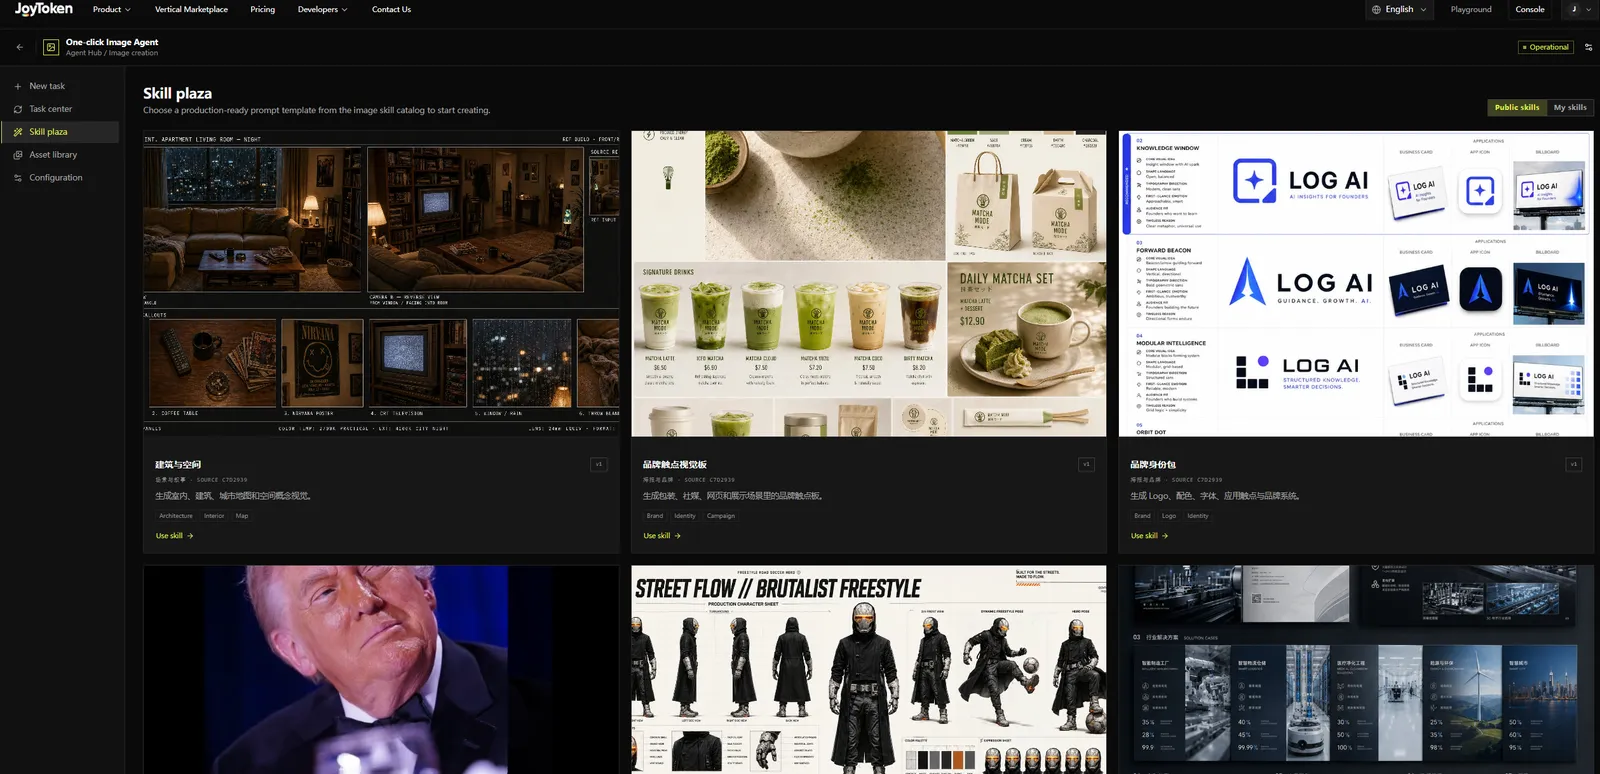
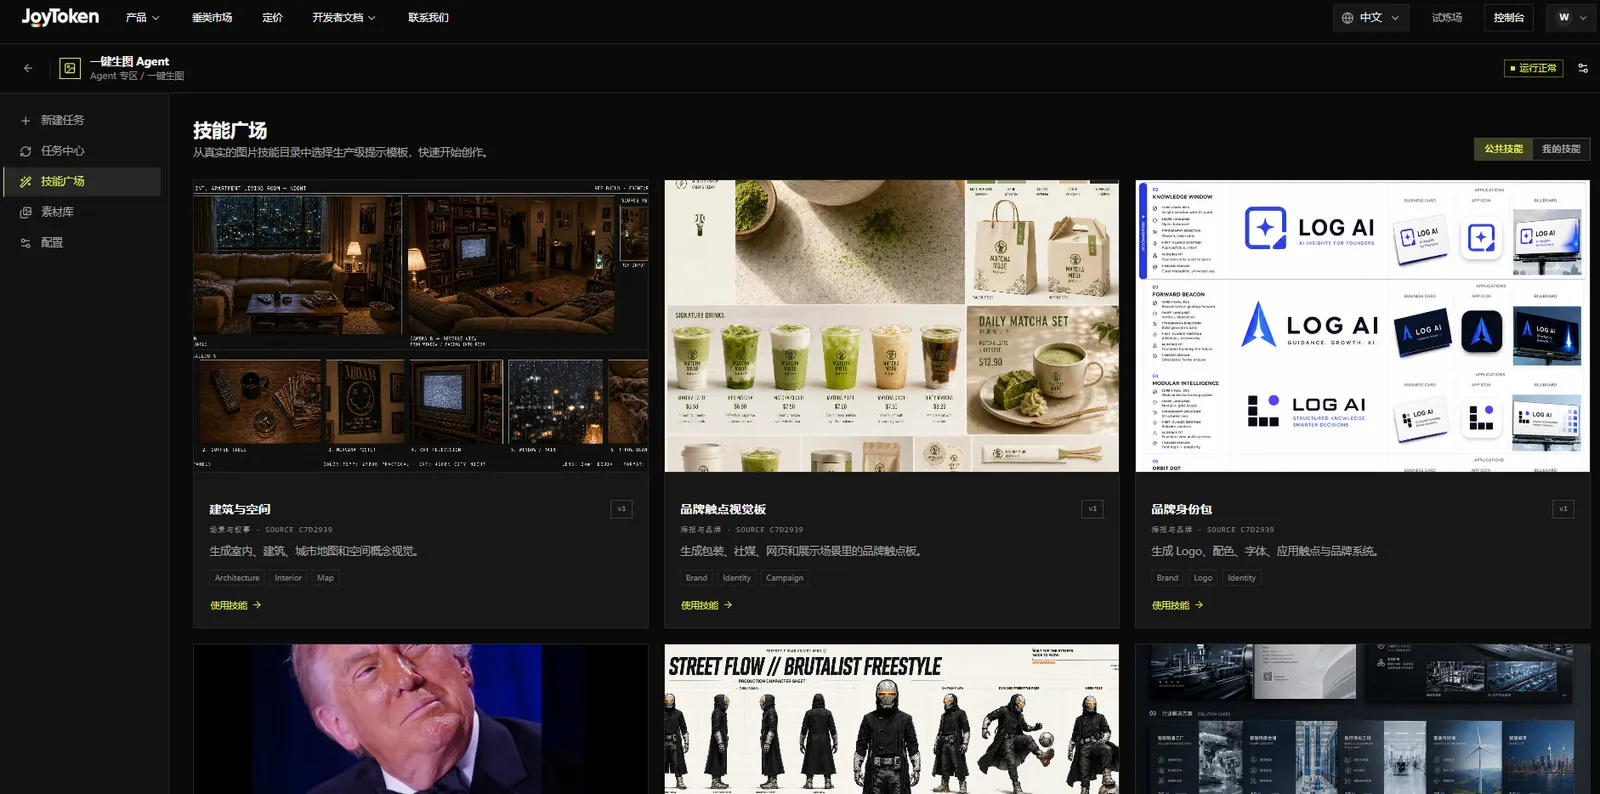
The Skill Plaza is the core entry point of the Text-to-Image Agent, providing production-ready image prompt templates (skills). Pick a template from the real image-skill catalog and start creating quickly.
Public Skills
Preset templates are shown as cards, each with: a preview image, name, category source (SOURCE ID), version (v1), description, tags, and a Use Skill → button. Example templates:
- Architecture & Space: generate interior, architecture, city-map, and spatial-concept visuals (tags Architecture / Interior / Map)
- Brand Touchpoint Moodboard: generate brand touchpoint boards for packaging, social, web, and display scenes (tags Brand / Identity / Campaign)
- Brand Identity Kit: generate logos, color palettes, typography, application touchpoints, and brand systems (tags Brand / Logo / Identity)
Using a Skill
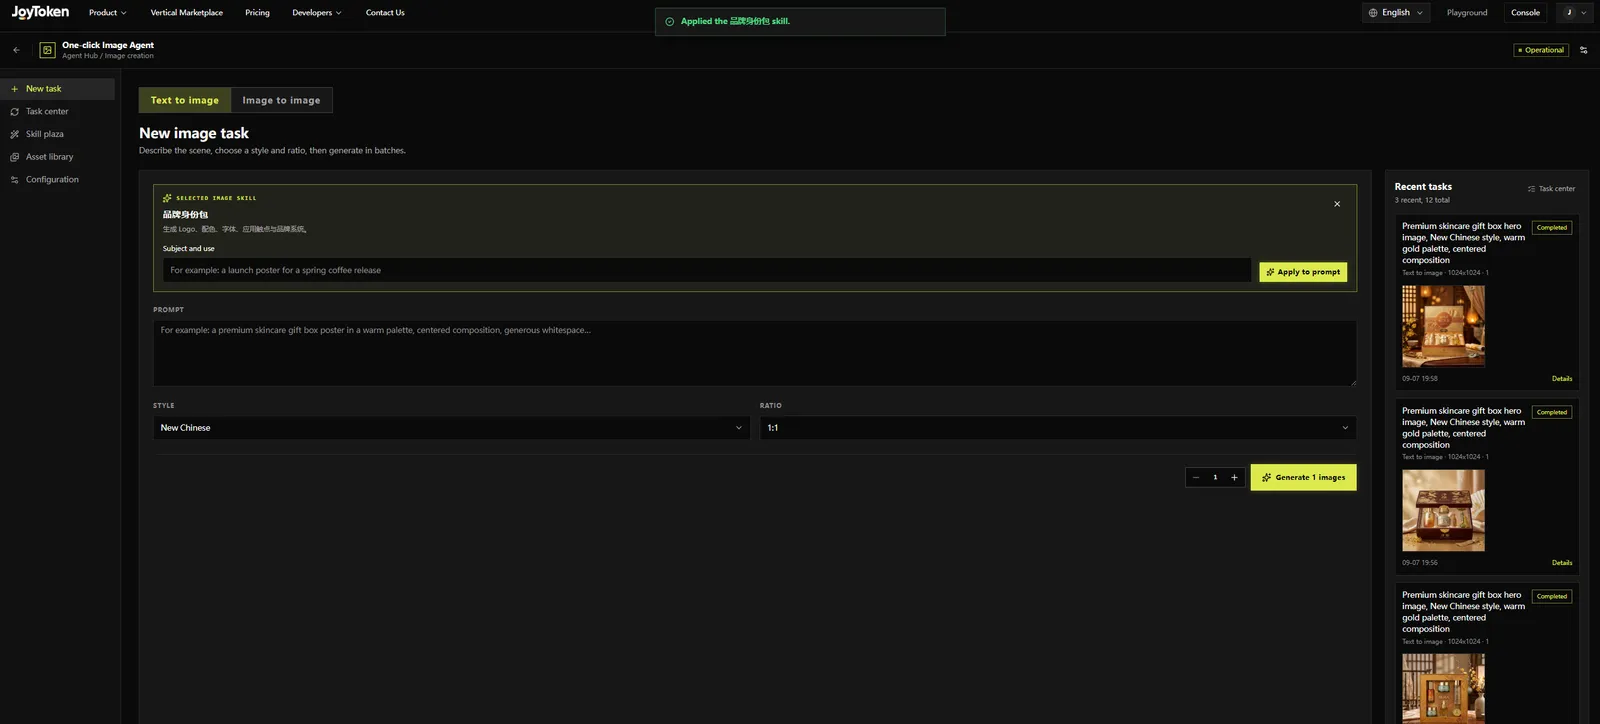
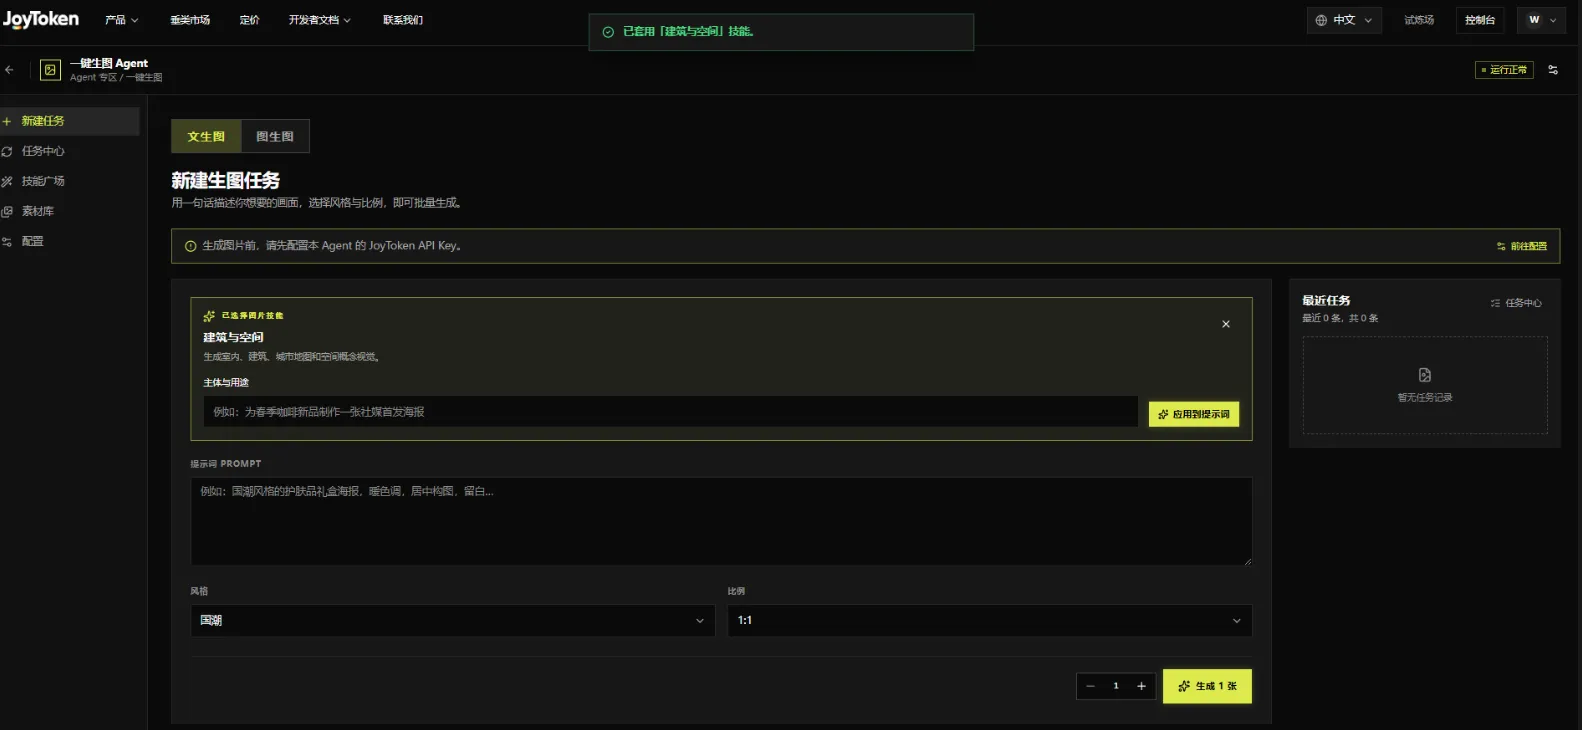
After clicking Use Skill → in the Skill Plaza, the page jumps to New Task - New Image Task, with a note at the top: “Applied the ‘Architecture & Space’ skill.”
Selected image-skill area (using the selected “Architecture & Space” as an example):
- Shows the skill name and description
- A subject & purpose input box (e.g., “Create a social-media launch poster for a new spring coffee product”)
- Apply to prompt button: combines the subject/purpose with the skill template and fills the prompt
- The × in the top-right cancels the selected skill
The remaining steps follow the same Text-to-Image Agent flow.
My Skills
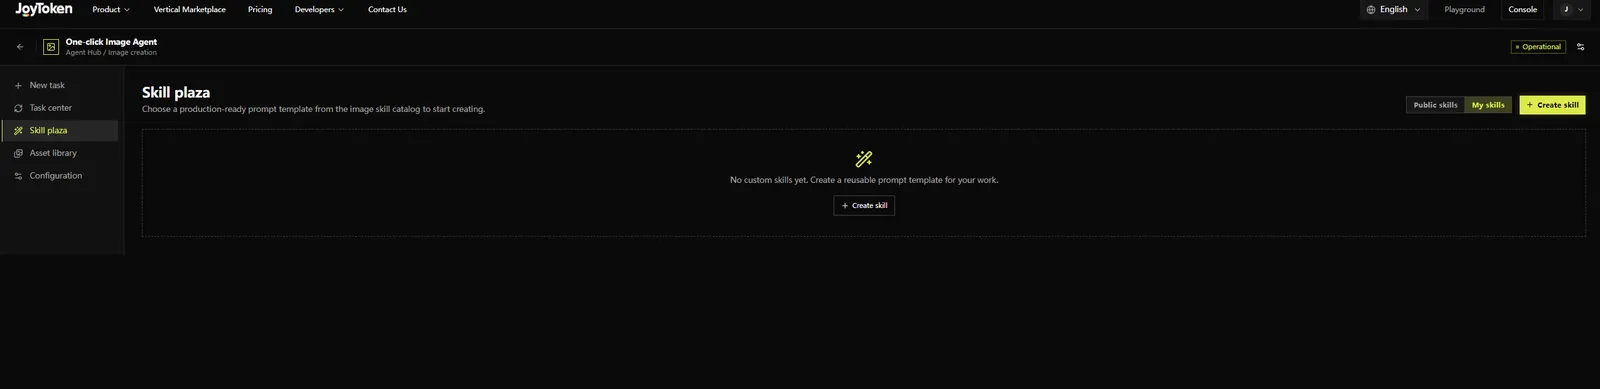
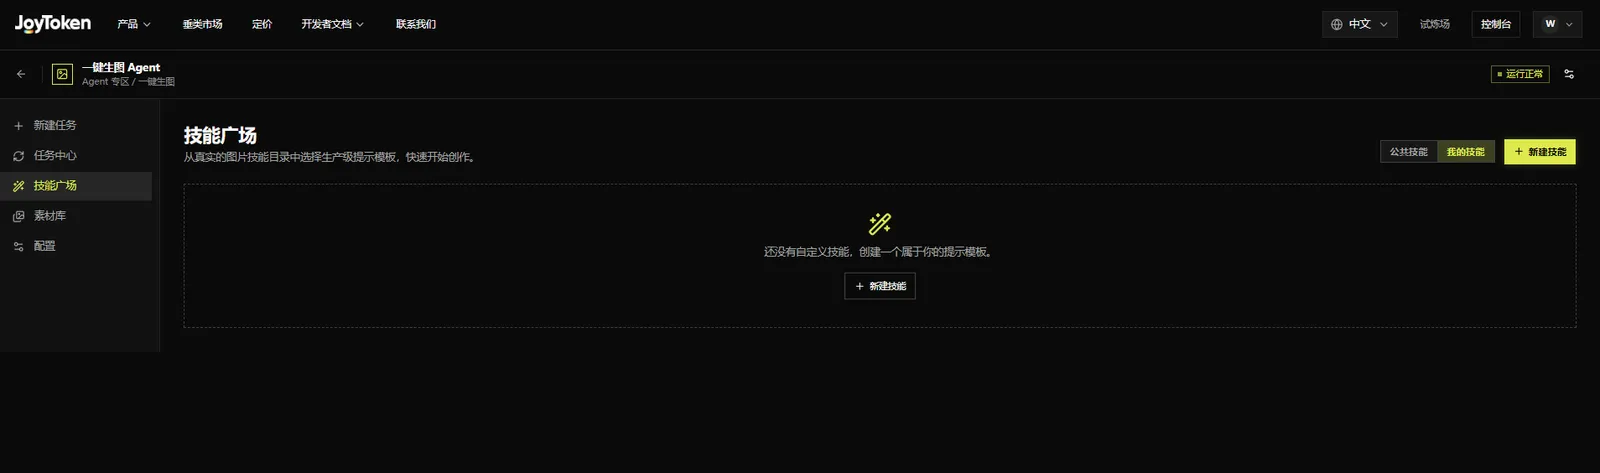
Shows user-created templates; when empty it prompts “You don’t have any custom skills yet,” and you can click + New Skill to create one.
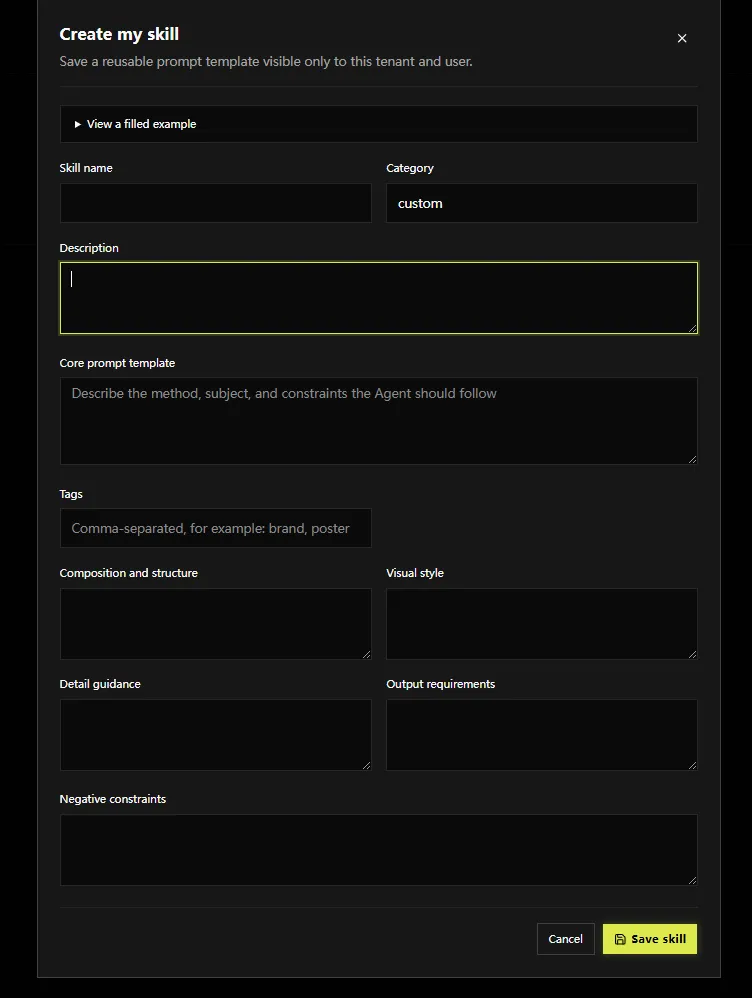
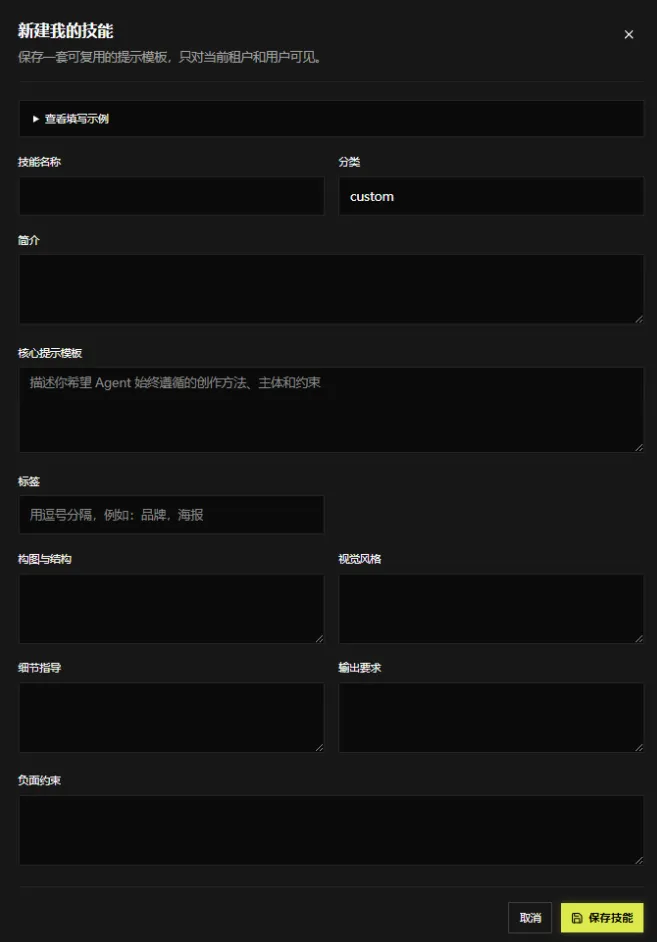
Clicking + New Skill under My Skills opens this dialog, used to save a reusable prompt template. The skill is visible only to the current tenant and user. A ▶ View filling example toggle at the top expands a reference example.
Field descriptions
- Skill name: the name of your custom skill
- Category: the skill’s category, default: custom
- Description: a brief note on what the skill is for
- Core prompt template: describe the approach, subject, and constraints you always want the Agent to follow (the core required content)
- Tags: comma-separated, e.g., “brand, poster,” for easier searching and categorization
- Composition & structure: constraints on composition and structure
- Visual style: overall visual-style requirements
- Detail guidance: guidance at the image-detail level
- Output requirements: output-spec requirements for the results
- Negative constraints: elements or effects you don’t want (negative prompt)
Buttons
- Save Skill: save and create a custom skill, shown in the My Skills list
- Cancel: discard input and close the dialog
- × (top-right): close the dialog
Steps
- Click + New Skill under My Skills to open the dialog
- (Optional) Click View filling example for the format
- Fill in the skill name, category, and description
- Enter the approach, subject, and constraints in Core prompt template
- Add tags, composition & structure, visual style, detail guidance, output requirements, and negative constraints as needed
- Click Save Skill to finish; you can then apply it when creating a new task
AIGC: Video Studio
Step 1: Start a quick creation
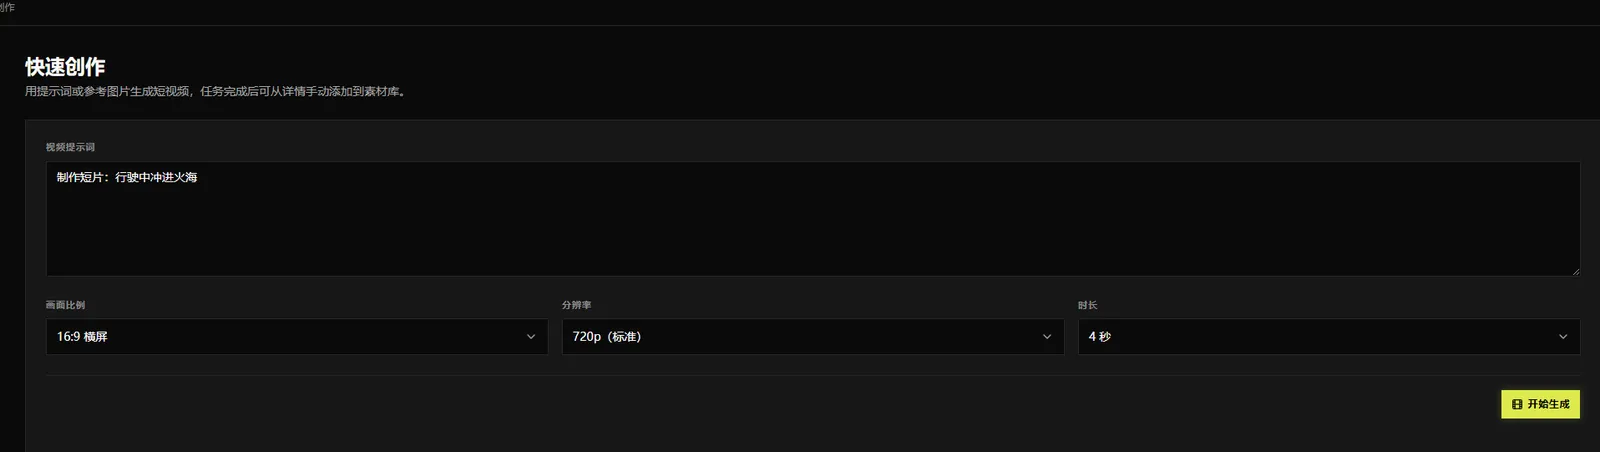
Quick Creation generates a short video from a text prompt. It is suited to testing an idea before deciding whether to refine it. Submitted tasks enter the generation queue. When complete, you can preview the video in Task Details and manually add it to the Material Library.
Interface:
- Video prompt: Describe the scene, subject, actions, and camera style. A more specific prompt generally brings the result closer to your intention.
- Aspect ratio: Choose 16:9 landscape for websites, large screens, or horizontal placements, or 9:16 portrait for mobile shorts and vertical feeds.
- Resolution: Choose 720p (Standard), 768p (Advanced), or 1080p (HD). Higher resolution offers more detail but takes longer and costs more.
- Duration: Choose 4, 6, 8, or 10 seconds. Longer videos take more time and cost more.
- Start Generation: Submit a video generation task using the current prompt and settings; check its progress and result in Task Details.
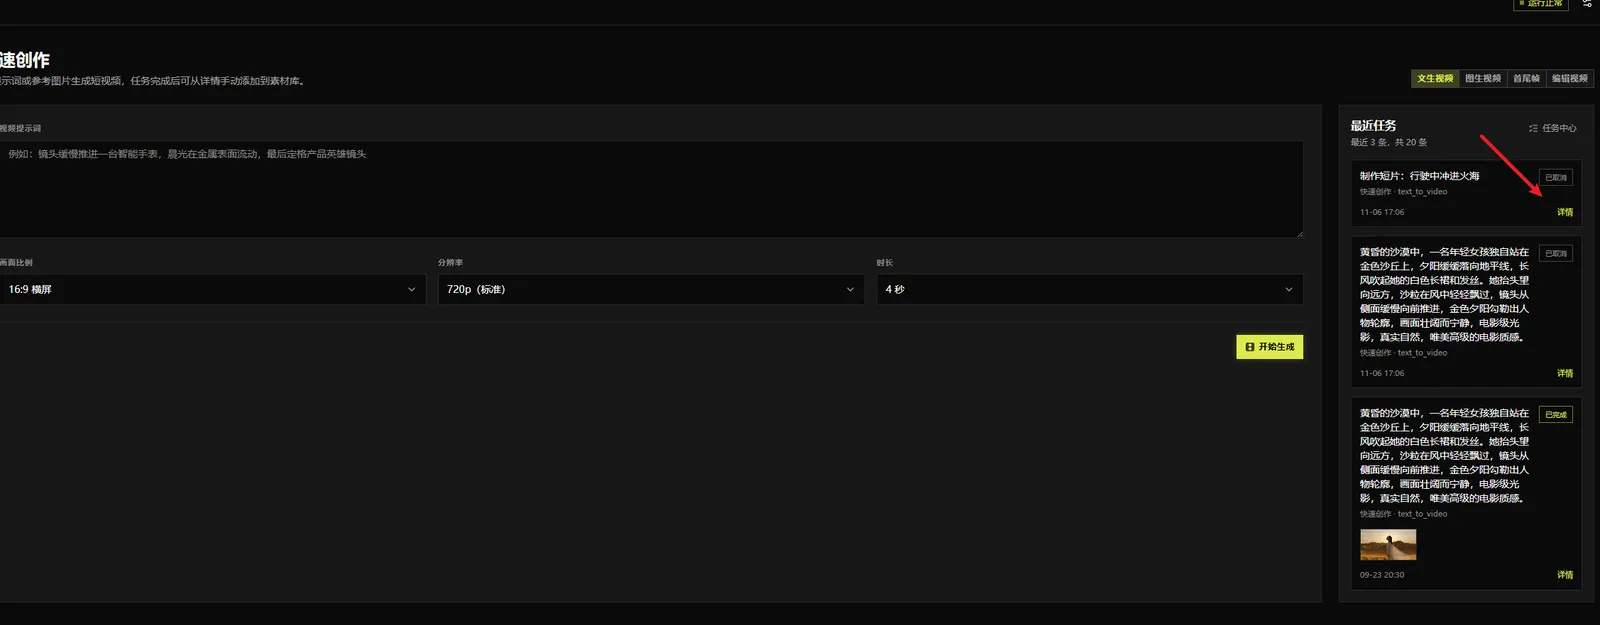
Completed tasks are not automatically added to the Material Library; add them manually from Task Details.
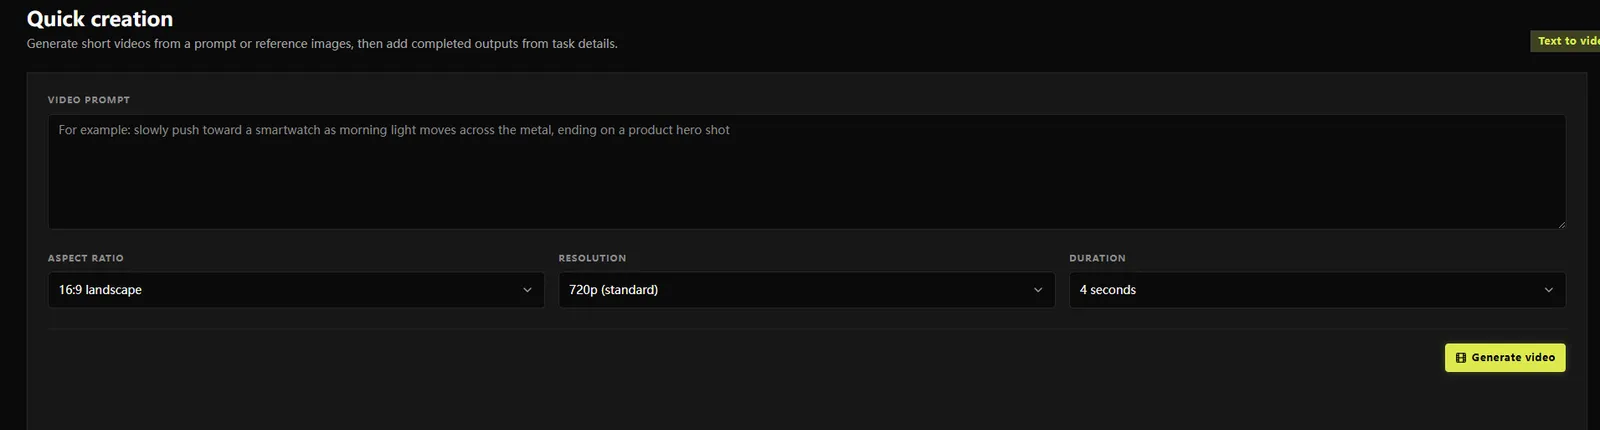
Step 2: Track progress and view results
After submitting, check generation progress under Recent Tasks on the right, or open Task Center from the menu.
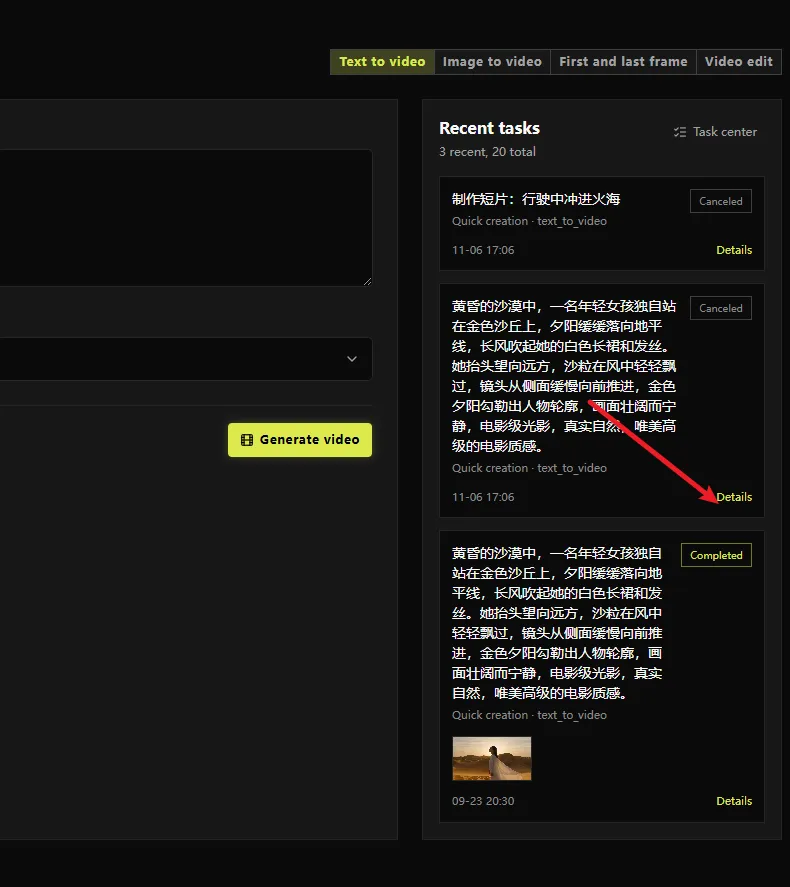
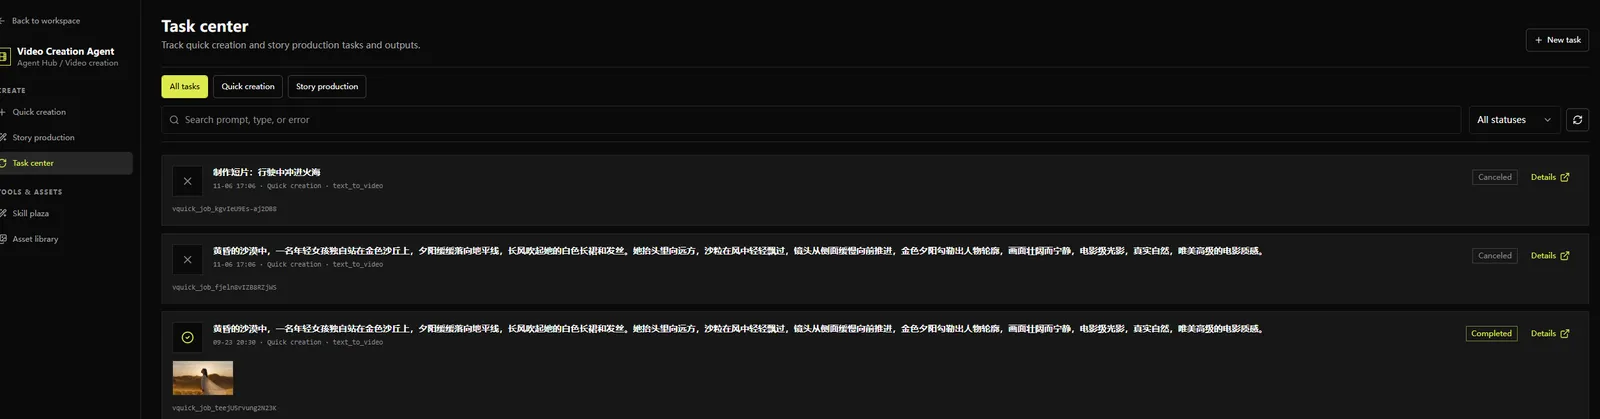
Task Center
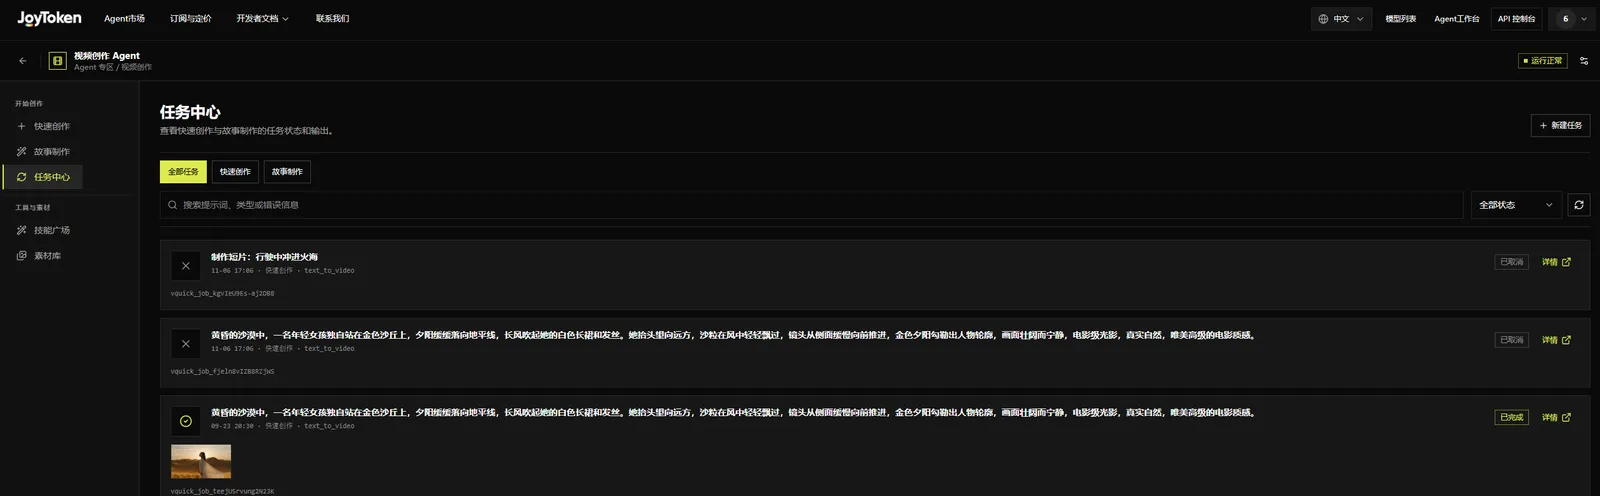
Task Center lists all tasks created through Quick Creation and Story Creation. You can check statuses, search past tasks, and open details to see outputs. The list is ordered newest first.
Interface:
- New Task: Start a new creation task from the top right.
- All Tasks / Quick Creation / Story Creation: Filter tasks by creation type.
- Search: Search prompt text, task type, or error messages.
- All Statuses: Filter for particular statuses, such as Completed or Canceled.
- Refresh: Reload the task list to see the latest status.
- Task entries: Show a prompt summary, submission time, creation method and type (such as text_to_video), and task ID. Completed tasks also show a first-frame thumbnail.
- Status label: Shows statuses such as Completed or Canceled to help determine whether an output is available.
- Details: Open the full prompt, settings, and output, and manually add a finished video to the Material Library.
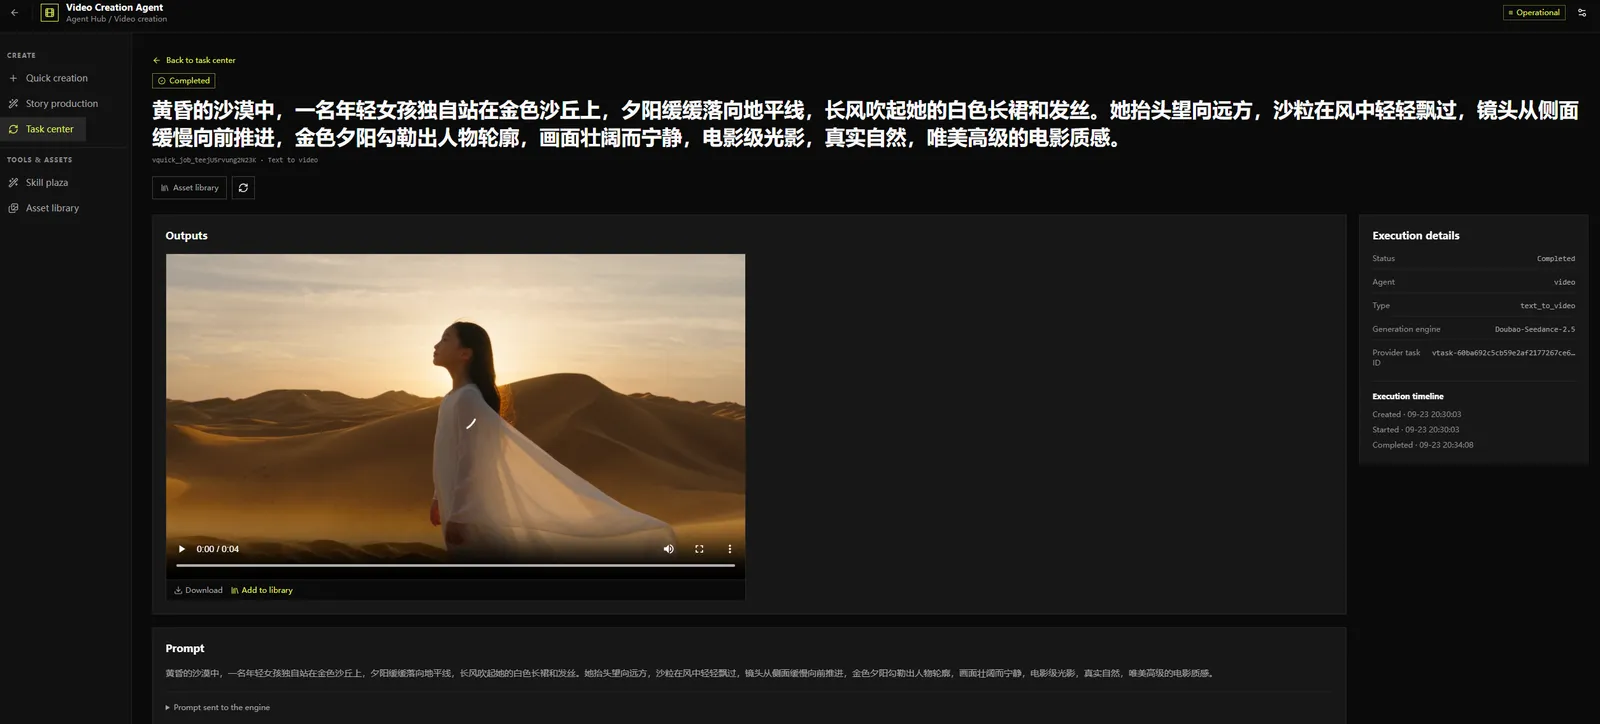
View details
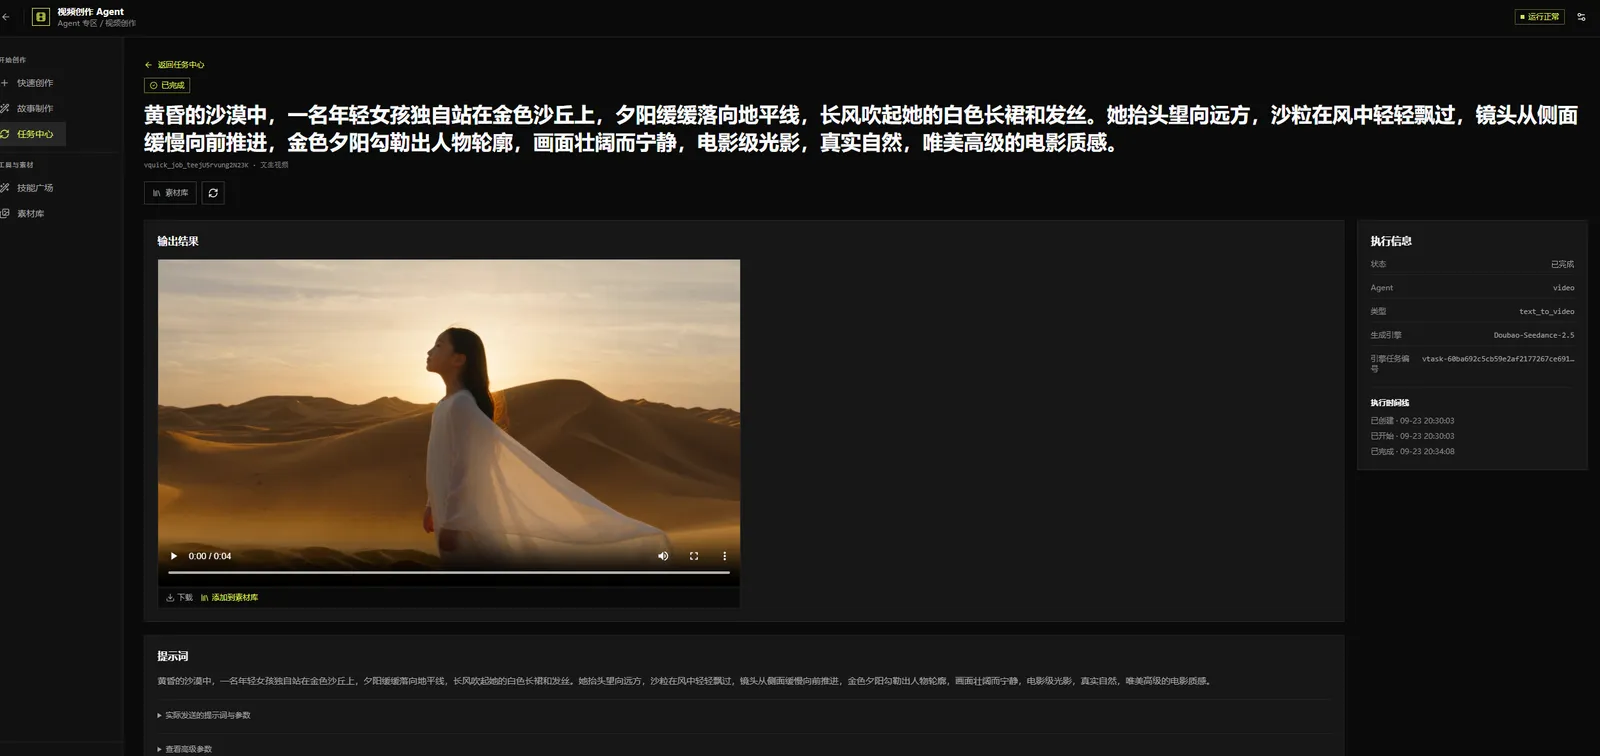
Task Details shows the full information and output for a single creation task, including the original prompt, generated video, engine, and processing time. Use it to review, download, or save a completed video to the Material Library.
Interface:
- Back to Task Center: Return to the list to inspect or filter other tasks.
- Status label: Displays the current status, including failure if a task fails.
- Prompt heading: Shows the full prompt prominently so you can check the creative brief.
- Task ID and type: Displayed beneath the heading (for example, Text-to-Video) for troubleshooting and reconciliation.
- Material Library: Save this task’s completed video for reuse.
- Refresh: Fetch the latest status and result.
- Output: Play the generated video, change volume, or view it full screen.
- Download: Save the video locally.
- Add to Material Library: Save the video for later creations.
- Execution information: The right panel lists status, Agent, type, engine, and engine task ID to identify the model and source task.
- Execution timeline: Records creation, start, and completion times for checking generation duration.
- Prompt: Displays the full prompt as text for copying or editing before another run.
- Prompt and parameters actually sent: Expand to inspect what was sent to the model if the submitted values seem different from those shown in the UI.
- Advanced parameters: Expand to see all advanced settings for this task.
Material Library
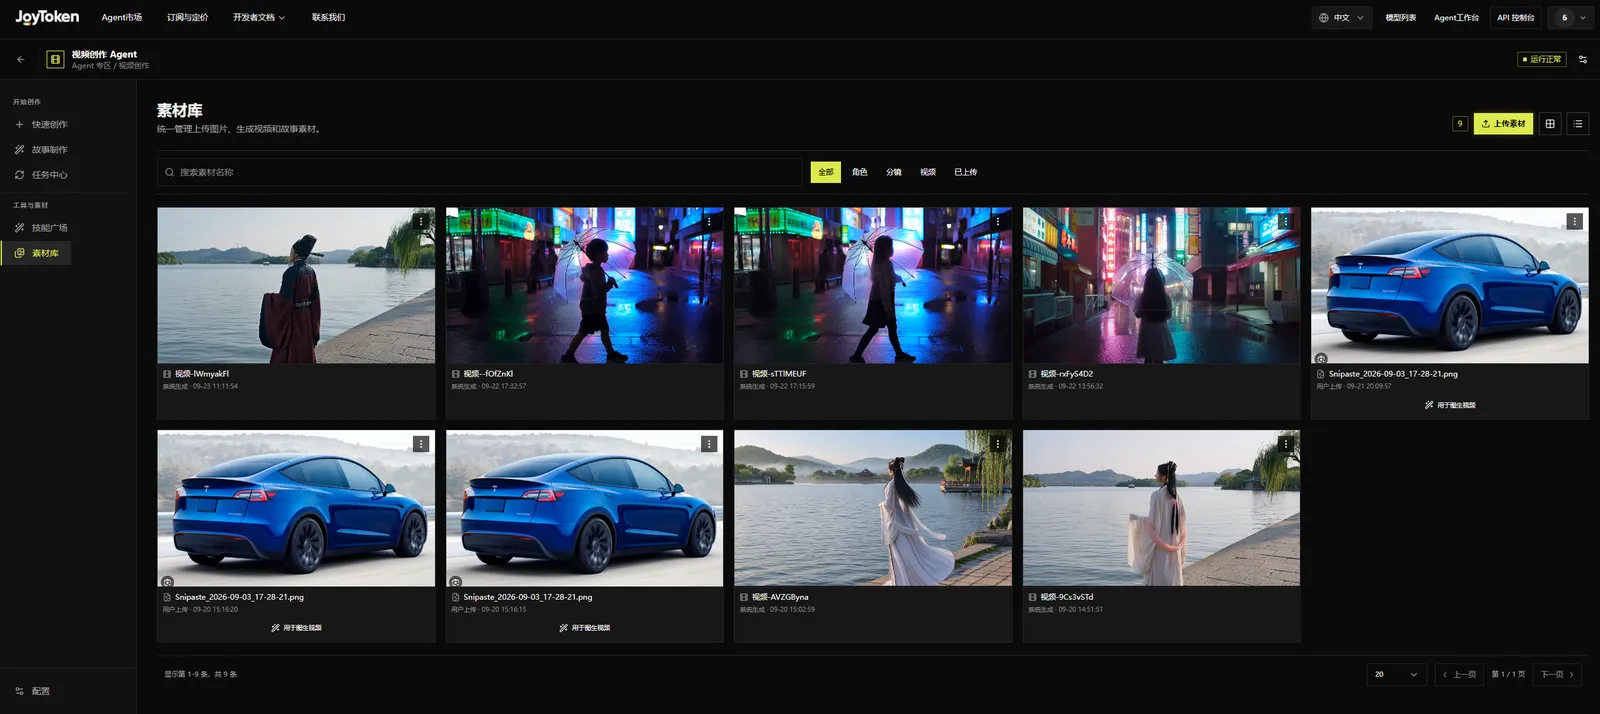
The Material Library manages images, videos, and story assets used in creation. It includes both uploaded reference images and videos generated and saved from tasks. An uploaded image can serve as a reference for image-to-video creation.
Interface:
- Upload Asset: Upload local images or videos from the top right.
- Asset count: Shows the total number of assets.
- View toggle: Switch between grid and list views.
- Search asset name: Find assets by name.
- All / Characters / Resolution / Videos / Uploaded: Filter by asset source or type to show all assets, character assets, resolution-related assets, videos, or uploads.
- Asset cards: Show thumbnails, names, sources (such as System Generated or User Uploaded), and timestamps; hover for more actions in the top-right menu.
- Use for Image-to-Video: Start an image-to-video task using an uploaded image as a reference.
- Pagination and page size: Change the number of items per page and browse additional pages.
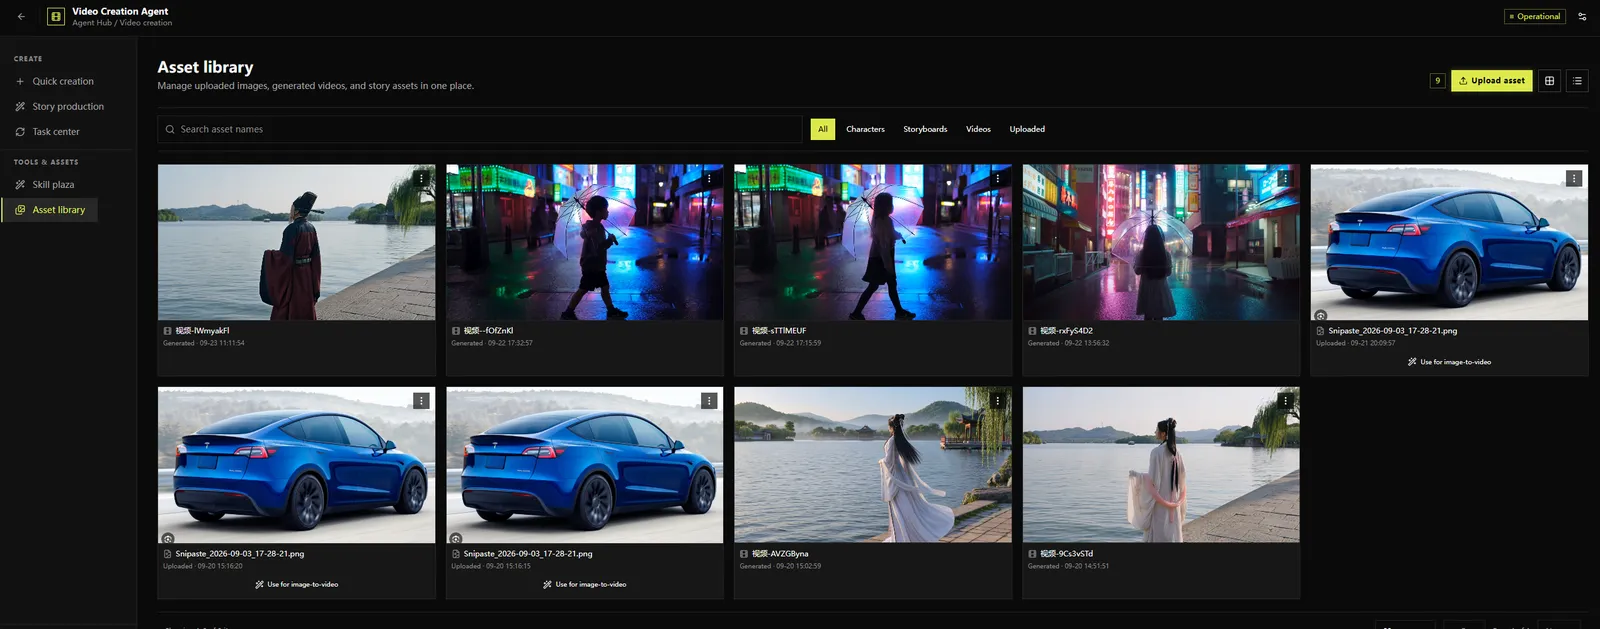
Skill Plaza
Overview
The Skill Plaza provides video creation templates to help you start from an existing creative direction. Browse a skill’s cover, name, summary, and tags, then click Use Skill to create a video.
Interface:
- The left navigation provides Quick Creation, Story Creation, Task Center, Skill Plaza, and Material Library; here Skill Plaza is selected.
- Switch between Public Skills and My Skills at the top right.
- Skill cards show covers, names, summaries, and tags; click Use Skill on a card.
- The Running Normally indicator at the top shows service status, with a settings entry alongside it.
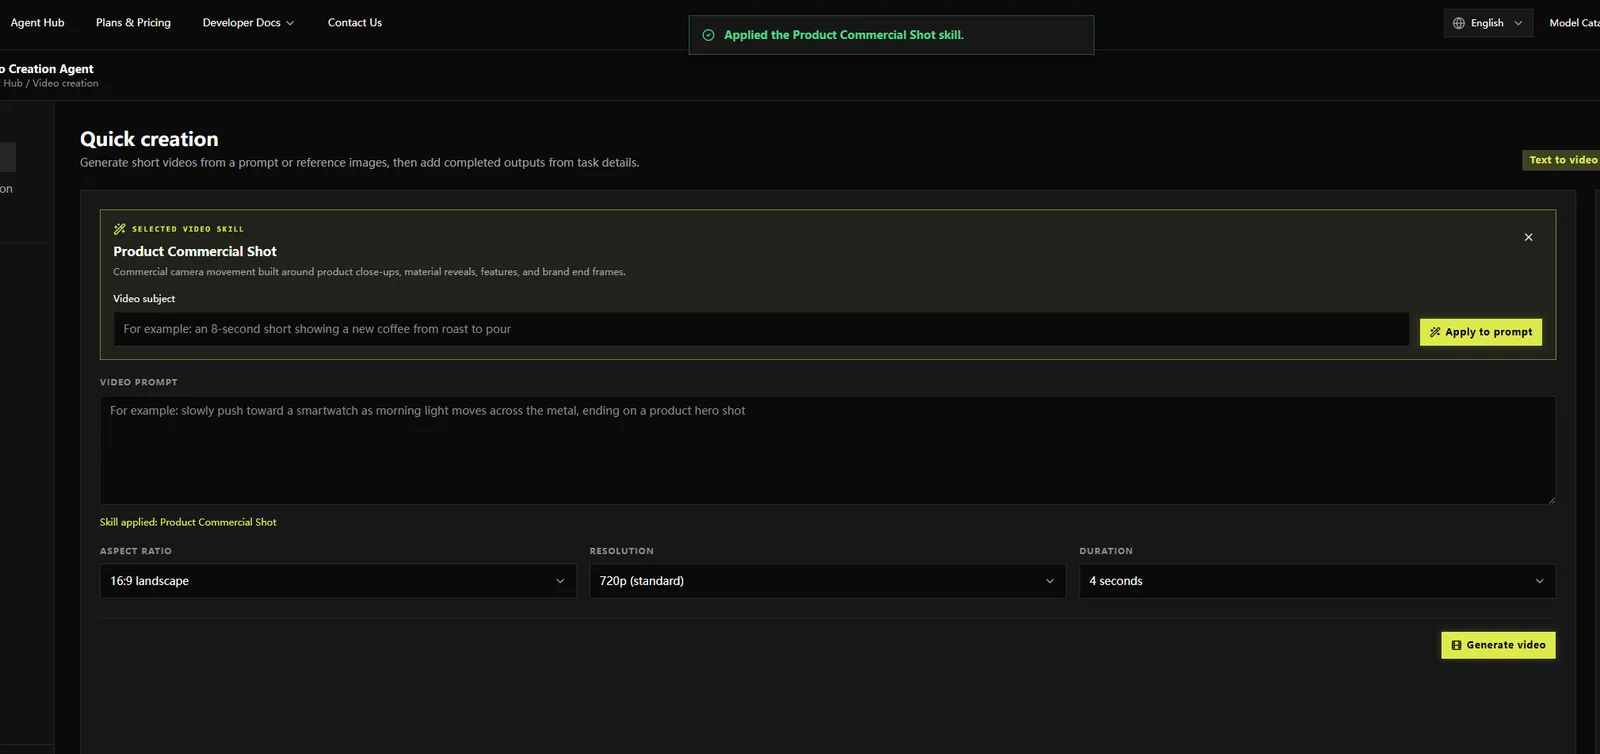
Use a Skill
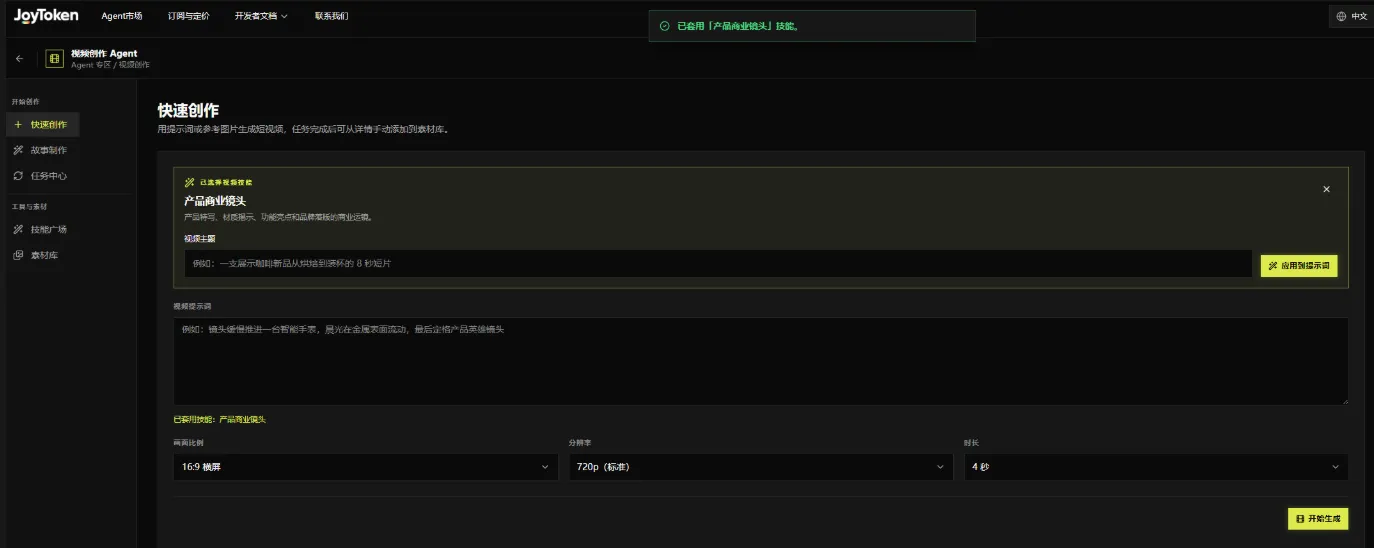
After clicking Use Skill, the page opens Quick Creation with the selected skill enabled. Enter a video subject and prompt, set the aspect ratio, resolution, and duration, then start generation.
Interface:
- A banner confirms that the skill is enabled; the creation area shows its name and summary.
- Enter your idea under Video Subject and optionally click Apply to Prompt to incorporate it into the video prompt.
- Describe the scene, camera motion, and other details under Video Prompt.
- Select the aspect ratio, resolution, and duration below. The screenshot shows 16:9 landscape, 720p (Standard), and 4 seconds.
- Check the prompt and settings, then click Start Generation.
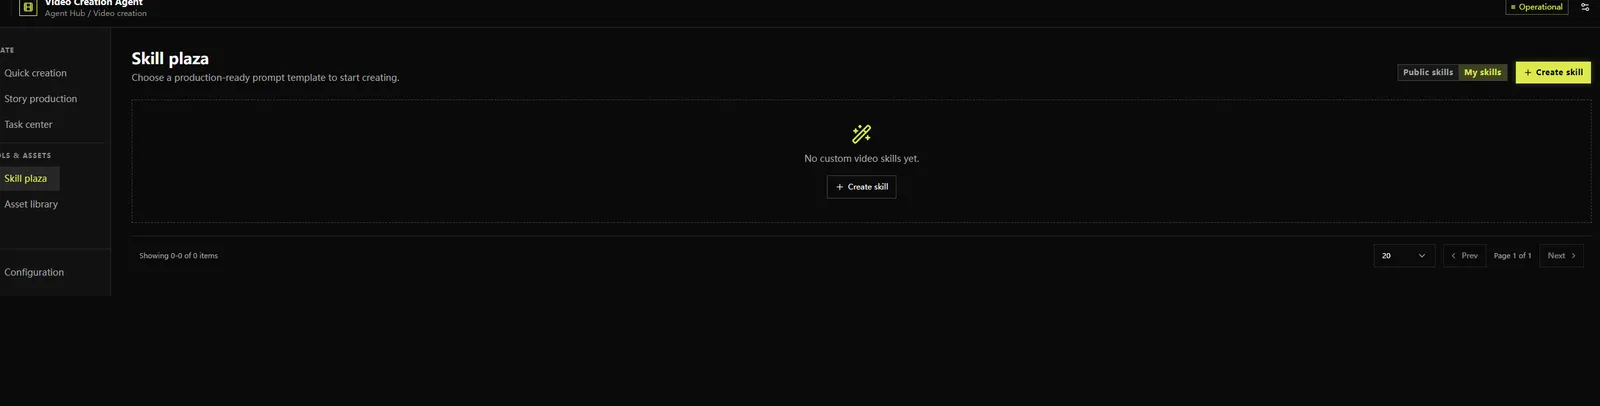
My Skills
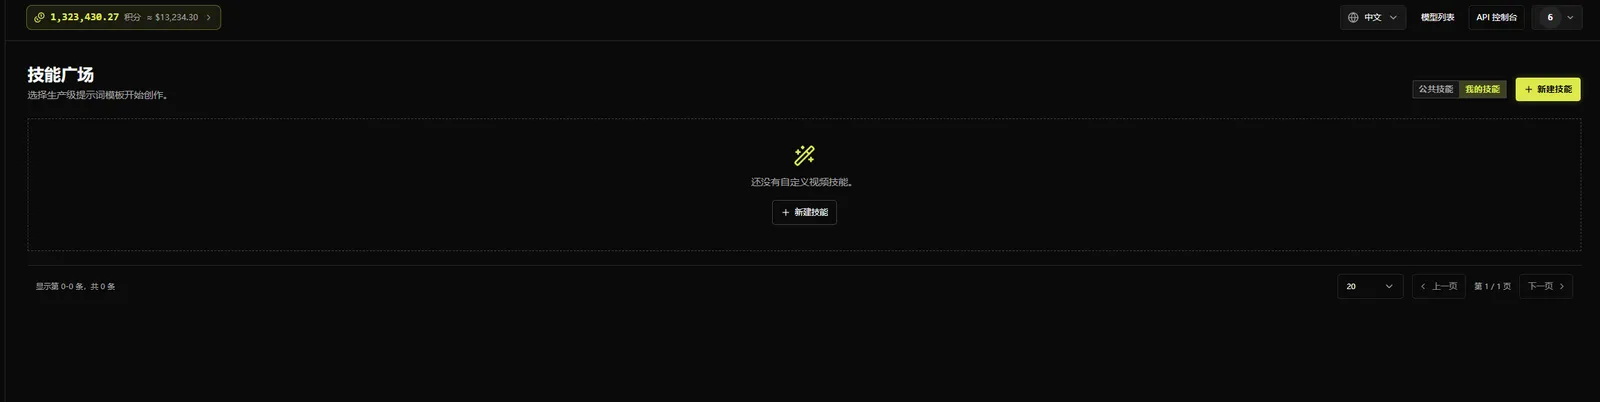
My Skills lets you view and create custom video skills visible only to your account. Click New Skill to specify creative methods and prompt requirements, then save them for reuse.
Interface:
- Switch to My Skills to see custom skills. The screenshot shows an empty list; click New Skill at the top right or in the empty state.
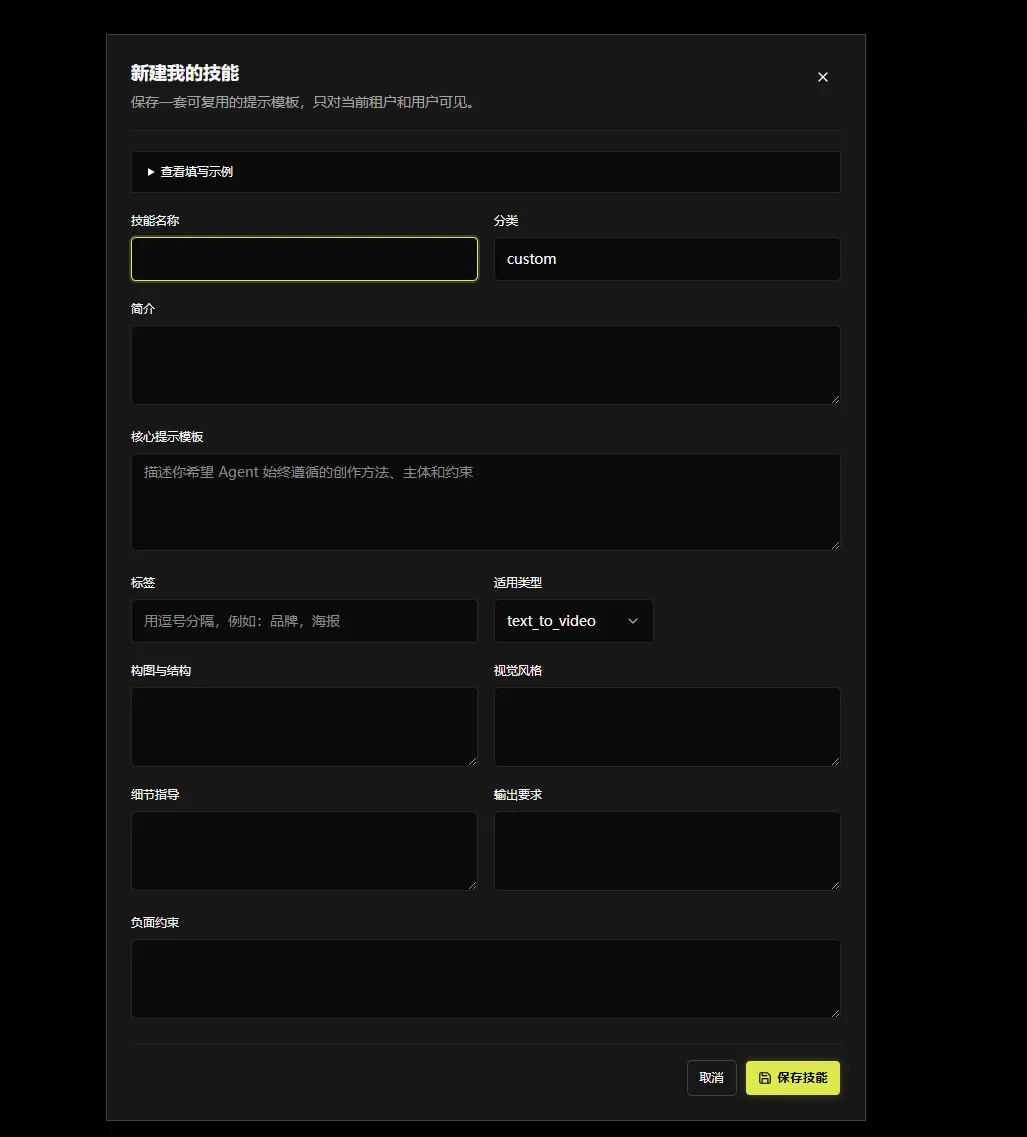
- The new-skill dialog includes View Filling Example for reference.
- Enter a name, summary, and core prompt template; you can also set category, tags, applicable type, composition and structure, visual style, detail guidance, output requirements, and negative constraints.
- Click Save Skill when finished; to discard changes, click Cancel or close the dialog.
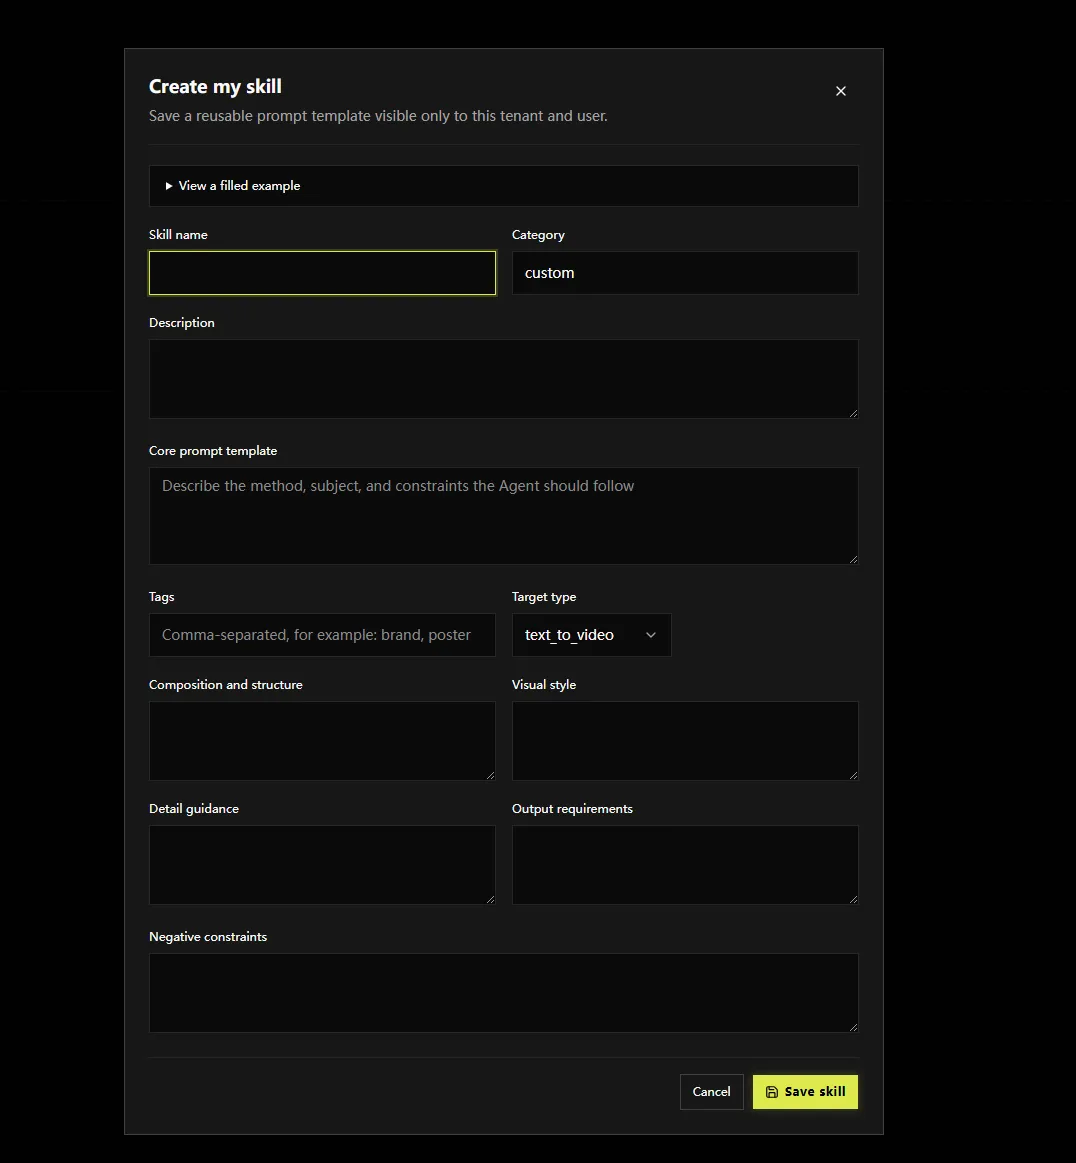
From My Skills, click New Skill to save frequently used video creation requirements as a personal skill for later use. Newly created skills are visible only to you.
FAQ
- Why can’t I send a message when I already have a Key?
- Check that it belongs to this environment, is selected as the default or dedicated Key, and was saved. Also check the account balance, budget, daily quota, and model permissions.
- Why can I use JoyToken Agent without adding it first?
- It is a built-in, general-purpose assistant. Add other Agents from the Marketplace as needed.
- Why can the assistant answer from my materials when the knowledge base says it has 0 files?
- The count in the configuration picker may differ from Knowledge Base Details. Check the file’s status and actual retrieval result rather than relying on one count.
- Why is a task still awaiting acceptance after it ran?
- Review the result and click Confirm Acceptance.
- Will deleting a plan remove the task?
- Deleting the plan stops future automatic runs; the task and its history remain.
- Why do conversation totals differ from Usage?
- Calculation times and coverage may differ. Compare the same time range, Key, and calls; use settled usage details as the final source.
- Can I use every capability mentioned in a Skill description?
- It still depends on the model, tools, and runtime environment. Verify against the actual configuration.
- What should I provide when a model or tool fails?
- Provide the environment, time, assistant, steps, error, and request identifier. Do not share full Keys, verification codes, or passwords.